- Knowledge Base
- Data
- Data Management
- Use and export your dataset in a workflow, segment, or report
BetaUse and export your dataset in a workflow, segment, or report
Last updated: December 9, 2025
Available with any of the following subscriptions, except where noted:
-
Data Hub Professional, Enterprise
Please note: if you're a Super Admin, learn how to opt your account into the beta.
You can create segments, workflow enrollment triggers, and reports with datasets in Data Studio. This allows you to generate dynamic segments based on targeted data, incorporate datasets into workflow actions, and combine multiple data sources to build unified reports.
Use your dataset to create segment
Use a dataset composed of HubSpot objects (e.g. contacts, deals, companies, tickets) and external data sources to create a segment.
- In your HubSpot account, navigate to Data Management > Data Studio.
- On the Datasets tab, hover over a dataset. Click Use in, then click Segment.

- In the Segment editor, you can view a preview of your segment.
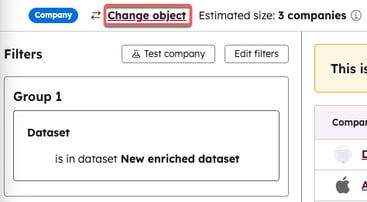
- In the Filters left sidebar menu:
- Click Edit filters to edit filters.
- Click Test [object] to see if an object matches all the requirements of a filter and grouping.
- Click Change object to change the data source of your segment.
- In the Filters left sidebar menu:

-
- At the top right of the Segment editor, click Use AI to create filters to have an AI assistant help you find the correct filters to build your segment. Once you are satisfied with the suggestions, you can add them to the segment for further editing or processing.
- Once you are done configuring your segment, at the top right, click Review and save.
- In the right panel, select the processing time:
- Active: will update automatically as record properties change
- Static: can be manually updated, but will not automatically update.
- On the Properties, write description or click Generate with AI, and click Create a campaign if you want to add the asset to a marketing campaign so you can track, manage, and report on it.
- On the Exclusions tab, click the dropdown menus, and select the checkboxes next to segment or companies to exclude.
- On the Access tab, select Private, Everyone can view and edit, or Specific users and teams to select who has access to the segment.
- Click Save and process segment.
Use datasets in workflow enrollment triggers
You can use a dataset as a trigger to enroll all objects from the dataset into a workflow. This enrollment criteria is available only with scheduled workflows. Learn more about using scheduled workflow triggers.
Compatible dataset types for workflow enrollment
Before using datasets as enrollment triggers, please review the following compatible dataset types:
- The following datasets are compatible when using workflows:
- Single-object datasets comprised of a CRM object.
- Multi-object datasets comprised of CRM objects.
- Multi-object datasets comprised of CRM objects and non-CRM data. When using a multi-object dataset with non-CRM data, the dataset’s primary data source must be a CRM object.
- When using datasets to trigger workflows, the following limitations will apply:
-
- Datasets comprised of only non-CRM data are not supported.
- For multi-object datasets, if a primary record is represented in the dataset in multiple rows, the record will only enroll in the workflow once. Enrolling the record for each row in the dataset is not supported.
Trigger a workflow using a dataset
To trigger a workflow using a dataset:
- On the Datasets tab, hover over a dataset. Click Use in, then click Workflow.

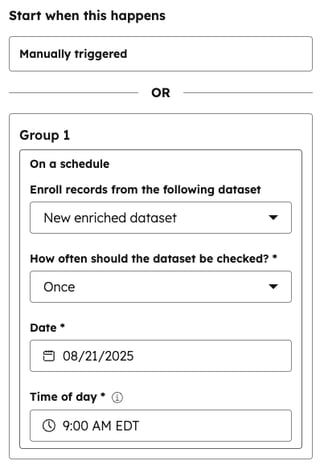
- You will be taken to the workflow trigger editor. In the left panel, under the Enroll records from the following dataset dropdown menu, you will see the dataset you selected in Data Studio.
- Click the How often should the dataset be checked dropdown menu and select Once, Daily, Weekly, Monthly, or Annually.

- On the left panel, in the Settings tab, continue customizing your enrollment trigger.
- At the top right of the left side panel, click Save.
- Continue customizing your workflow.
Manually enroll records with datasets
After creating a dataset, you can manually enroll records from these datasets into your workflows. Learn more about manually enrolling records in workflows.
To manually enroll a dataset from within a workflow:
- In your HubSpot account, navigate to Automation > Workflows.
- Click the name of a workflow.
- At the top, click Edit, then click Edit enrollment trigger.
- In the left panel, click the Enroll records from the following dataset dropdown menu and select a dataset.
- Click the How often should the dataset be checked dropdown menu and select Once, Daily, Weekly, Monthly, or Annually.
- On the left panel, in the Settings tab, continue customizing your enrollment trigger.
- On the top right of the left side panel, click Save.
- Continue customizing your workflow.
Use your dataset in a report
After creating a dataset, you can use that data to build a report in the custom report builder.
To build a report:
- In your HubSpot account, navigate to Data Management > Datasets.
- On the Datasets tab, hover over a dataset. Click Use in, then click Report.

- Continue customizing your report.
Export dataset to Google Sheets and Office 365 Excel
To export your dataset:
- In your HubSpot account, navigate to Data Management > Data Studio.
- On the Datasets tab, hover over a dataset. Click the Use in dropdown menu, then click Export.
- Select one of the following:
- Download to desktop
- Type the name and the file format.
- Click Export.
- Google Sheets
- If multiple accounts are linked to your HubSpot, click Select next to your preferred account.
- Select your Export preference, Google Sheets file name, Export view, and Sync schedule.
- Click Start sync.
- Office 365 Excel
- If multiple accounts are linked to your HubSpot, click Select next to your preferred account.
- Select your Export preference, Office 365 Excel file name, Export view, and Sync schedule.
- Click Start sync.
- Download to desktop