- Knowledge Base
- Account & Setup
- Connected Email
- Customize your HubSpot Sales Outlook desktop add-in | Knowledge Base
Customize your HubSpot Sales Outlook desktop add-in
Last updated: October 30, 2025
Available with any of the following subscriptions, except where noted:
In your Outlook desktop add-in settings, you can configure your default options for the add-in. You can connect the add-in to another HubSpot account, configure your default log and track settings, and access your email integration settings.
Please note: due to the significant changes introduced by Microsoft as part of the new Outlook for Windows, HubSpot will no longer actively develop or improve the HubSpot Sales Outlook desktop add-in. While the HubSpot Sales Outlook desktop add-in is still available in the legacy Outlook for Windows and will continue to be supported, it's highly recommended that you activate the HubSpot Sales Office 365 add-in instead. If you're using the Outlook desktop add-in, the HubSpot Sales Office 365 add-in will automatically be installed if you switch to the new Outlook for Windows. Learn more in this HubSpot Community post.
To access your settings:
- Log in to your Outlook desktop account.
- In the Outlook inbox ribbon, click HubSpot Sales and select Settings. A dialog box will appear with a list of settings you can configure.
HubSpot account information
Information about the HubSpot account that your add-in is connected to will appear, including your user email address and your inbox connection status.
To switch the HubSpot account your add-in is syncing to, click the Switch connected HubSpot account dropdown menu and select another HubSpot account. This will be the account where your tracked and logged email information is stored. This is also the account where you'll access your sales tools from in your email client.Contact profiles sidebar
If you want the contact profiles sidebar to appear in your email account when sending emails to your contacts, select the Show Contact Profiles checkbox. If you have data privacy settings turned on in your account, the contact profiles setting must be turned on.
Log and track preferences
Please note: if you've turned on data privacy settings in your account, the HubSpot Sales Outlook add-in will not track email opens and clicks for contacts who have not provided a lawful basis for data processing. Learn more about granting contacts legal basis for processing data.
Before getting started, note the difference between a tracked email and a logged email:
You can customize your default log and track preferences so the settings are applied each time you send an email.
- To log every email that you send to HubSpot, select the Log email checkbox.
- To track every email that you send, select the Track email checkbox.

Association defaults
You can also customize which associated records the emails will automatically log to. For example, you can choose to only log emails to the record's associated deal records or only to existing contacts in your CRM.
- Select the checkboxes next to the associated records to automatically log emails to:
- Existing contacts: automatically log emails to existing contacts' records in your CRM.
- New contacts: automatically log emails to new contacts included on the email. If the email is sent to an email address that is not associated to an existing contact in your CRM, a new contact record will be created and the email will log to this record.
- Companies: automatically log emails to associated company records.
- Deals: automatically log emails to associated deal records.
- Tickets: automatically log emails to associated ticket records.
 Learn how to
edit email associations before sending an email.
Never log
Emails sent to an email address or domain included in your Never log list will never save to your CRM. Email tracking activity will also not appear on the contact's timeline.
- In the Never log field, enter email addresses or domains you don't want to log emails for and click Add.
- Click Remove next to an email address or an email domain to remove it from this list.
You can also specify never log emails and domains from your HubSpot account settings and block specific IP addresses from email tracking in HubSpot.
When you're finished configuring your desktop add-in, click Save at the bottom.
Help
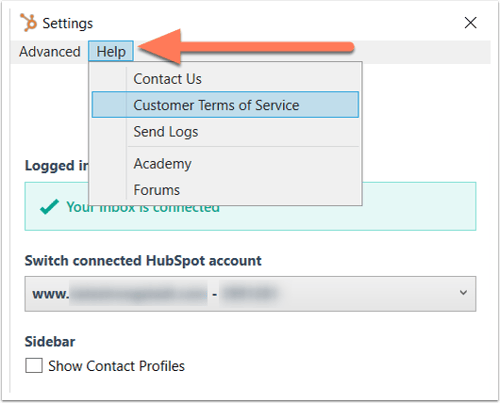
If you need additional assistance getting set up with your Outlook desktop plugin, in the dialog box, click the Help dropdown menu. Select Academy to access training resources, or click Customer Terms of Service if you want to know more about how HubSpot handles your data. 