- Knowledge Base
- Marketing
- Ads
- Understand privacy and consent while using HubSpot ads
Understand privacy and consent while using HubSpot ads
Last updated: May 13, 2025
Available with any of the following subscriptions, except where noted:
Features of the HubSpot ads tool help you better engage with your contacts while maintaining their privacy.
Please note: while these features are in HubSpot, your legal team is the best resource to give you compliance advice for your specific situation.
Display your cookie consent banner before your pixel fires
When you install a pixel using HubSpot, it will be added to all pages with the HubSpot tracking code installed. If you've set up a cookie consent banner, visitors to these pages will also be prompted to opt in or opt out of being tracked with cookies. If you require visitors to opt into cookie tracking, pixels will not use cookies until the visitor confirms their consent.
If you want to allow users to edit or revoke their consent, you will need to work with a developer to implement that functionality using the HubSpot Tracking Code API. Learn more about implementing additional consent status and cookie removal functions in the developers documentation.
Please note: you can only install one pixel per ad network through HubSpot. If you need to install multiple pixels per network, you can use the Google Tag Manager. Pixels installed through the Google Tag Manager will not be automatically prompted with a cookie consent banner.
Sync your contact list audiences with Google, Facebook, and LinkedIn (Marketing Hub Starter, Professional, and Enterprise only)
When you create contact list audiences in HubSpot, contacts from your lists are periodically synced to the corresponding ad network. The ad network then attempts to match these contacts to users on their network.
Encrypting data sent to Google, Facebook, and LinkedIn
Each ad network requires different data to match a HubSpot contact to a user on their network. HubSpot encrypts and sends a contact's properties to the associated ad network, but ad networks can only use encrypted contact properties for matching purposes. Ad networks cannot use the data that HubSpot sends to augment the info they have for the corresponding user on their network.
HubSpot will encrypt and send different contact properties based on each network's requirements.
- Facebook: HubSpot encrypts and sends the following contact properties:
- Email (if a contact has multiple email addresses, HubSpot will send all addresses)
- First name
- Last name
- Phone number
- City
- State
- Country
- Zip code
- Google ads: HubSpot sends the following contact properties. All fields except for Zip code and Country code will be encrypted.
- Email (if a contact has multiple email addresses, HubSpot will send all addresses)
- First name
- Last name
- Phone number
-
- City
- State
- Zip code
- Country code
- LinkedIn: HubSpot encrypts and sends the following contact properties:
- Email (if a contact has multiple email addresses, HubSpot will send all addresses)
- First name
- Last name
- Company name
- Job title
- Country
Sync your company list audiences with LinkedIn (Marketing Hub Starter, Professional, and Enterprise only)
When you create a company list audience, HubSpot will automatically sync companies from your target accounts or a specific company profile tier to a matched audience in LinkedIn.
HubSpot will encrypt and send the following company properties to LinkedIn:
- Company name
- Company website domain
- Company page URL
- Industry
- Phone number
- City
- State
- State code
- Country
- Country code
- Zip code
Per LinkedIn's requirements, HubSpot will only sync companies with LinkedIn that have either a name or a website domain.
Handling GDPR and CCPA deletion requests
When you perform a permanent delete of a contact, HubSpot also deletes that contact from any syncing contact list audiences. HubSpot also sends a request to delete that contact from any syncing contact list audiences on the ad network itself. Successful deletion is subject to the ad network being able to match the encrypted contact information to a user in the respective audiences. Since this process ensures that your ad campaigns do not target permanently deleted contacts, it will also ensure you stay CCPA-compliant.
Sync consent to contact field from your lead generation ads to HubSpot
You can add a consent to contact field to your Facebook and LinkedIn lead generation ads. Any consent fields from these ads will now sync over to HubSpot as a new contact property. These properties will be labeled with [Ad Network] Consent before the property name. You can use these properties to create a list of contacts who have given you consent to be contacted.
Please note: users who select a consent to contact checkbox on your lead ad do not automatically subscribe to your emails. Once these users submit your lead ad form, you'll need to create a workflow in HubSpot which uses the new contact property to set the contact's subscription status.
Add a consent field when creating a lead generation ad in HubSpot
To add a consent field when creating a new Facebook form or LinkedIn lead gen form in HubSpot:
- In your HubSpot account, navigate to Marketing > Ads.
- Click Create ad campaign, then select Lead generation.
- Facebook: select socialBlockFacebook Lead generation.
- LinkedIn: select socialBlockLinkedin Lead generation.
- Create a new form:
- Facebook: under Facebook form, click the Select a Facebook form dropdown menu, then click Create a new Facebook form.
- LinkedIn: under LinkedIn lead gen form, click the Select a LinkedIn form dropdown menu, then click Create a new LinkedIn form.
- In the Create form panel, under Notice and Consent, click the dropdown menu and select Ask for consent to communicate; submit for consent to process, Ask for consent to communicate and process, Legitimate interest, or Custom. Learn more about the different notice and consent options.
Add a consent field to a new form in Facebook
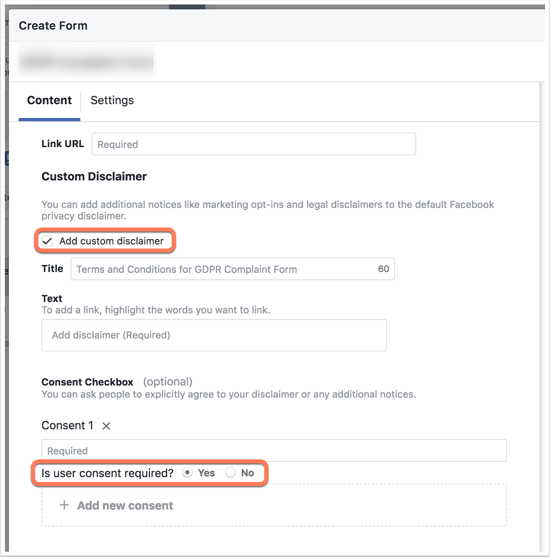
You can add a consent field when creating the lead ad in Facebook within the Create form step:- Click Privacy Policy.
- Select the Add custom disclaimer checkbox, then enter a title and disclaimer text.
- Where it asks, Is consent required?, select the Yes radio button.

Add a consent field to a new form in LinkedIn
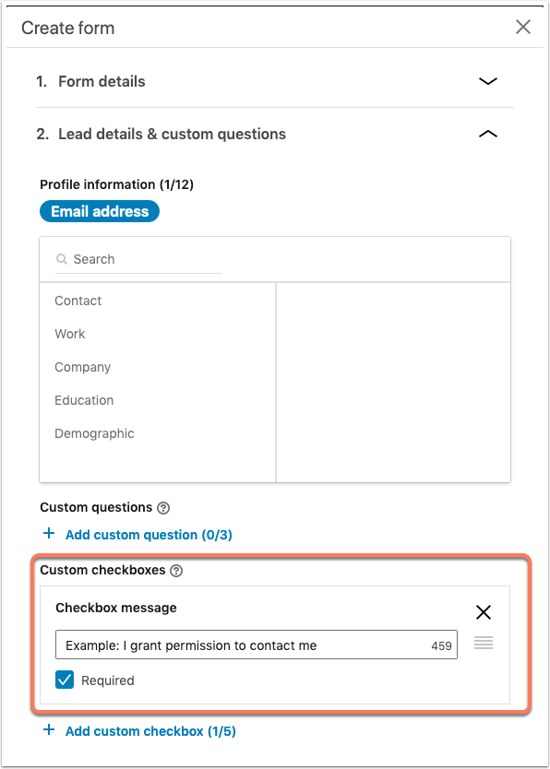
You can add a consent field when creating a lead form in LinkedIn within the Lead details and custom questions step:
- Click Add custom checkbox, then enter terms and conditions to prompt users for their consent.
- Select the Required checkbox.

Once the consent field is added to a Facebook or LinkedIn form, this field will start syncing for all lead ad forms. If you already created a lead generation ad before adding the consent field, and this ad was already syncing with HubSpot, any new leads that come in through this existing ad will now sync the consent field with HubSpot. However, any leads that were created before the consent field was added to your lead ads will not have that field sync.