- Knowledge Base
- Marketing
- Forms
- Create and edit forms
Create and edit forms
Last updated: December 15, 2025
Available with any of the following subscriptions, except where noted:
-
Additional subscriptions required for certain features
Create and use forms with the forms editor to collect information about your visitors to store in your HubSpot CRM. When using the forms editor, you can create multi-step forms. Then, style your form to reflect the identity and branding of your business.
After creating your form, you can add it to your HubSpot pages using the HubSpot form module, an external site using the form embed code, or share it as a standalone page with a share link.
Permissions required Forms permissions are required to view, create, or edit forms.
Understand limitations and considerations
- Users with a View-Only seat cannot access forms. Learn more about managing seats.
- You can only associate a form with Brands when creating the form. Learn more about how to associate your forms with Brands.
Create a new form
To create a new form:
- In your HubSpot account, navigate to Marketing > Forms.
- In the top right, click Create form.
- Select the Form Editor.
- In the top right, click Next.
- Select a pre-made template, or to build your own, select the template Start from blank.
- At the top, click the edit edit icon to edit the form name.
Add and edit form fields
Add form fields to collect information from your website visitors and contacts. Each form field must be associated with a HubSpot property. To add a form field:
- In your HubSpot account, navigate to Marketing > Forms.
- Create a new form or hover over an existing form and click Edit.
- In the top left, click the + add icon.
- In the left panel, click and drag the field type onto the form preview on the right to include them on your form. Fields can be placed above, below, or next to other fields.
- When adding a Phone number field, the country code will correspond to the visitor's device IP address by default. It is not possible to configure the default country code.
- In the right panel, click and enter the field label. When entering the field label, a list of similar existing properties will appear.
- In the Connect field to a property dialog box, click a suggested property.
- To connect your form field to a different property, click Search properties.

- To add a connected property, in the left panel, click to expand the Connected property section. Click the property that you want to connect to the form field.
- To use an existing property as a connected property with a field on your form, use the search bar to search for an existing property. The object type of the field added can determine whether the form submission appears on the activity timeline of associated records.
Please note:
- By default, the Email field is required for form submissions to create contacts. HubSpot will check whether an email address is valid before allowing a user to submit the form. Learn more about allowing form submissions without email addresses to create contacts.
- Score, calculation, and rich text properties cannot be used in a form.

- To create a new property and use it as a connected property with a field on your form:
- Click Create new property.
-
- In the right panel, set up your form field.
- Review your property rules, then click Create. By default, the option to Show in forms, pop-up forms, and bots will be selected. After creating your new property, it will be automatically associated with the form field. Learn how to manage your properties.
- To edit or disconnect a property that's connected with a field on your form:
- Click the form field.
- In the left panel, click Connected property to expand the section.
- To change the property:
- Click Change property.
- In the dialog box, click Change property.
- Use the search bar to search for existing properties, or click Create new property.
- To disconnect the property:
- Click Disconnect property.
- In the dialog box, click Disconnect property.
- To add a property as a field on your form, click Properties on the left panel:
- Use the All properties dropdown menu to select contact, company, ticket or custom object properties.
- If you're using a ticket property, click the dropdown menu in the dialog box and select help desk or an inbox to connect the form to. When the form is submitted, a ticket will be automatically created.
-
- To add the property as a field on your form, click and drag the property onto the form preview. Fields can be placed above, below, or next to other fields.
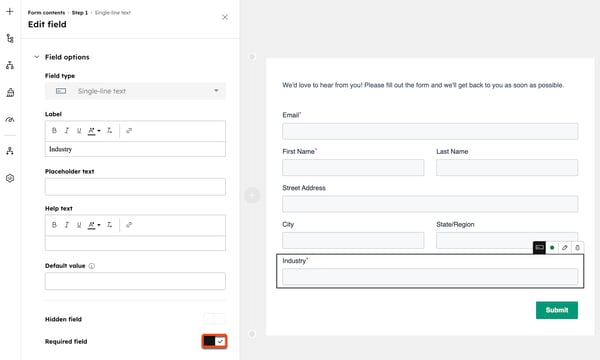
- After adding your form field, to edit a field's options:
- In the right panel, click the field in the form preview.
- In the left panel, click to expand the Field options section. The options here may vary depending on the field's property type.
- Help text: informational text below the field's label to help the visitor complete the field.
- Placeholder text: text that appears in the input box for the field. The text will disappear when the visitor enters a value in the field, and will not come through in the submission, even if the field is left empty.
- Default value: a value that will be submitted for the field by default unless changed by the visitor.
- Hidden field: when this option is toggled on, the field will have its value set through the form submission, but the field will not appear to the visitor. Once the setting is toggled on, set the default value that'll pass into the property when the form is submitted.
- Required field: when this option is toggled on, the field must be completed to submit the form. If a form field has been set as required, it cannot be set as hidden.
Add additional form elements
Add additional Text & Media or Security to your form. Similar to form fields, these elements can be placed above, below, or next to other fields.
- In your HubSpot account, navigate to Marketing > Forms.
- Create a new form or hover over an existing form and click Edit.
- In the top left, click the + add icon.
- In the left panel, click Other.
- Click and drag the elements onto the form preview on the right to include them on your form.

Add and edit your form thank you message or redirect URL
When a visitor submits your form, you can display a thank you message or redirect the visitor to a page, meeting link, or payment link.
- In your HubSpot account, navigate to Marketing > Forms.
- Create a new form or hover over an existing form and click Edit.
- In the top left, click the siteTreeIcon contents icon.
- In the left panel, click On submit. You can also click the form step in the editor.
- On the Options tab, select the content that will display when the form is submitted:
- Show thank you message: hover over the default thank you message and click the editIcon edit icon to add or edit the text.
- To edit the thank you message in the expanded rich text editor, in the left panel, under Rich text, click Edit in expanded view.
- Redirect to a page, URL, Meeting, or Payment link: redirect the visitor to a HubSpot page, meeting link, payment link, or specific URL when they submit the form.
- Click the Redirect to a page, URL, Meeting, or Payment link dropdown menu, then select your redirect content or enter a specific URL.
- Show thank you message: hover over the default thank you message and click the editIcon edit icon to add or edit the text.
- In the top right, click Review and update to publish the changes to your live form.
To set up conditional logic to redirect visitors to a specific page based on their previous responses, learn how to add conditional logic to forms.
Add conditional logic to forms
Subscription required A Marketing Hub or Content Hub Professional or Enterprise subscription is required to add conditional logic to forms.
After adding your form fields, you can set up conditional logic to hide or show relevant fields, or redirect visitors to other HubSpot pages based on their responses. If you’ve opted into the the Enhanced multi-step form logic (hide & show steps) beta, you can also hide or skip form steps.
For each form, you can add up to 100 rules with 10 conditions per rule.
To set up conditional logic on your form:
- In your HubSpot account, navigate to Marketing > Forms.
- Create a new form or hover over an existing form and click Edit.
- In the top left, click the workflows logic icon.
- In the left panel, click Add logic.
- In the logic section, configure your conditional logic rules. For example, if you filter by City and select is any of Dublin, the conditional logic rule will only apply to records with the value Dublin.
- To delete a filter, click the deletee delete icon.
- To clone a filter, click the duplicate clone icon.
- To add additional filters to the rule, click add Add filter to this group.
- To add an additional group to the rule, click add Add group.
- If you’ve added multiple filters or groups to the rule, click the AND OR dropdown menu between the filters and groups to apply AND or OR logic:
- AND: All filters in the rule must be true for the rule to be triggered.
- OR: Only one filter in the group must be true for the rule to be triggered. Learn more about AND or OR logic.
- In the Then section, click the dropdown menu to select on-form actions. You can choose from the following:
-
- Show a field: if the user's responses match the criteria set in your rules, show a specific field. If you’ve opted into the Enhanced multi-step form logic (hide & show steps) beta, you can also show rich text, headings, and images.
- Hide a field: if the user's responses match the criteria set in your rules, show a specific field.
- Skip to step: if the user's responses match the criteria set in your rules, skip to a specific step. To use this option, the form must have at least three steps. Learn more about adding form steps.
- Redirect to: if the visitor's responses match the criteria set in your rules, redirect them to a HubSpot page, an external URL, or payment link. Users in a Sales Hub Enterprise or Service Hub Enterprise account can redirect forms to a meeting link on a scheduling page.
- Depending on the action selected, fill in the required fields.
- To apply the conditional logic, Click Save and Activate.

Manage conditional logic rules
- In your HubSpot account, navigate to Marketing > Forms.
- Create a new form or hover over an existing form and click Edit.
- In the top left, click the workflows logic icon.
- To add another rule, click Add logic.
- To edit a rule, click the Actions dropdown menu and select Edit.
- To delete a rule, click the Actions dropdown menu and select Delete.
Add and edit form steps
Subscription required A Marketing Hub, Sales Hub, Service Hub Starter, Professional or Enterprise or Content Hub Enterprise subscription is required to add and edit form steps.
Create multi-step forms to encourage users to complete multiple form segments instead of a single long form. To add a form step in a multi-step form:
- In your HubSpot account, navigate to Marketing > Forms.
- Create a new form or hover over an existing form and click Edit.
- In the right panel, hover between two existing steps and click the + add icon. A new step section will appear. Then, you can set up form fields and additional form elements in the step panel.
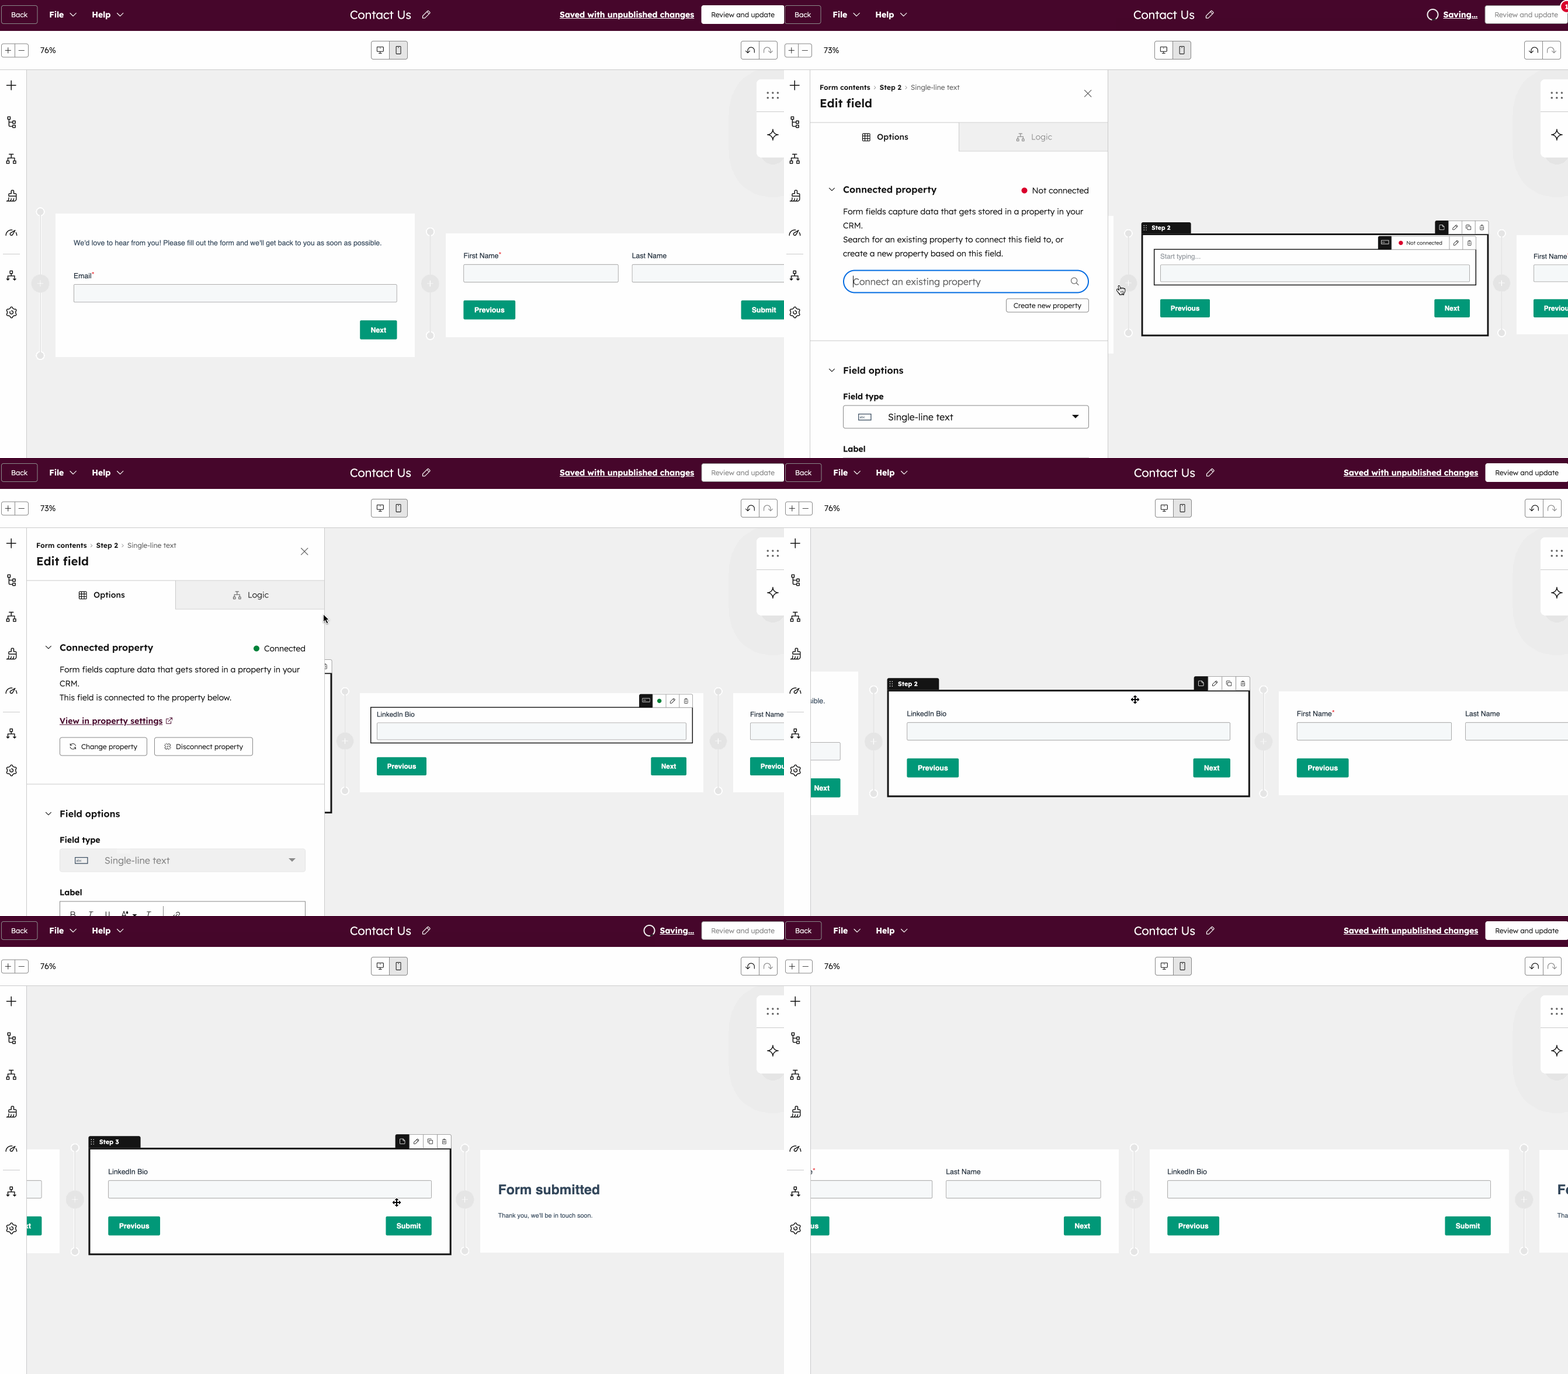
- To rearrange the order of a step, hover over the step. Then, in the top left of the step, click and drag Step [x] to reposition it.
- To clone a step, hover over the step and click the duplicate clone icon. You can't clone steps that include an email, reCAPTCHA, or data privacy fields.
- To delete a step, hover over the step and click the delete delete icon.
- The form submission will only be completed when the visitor submits all steps of the form. If a visitor has completed the first step, but does not complete the rest of the form, the fields in the first step will not be submitted to the form.
- You can add a maximum of 20 steps per form.
Add and edit the progress bar
Subscription required A Marketing Hub Starter, Professional, or Enterprise subscription is required to add and edit the progress bar.
A progress bar visually indicates how much of the form a user has completed, improving form completion rates.
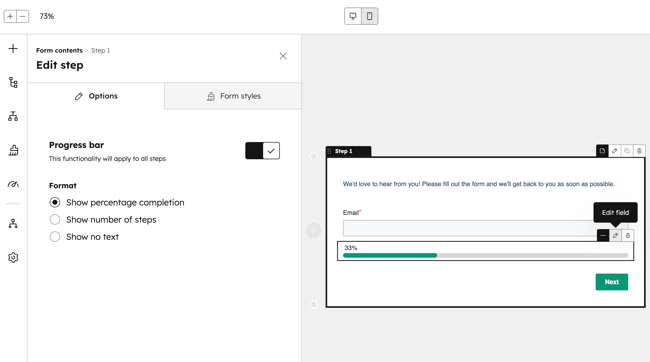
- To turn on the progress bar, hover over a form step and click the edit edit icon.
- In the left panel, click the Progress bar switch on. The progress bar will be added to all of the form's steps.
- To edit the progress bar format, in the left panel below Format, choose how you want to display text on the progress bar. You can select from the following options: Show percentage completion, Show number of steps, or Show no text.
Edit the step layout and background banner
Choose from predefined step layouts using the quick layout switcher and customize your form background banner.
- In your HubSpot account, navigate to Marketing > Forms.
- Create a new form or hover over an existing form and click Edit.
- Hover over the form step and click the edit edit icon in the top right.
- In the left panel, click the Style tab and select a step layout.
- To remove the layout, click Remove layout in the top right.
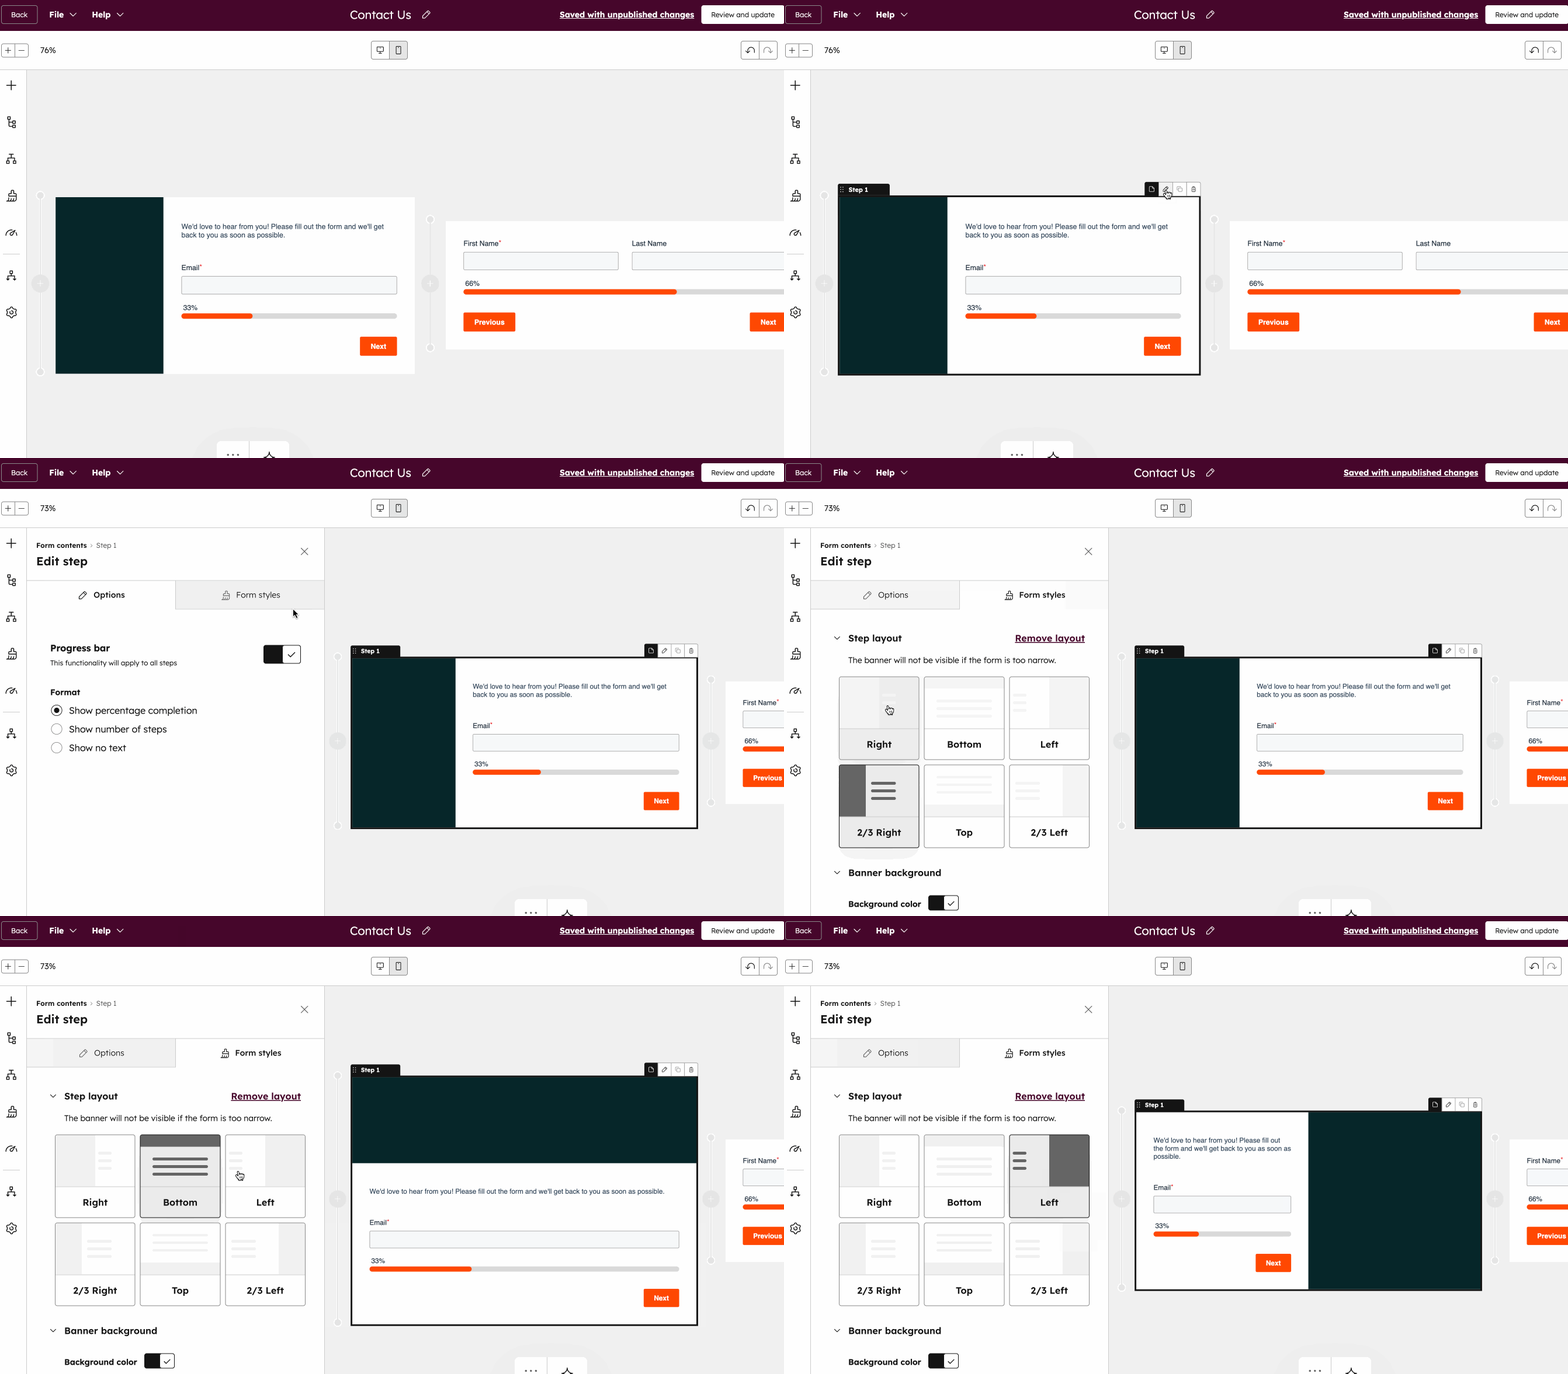
- Click Banner background to expand the section:
-
- Toggle the Background color switch on to customize your form's background banner.
-
- Select a color and opacity.
- Click the Gradient dropdown menu to add a gradient.
- Use an image for the banner background. You can upload an image from your HubSpot files, browse images from your computer's hard drive, or use AI assistants to generate images.

Style your form
Customize the text, input fields, button, and background for your form and form steps. Style options configured in the Global Styling tab will be applied to all form steps. You cannot style individual form steps separately.
Please note: it's not possible to set your form as raw HTML in the updated editor. Only forms built using the legacy editor can be set as raw HTML.
To style your form:
- In your HubSpot account, navigate to Marketing > Forms.
- Create a new form or hover over an existing form and click Edit.
- On the left side, click the Styling icon.

- When customizing your Text, Input fields, or Button, you can choose from existing styles using the Quick field input styles. Alternatively, you can manually customize the style for each component of your form:
- Fields: customize the field, including background and borders. You can also customize the font, font-size and colors for your labels, as well as the colors for your help text, placeholders, and error text.
- Buttons: customize the button's height, corner rounding, background, gradient, and add a drop shadow to the button. You can also customize the font, font-size, and color for the button text.
- Paragraph (Rich Text): customize the font, font size, and color for your body text.
- Heading: customize the font and text color of your heading. You can choose to add drop shadow to your header text.
- Background: customize the background for your form and form steps. You can choose to set a background color or use an image for the background. You can use AI assistants to generate images. You can also choose to set a border for your form.
- Progress bar: customize the progress bar on your form, including the color of the progress line and the font of the progress bar.
Automate your form
Turn on simple automation features such as sending a follow-up email to a contact or sending automatic internal email notifications to other HubSpot users. You can also use the form submission as a trigger in a simple workflow.
- In your HubSpot account, navigate to Marketing > Forms.
- Create a new form or hover over an existing form and click Edit.
- In the left panel, click thesettis automati workflows automation icon.
-
In the Automate what happens after a form is submitted section:
- To automatically trigger a follow-up email after each form submission, under Send an email after form submission, click Create this workflow.
- To create your own workflow from a blank template, under Create your own simple workflow, click Create new workflow. In the right slide-in panel, under Trigger the action(s) when, select the option A contact submitted a form.
- To add other workflow actions, click the + plus icon.
- To turn on a workflow, next to the workflow name, click to toggle the switch on. Then, click Got it. After publishing your simple workflow, any changes made to the workflow will automatically apply to currently enrolled contacts.
- If you've opted into the Notifications for form automations beta, you can notify users when the automation needs review and when the enrollment rate changes:
- To receive notifications if there are any errors in the workflow that require your attention, toggle the Get notified when this automation needs review switch on.
-
- To receive notifications when the enrollment rate fluctuates, toggle the Get notified if the enrollment rate changes switch on. Then, choose from the following options:
-
-
- Use Breeze intelligence: toggle this switch on to automatically detect any changes to the rate of enrollment based on data from the last 30 days.
- Use a manual range: toggle this switch on to manually set a fixed rate threshold that will trigger notifications when exceeded.

- In the Notifications recipients section, click the Users and Teams dropdown menus and select the recipients to send the notifications to. Only users who have turned on HubSpot notifications for at least one channel will be able to receive these notifications.
-
Learn more about using automation with forms.
Customize form settings
Configure the form's settings, including what happens to the corresponding contact after a form is submitted, user notification settings, and the form's default language. You can set the contact's marketing status, lifecycle stage, and more. Some options may not be displayed depending on your HubSpot subscription.
- In your HubSpot account, navigate to Marketing > Forms.
- Create a new form or hover over an existing form and click Edit.
- In the left panel, click the settings settings icon.
- On the General tab, configure the following general form settings:
- Automatically create new contacts from unknown email addresses: select this option to create a new contact record for every submission with a unique email address. If the email address submitted matches an existing contact record in your database, the details on the existing record will be updated.
- If this option is turned off, HubSpot will first attempt to associate the submission with an existing contact using the submitted email address. If no contact exists at the email address, HubSpot will recognize and update your contacts based on the cookies in their browsers. This may result in contacts being overwritten if the same form is submitted multiple times from the same device.
- If this option is turned on, when a contact submits the form using a different email on a browser where there's already a cookie, views will not be tracked for this contact. The Pre-populate contact fields with known values and Add link to reset the form options will also be automatically turned off.
- If this option is turned off, HubSpot will first attempt to associate the submission with an existing contact using the submitted email address. If no contact exists at the email address, HubSpot will recognize and update your contacts based on the cookies in their browsers. This may result in contacts being overwritten if the same form is submitted multiple times from the same device.
- Set new contacts as marketing contacts: if your HubSpot account has access to marketing contacts, you can automatically set any contacts who have submitted this form as marketing. This includes both new and existing contacts.
- Pre-populate fields for returning visitors: if a contact previously visited your site and submitted a form, and HubSpot was able to store and track their cookies, any known field values can be pre-populated on the form. This option is turned on by default. Learn more about pre-populated form fields.
- Automatically create new contacts from unknown email addresses: select this option to create a new contact record for every submission with a unique email address. If the email address submitted matches an existing contact record in your database, the details on the existing record will be updated.
-
- Form shortening: if you have HubSpot Credits, you can streamline your forms by automatically hiding any form fields that can be filled in by Data Enrichment. Learn more about form shortening.
- Add link to reset the form: if you have turned on Pre-populate fields for returning visitors, you can also add a reset link to your form. If this option is turned on, the visitor can click Not you? Click here to reset on the form to clear any pre-populated form fields. When a form is reset:
- Cookie tracking will be turned off for the specific form submission. Any existing tracking cookies will not be overwritten.
- The form submission will create a new contact record for an email address that doesn’t match an existing contact record.
-
- Add to marketing campaign: if you have a Marketing Hub Professional or Enterprise subscription, you can associate the form with a campaign:
- To associate your form with an existing campaign, click the Campaign dropdown menu and select a campaign.
- To associate your form with a new campaign, click the Campaign dropdown menu and click Create campaign. Then, continue setting up your campaign.
- Add to marketing campaign: if you have a Marketing Hub Professional or Enterprise subscription, you can associate the form with a campaign:
-
- On submission, update contact and company lifecycle stage: click the Set lifecycle stage to dropdown menu and select a lifecycle stage. When visitors submit the form, any new or existing records will be set to the selected lifecycle stage.
- You cannot move a record's lifecycle stage backwards. If an existing contact or company with a later lifecycle stage submits a form, the lifecycle stage will not be updated.
- The lifecycle stage set in a form will overwrite the default lifecycle stage configured in your HubSpot settings.
- On submission, update contact and company lifecycle stage: click the Set lifecycle stage to dropdown menu and select a lifecycle stage. When visitors submit the form, any new or existing records will be set to the selected lifecycle stage.
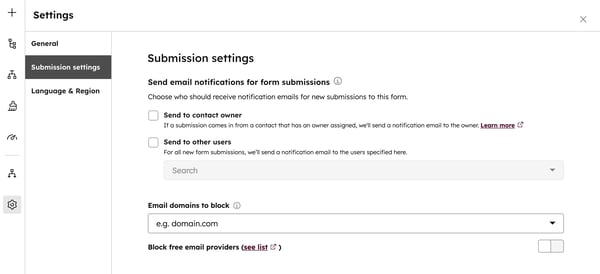
- To customize submission settings, in the left panel, click the Submission Settings tab. Customize the following form submission settings:
- Send to contact owner: automatically send a notification to the contact's owner. If a contact has no owner, no notifications will be sent. Learn more about object ownership in HubSpot.
- Send to other users: select the default teams or individuals to send submission email notifications to, regardless of contact ownership. Recipients set here will be overwritten by recipients set in the form options on HubSpot pages.
-
Additional email domains to block: enter specific email domains to block from form submission. For example, if you'd like to block submissions from email@domain.com, you can add domain.com. To block submissions from all free email providers, click to toggle the Block free email providers switch on.
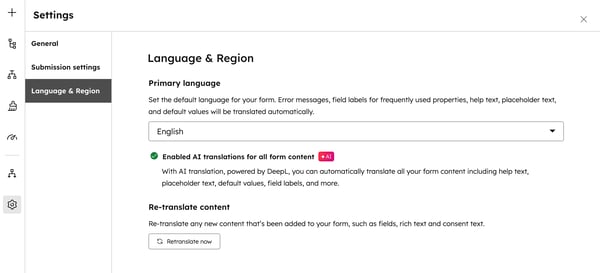
- To customize your form language settings, click the Language & Region tab. Click the Primary language dropdown menu, then select a default language for your form. Error messages, labels for default properties, help text, placeholder text, and default values will be translated into this language.
- To create an AI translation of your form (Marketing Hub or Content Hub Professional and Enterprise only):
- Toggle the Enabled AI translations for all form content AI switch on.
- In the Primary language dropdown menu, select the language into which you want to translate the form. Error messages, labels for default properties, help text, placeholder text, default values, custom labels, rich text, and consent text will be translated automatically into this language.
- If you've updated your form since the previous translation, click Retranslate now to update the translation.
Manage live validation on form fields
If you’ve set validation rules for a property , these rules will apply to form fields, and visitors must meet these requirements to submit the form. Live validation on form fields gives visitors immediate feedback on their input, making it easier to correct errors and complete forms accurately.For example, if you've set a validation rule for the Order Number property to contain only numeric values, visitors will receive feedback to correct any non-numeric entries.
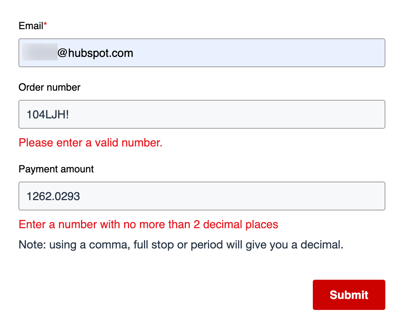
By default, live validation on forms is turned on. To manage live validation on form fields:
- In your HubSpot account, click the settings settings icon in the top navigation bar.
-
In the left sidebar menu, navigate to Marketing > Forms.
- Click the Submission Settings tab.
- Toggle the Enable live validation of form fields switch on or off.
- In the bottom left, click Save.
Publish and share your form
After creating a new form or making your form updates, you'll need to update your form to make the changes live. Then, you can embed the form on a HubSpot page or CTA. If you have content hosted outside of HubSpot, you can copy the form embed code or use the share link to share a standalone form page.
To publish and share your form:
- In your HubSpot account, navigate to Marketing > Forms.
- Create a new form or hover over an existing form and click Edit.
- In the top right, click Review and update to publish your form updates.
- In the right panel, at the bottom, click Update.
- To embed or share your form, select one of the following options:
- Embed with HubSpot: embed your form on a HubSpot CMS website page, landing page, or with HubSpot CTAs.
- In the Choose between embedding your form within HubSpot website or landing page or with HubSpot CTAs section, select a content option.
- Click the dropdown menu, and select the destination page or CTA where the form should be embedded.
- Get embed code: use an embed to add your form on an externally hosted page. To track analytics for your form on an external page, your HubSpot tracking code must be installed on the page. Learn more about adding a HubSpot form to an external site.
- At the bottom, click Copy.
- Paste the embed code into the HTML module on your page.
- Copy a share link: use a URL to share the form as a standalone page.
- Embed with HubSpot: embed your form on a HubSpot CMS website page, landing page, or with HubSpot CTAs.

