
Last updated: October 25, 2024
Available with any of the following subscriptions, except where noted:
|
|
With the pop-up forms tool, you can create engaging lead capture forms to attract new leads. You can use pop-up forms with any blog post, landing page, or website page hosted on HubSpot.
If you'd like to trigger your pop-up with a button or customize a pop-up further, we recommend creating a CTA with a form instead.
Please note: on 17th July, the pop-up forms tool was sunset. All Starter, Professional, and Enterprise users can no longer create or clone pop-up forms. Users can still edit, delete, and unpublish existing pop-up forms. It is recommended to use the new CTAs tool to create sticky banner, pop-up box, or slide-in CTAs instead.
Create a pop-up form
To add pop-up forms to an external page, you must install the HubSpot tracking code on your external site, or install the HubSpot WordPress plugin on your WordPress site.
To create a new pop-up form:
- In your HubSpot account, navigate to Forms:
- For Professional and Enterprise accounts, navigate to Marketing > Lead Capture > Forms.
- For Starter and Free accounts, navigate to Marketing > Forms.
- In the upper right, click Create form.
- To associate the form with a business unit (Business units add-on only):
- Click the Select a business unit dropdown menu.
- Select the business unit you want to associate this form with.
- Select your form type. To create a pop-up form, select one of the following form types:
- Pop-up box
- Dropdown banner
- Slide in left box
- Slide in right box
- In the upper right, click Next.
- At the top of the form editor, click the pencil icon to edit the form name.
Set up your callout
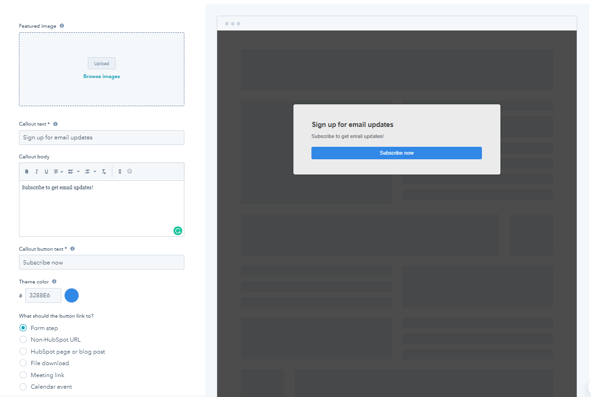
On the Callout tab, add and customize callout text to grab your visitors' attention. Any callout customization will appear in the preview on the right, so you have an idea of what your pop-up form will look like when it's live on your page.
- Featured image: select a featured image to display on both the callout and form step (pop-up box and slide-in box only).
- Callout text: enter text for the main header on the callout.
- Callout body: enter any additional information or details on the callout. This is optional.
- Callout button text: enter the callout form button text.
- Theme color: set the theme color for the button on your pop-up form. Select a custom color from the color picker or manually enter a hex value.
- Link button: select where the callout button will link to.
- Form step: direct your users to a form from the pop-up form. Customize your form by clicking on the Form tab.
- Non-HubSpot URL: enter a link to an external page.
- HubSpot page or blog post (Marketing Hub or Content Hub Starter, Professional, or Enterprise): select a HubSpot page or blog post in the dropdown.
- File download: click Browse files to add your file.
- Meeting link: select a meeting link from the dropdown menu.
- Calendar event: create a calendar event and configure your event details. The event will be created in the customer's Google or Outlook calendar.
Customize your pop-up form
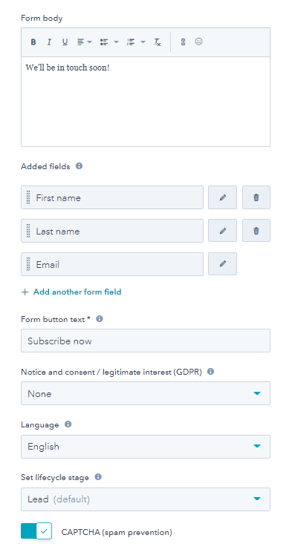
If your callout button links to a form step, you can customize the form displayed. On the Form tab, customize the following details:- Form body: enter any additional information or details which will display before the form fields. This is an optional step.
- Added fields: select the fields for your pop-up form. The default Email field is automatically included and a maximum of four fields can be added to the form.
- To add additional fields to the form, click + Add another form field.
- Pop-up forms support the following field types: single-line text, multi-line text, dropdown select, single checkbox, number, date picker, and file.
- Users in a Marketing Hub Starter, Professional, and Enterprise account can create custom contact properties in pop-up forms.
- To customize the way a form field appears to visitors, click the pencil icon.
- You can edit the field label, add placeholder text, or enter a default value.
- For the Email field, you can specify email addresses and domains to block.
- To add additional fields to the form, click + Add another form field.
- Form button text: customize the form button text. By default, the form button text from the Callout tab will populate this field.
- GDPR options: if you have data privacy settings turned on in your HubSpot account, you can set the notice and consent option for this pop-up form. To customize the default text, click the pencil icon.
- Language: set the form language. This will change the form field labels, Notice and consent/legitimate interest message, and error messages displayed on the form. All other editable fields will need to be manually translated.
- CAPTCHA: enable CAPTCHA to provide additional protection against spam submissions.
Create a form thank you message
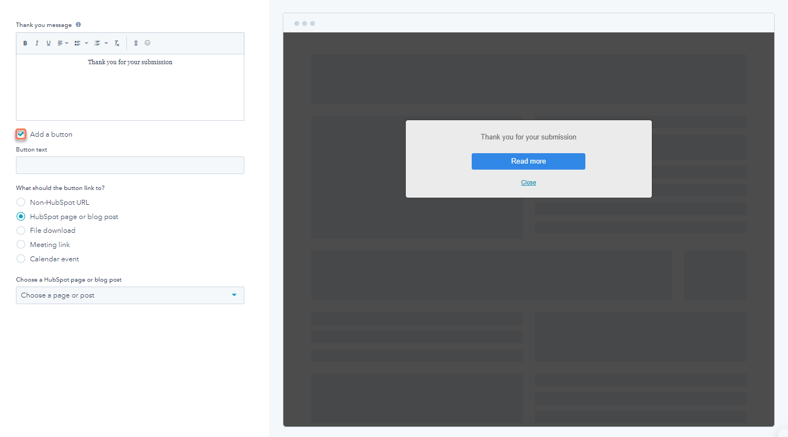
If your callout button links to a form step, configure what happens after a visitor submits your pop-up form on the Thank you tab.
- In the Thank you message field, enter a message to display after visitors submit your pop-up form. You can use the rich text editor to format your text.
- To add a button after your thank you message to redirect your visitors elsewhere:
- Select the Add a button checkbox.
- Customize the Button text.
- Select the link for your button:
- Non-HubSpot URL: redirect visitors to an external page. Enter the page URL.
- HubSpot page or blog post (Marketing Hub or Content Hub Starter, Professional, or Enterprise): select a HubSpot page or blog post from the dropdown menu.
- File download: click Browse files to add your file.
- Meeting link: select a meeting link from the dropdown menu.
- Calendar event: create a calendar event and configure your event details. The event will be created in the customer's Google or Outlook calendar.
Please note: Accounts using HubSpot’s free tools must complete an email setup wizard to enable double opt-in for pop-up forms creating a follow-up email will automatically add a CAPTCHA to the form.
Customize the targeting for your pop-up form
Target your visitors by choosing when you want this pop-up form to appear on your site. Add filters to combine multiple sets of rules to determine when the pop-up form is displayed. Learn more about targeting rules.
Website URL
You can add conditional logic for specific webpage URLs and/or query parameter values. By default, the pop-up form will appear on all pages.
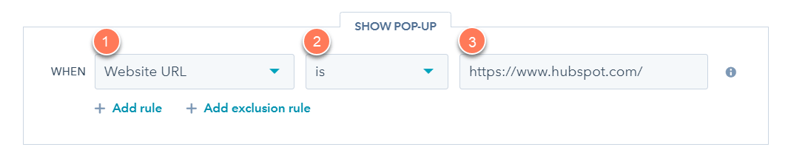
- To show the pop-up form when a visitor is on a specific website URL, in the Website URL section:
- Click the first dropdown menu and select Website URL.
- Click the second dropdown menu and select a targeting rule.
- Enter your rule criteria in the text field.
- To show the pop-up form when a visitor is on a website page whose URL includes specific query parameters:
- Click the first dropdown menu and select Query parameter.
- In the first text field, enter the query parameter name.
- Click the dropdown and select a targeting rule.
- In the second text field, enter the query parameter value.

- To add another rule, click Add rule.
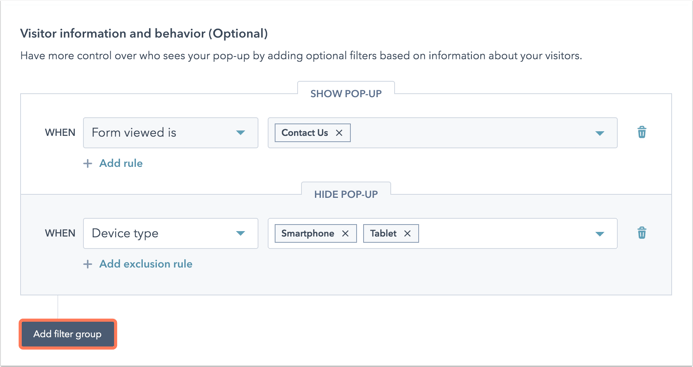
- To exclude the pop-up form from certain pages (e.g., a privacy policy page), click Add exclusion rule.
- Select when to hide the pop-up form:
- Click Add exclusion rule.
- Click the first dropdown menu to choose when the pop-up form should be hidden.
- Click the next dropdown menu to select your filtering rules.
- To add more rules for when to hide your pop-up form, click Add exclusion rule and select your filters.
- To create another set of filtering rules, click Add filter group and select your filtering rules.
Triggers
Set when the pop-up form should appear on the page.
Please note:
-
When multiple triggers are selected, the form will appear according to whichever trigger condition is met first.
-
When a contact has filled out your pop-up form, it will not be displayed again if they are in the same browsing session.
You can select the following options:
- On 50% scroll: the form will appear when the visitor has scrolled halfway down the page.
- On exit intent (pop-up box only): the form will appear when the visitor moves their cursor to the top bar of the browser window.
- After elapsed time: the form will appear after the specified amount of seconds.
Customize your pop-up form options
On the Options tab, further customize your pop-up form settings. Some options may not be displayed, depending on your HubSpot subscriptions and which integrations you've added. You can configure the following options:
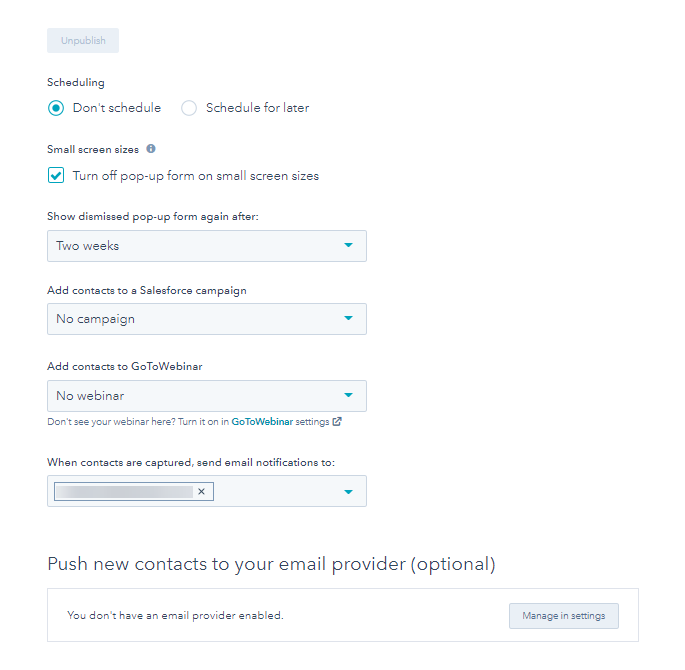
- Scheduling (Professional or Enterprise accounts only): by default, a pop-up form will be published immediately. To schedule a pop-up form so it is only active from a specific date, select Schedule for later.
- To publish the pop-up form on a specific date and time, click the Start date and Time dropdown menus and set the date and time.
- To unpublish the pop-up form on a specific date and time, click the Set unpublish date and time checkbox, then click the End date and Time dropdown menus and set the date and time.
- Set a lifecycle stage when a contact or company is created: click the Set lifecycle state to dropdown menu and select a lifecycle stage. When visitors submit a form, the corresponding record will be set to the selected lifecycle stage.
- You cannot move a record's lifecycle stage backward. If an existing contact or company with a later lifecycle stage submits a form, the lifecycle stage will not be updated.
-
- The lifecycle stage set in a form will overwrite the default lifecycle stage configured in your HubSpot settings.
- Small screen sizes: to turn off your pop-up form on mobile devices, select the Turn off pop-up form on small screen sizes checkbox. While pop-up forms are mobile-optimized, it's recommended to disable them on mobile.
- Show dismissed pop-up form again after: click the dropdown menu to set the amount of time that should pass after a visitor dismisses the pop-up form, before it is displayed again.
- Add contacts to Salesforce campaign: if you're using the Salesforce integration, click the dropdown menu to associate any contact who submits the pop-up form with a Salesforce campaign.
- Add contacts to GoToWebinar: if you're using the GoToWebinar integration, click the dropdown menu to register any contact who submits the pop-up form for a specific webinar.
- When contacts are captured, send email notifications to: click the dropdown menu to notify a HubSpot user or team when contacts are captured.
- Send opt-in emails: to manage double opt-in settings for your pop-up forms, click Manage in settings.
- Set contacts created as marketing contacts: if your HubSpot account has access to marketing contacts, you can automatically set any contacts created from this form as marketing.
- Push new contacts to your email provider (optional): to set up an email provider to push contacts to, click Manage in settings. Learn more about pushing contacts to MailChimp lists.
Use automations with your pop-up form
Use simple automation features such as sending a follow-up email to a contact or sending automatic internal email notifications with your pop-up forms. You can also use the form submission as a trigger in a simple workflow. Learn more about how to use automations with the forms tool.
- At the top, click the Automations tab. From the Automations tab, you can configure what happens after the form is submitted.
- In the Choose what happens after a form is submitted section, customize the settings for your form as needed.
- In the Create a simple workflow section, set up a simple workflow to automate follow-up actions such as sending an email or setting a contact property.
Preview your pop-up form
On the Preview tab, you can test an interactive preview of your pop-up form.
- To review how your pop-up form will appear on different devices, click the Desktop, Tablet, or Mobile buttons in the upper left.
- To view each step of the pop-up form, click theleft and right arrow icons

Publishing and unpublishing your pop-up form
- Once you've finished setting up your form, in the top right, click Publish to take your pop-up form live.
- You can also unpublish a live form from the Options tab:
- Navigate to the Options tab.
- Click Unpublish.
- In the dialog box, click Unpublish pop-up form.
- After unpublishing your form, you can choose to either return to the forms dashboard by selecting Go to the dashboard, or stay in the forms editor by selecting Stay in the editor.

