
Last updated: September 5, 2026
Available with any of the following subscriptions, except where noted:

-
 Additional subscriptions required for certain features
Most objects include index pages where records can be filtered, segmented, and organized into saved views. Filters allow you to view only certain records or create reusable displays.
View an index page
Permissions required Super Admin permissions are required to view the communications index page.
On an object index page, you can view all the object’s records, view specific records in saved views, customize the appearance of the displayed view type (e.g., board, table), and take actions on displayed records.
To navigate to each object’s index page:
- Contacts: In your HubSpot account, click More, then navigate to CRM > Contacts. If More doesn't appear in your account, navigate to CRM > Contacts directly.
- Companies: In your HubSpot account, click More, then navigate to CRM > Companies. If More doesn't appear in your account, navigate to CRM > Companies directly.
- Deals: In your HubSpot account, click More, then navigate to CRM > Deals. If More doesn't appear in your account, navigate to CRM > Deals directly.
- Tickets: In your HubSpot account, click More, then navigate to CRM > Tickets. If More doesn't appear in your account, navigate to CRM > Tickets directly.
- Appointments (if activated): In your HubSpot account, click More, then navigate to CRM > Appointments. If More doesn't appear in your account, navigate to CRM > Appointments directly.
- Courses (if activated): In your HubSpot account, click More, then navigate to CRM > Courses. If More doesn't appear in your account, navigate to CRM > Courses directly.
- Listings (if activated): In your HubSpot account, click More, then navigate to CRM > Listings. If More doesn't appear in your account, navigate to CRM > Listings directly.
- Services (if activated): In your HubSpot account, click More, then navigate to CRM > Services. If More doesn't appear in your account, navigate to CRM > Services directly.
- Projects (if activated): In your HubSpot account, click More, then navigate to CRM > Projects. If More doesn't appear in your account, navigate to CRM > Projects directly.
- Calls: In your HubSpot account, click More, then navigate to CRM > Calls. If More doesn't appear in your account, navigate to CRM > Calls directly.
- Forms: In your HubSpot account, click More, then navigate to Marketing > Forms. If More doesn't appear in your account, navigate to Marketing > Forms directly.
- Payments:In your HubSpot account, click More, then navigate to Revenue > Payments. If More doesn't appear in your account, navigate to Revenue > Payments directly.
- Products: In your HubSpot account, click More, then navigate to CRM > Products. If More doesn't appear in your account, navigate to CRM > Products directly.
- Subscriptions: In your HubSpot account, click More, then navigate to Revenue > Subscriptions. If More doesn't appear in your account, navigate to Revenue > Subscriptions directly.
- Emails: In your HubSpot account, navigate to CRM > Contacts, then click the Contacts dropdown menu and select Emails.
- Communications: In your HubSpot account, navigate to CRM > Contacts, then click the Contacts dropdown menu and select Communications. This index page displays LinkedIn, SMS, and WhatsApp messages.
Access records in a saved view
You can organize records with filters and save them as view tabs to revisit later. You can access pre-built default HubSpot views and custom views you or others in your account have created.
To open a saved view and interact with records:
- Navigate to your records (e.g., In your HubSpot account, click More, then navigate to CRM > Contacts. If More doesn't appear in your account, navigate to CRM > Contacts directly.).
- Click the name of a view tab (e.g., My deals).
- If a view tab isn't displayed:
- Click the + add view icon and select Add view.
- In the pop-up box, select a view, then click Add. Learn more about creating custom saved views.
- In the upper right, click the table view icon.
- Hover over a record and click Preview to preview a record.
- Click the record’s name to open the full record.
Learn more about how to edit an individual record or create and manage saved view tabs.
Access associated records in a saved view
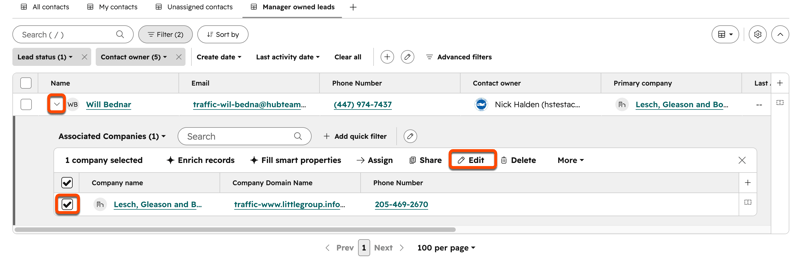
View associated records inline on the table view to quickly review and edit associated records.
- Navigate to your records (e.g., In your HubSpot account, click More, then navigate to CRM > Contacts. If More doesn't appear in your account, navigate to CRM > Contacts directly.).
- In the upper right, click the table view icon.
- In the row of the desired record, click the expand associations icon.
- If this is your first time using the inline association, select an object. If you've used it before, click the Associated [object name] dropdown menu, then select a different object.
- Review the associated records in a nested table and take actions (e.g., preview a record, bulk edit property values).
Filter records in the index pages
For each object, you can partition records based on the properties of the selected object. If you’re looking for more ways to filter records, learn about the differences between saved views and segments.
If you're a user in an account enrolled in the Cross-object filtering public beta, you can filter records by one associated object's properties in addition to the selected object's properties.
To filter records:
- Navigate to your records or a specific view.
- In the upper right, click the table view icon.
- Select filter methods:
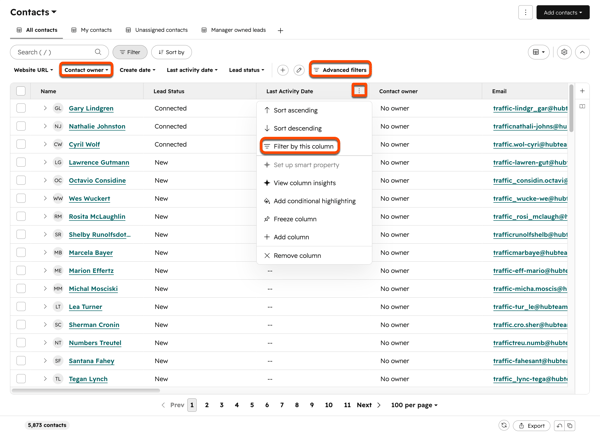
- Table column: on a column name, click the three vertical dots icon, then select Filter by this column. In the pop-up box:
- Enter or select a property value, then press the Enter key on your keyboard. Enter or select additional values, if desired.
- The filter will be cleared on a page refresh. In the bottom right, click Save to save the filter as a quick filter to the saved view tab you're viewing.
- Quick filters: click a property dropdown menu and select filter criteria to use quick filters. Learn how to configure quick filters.
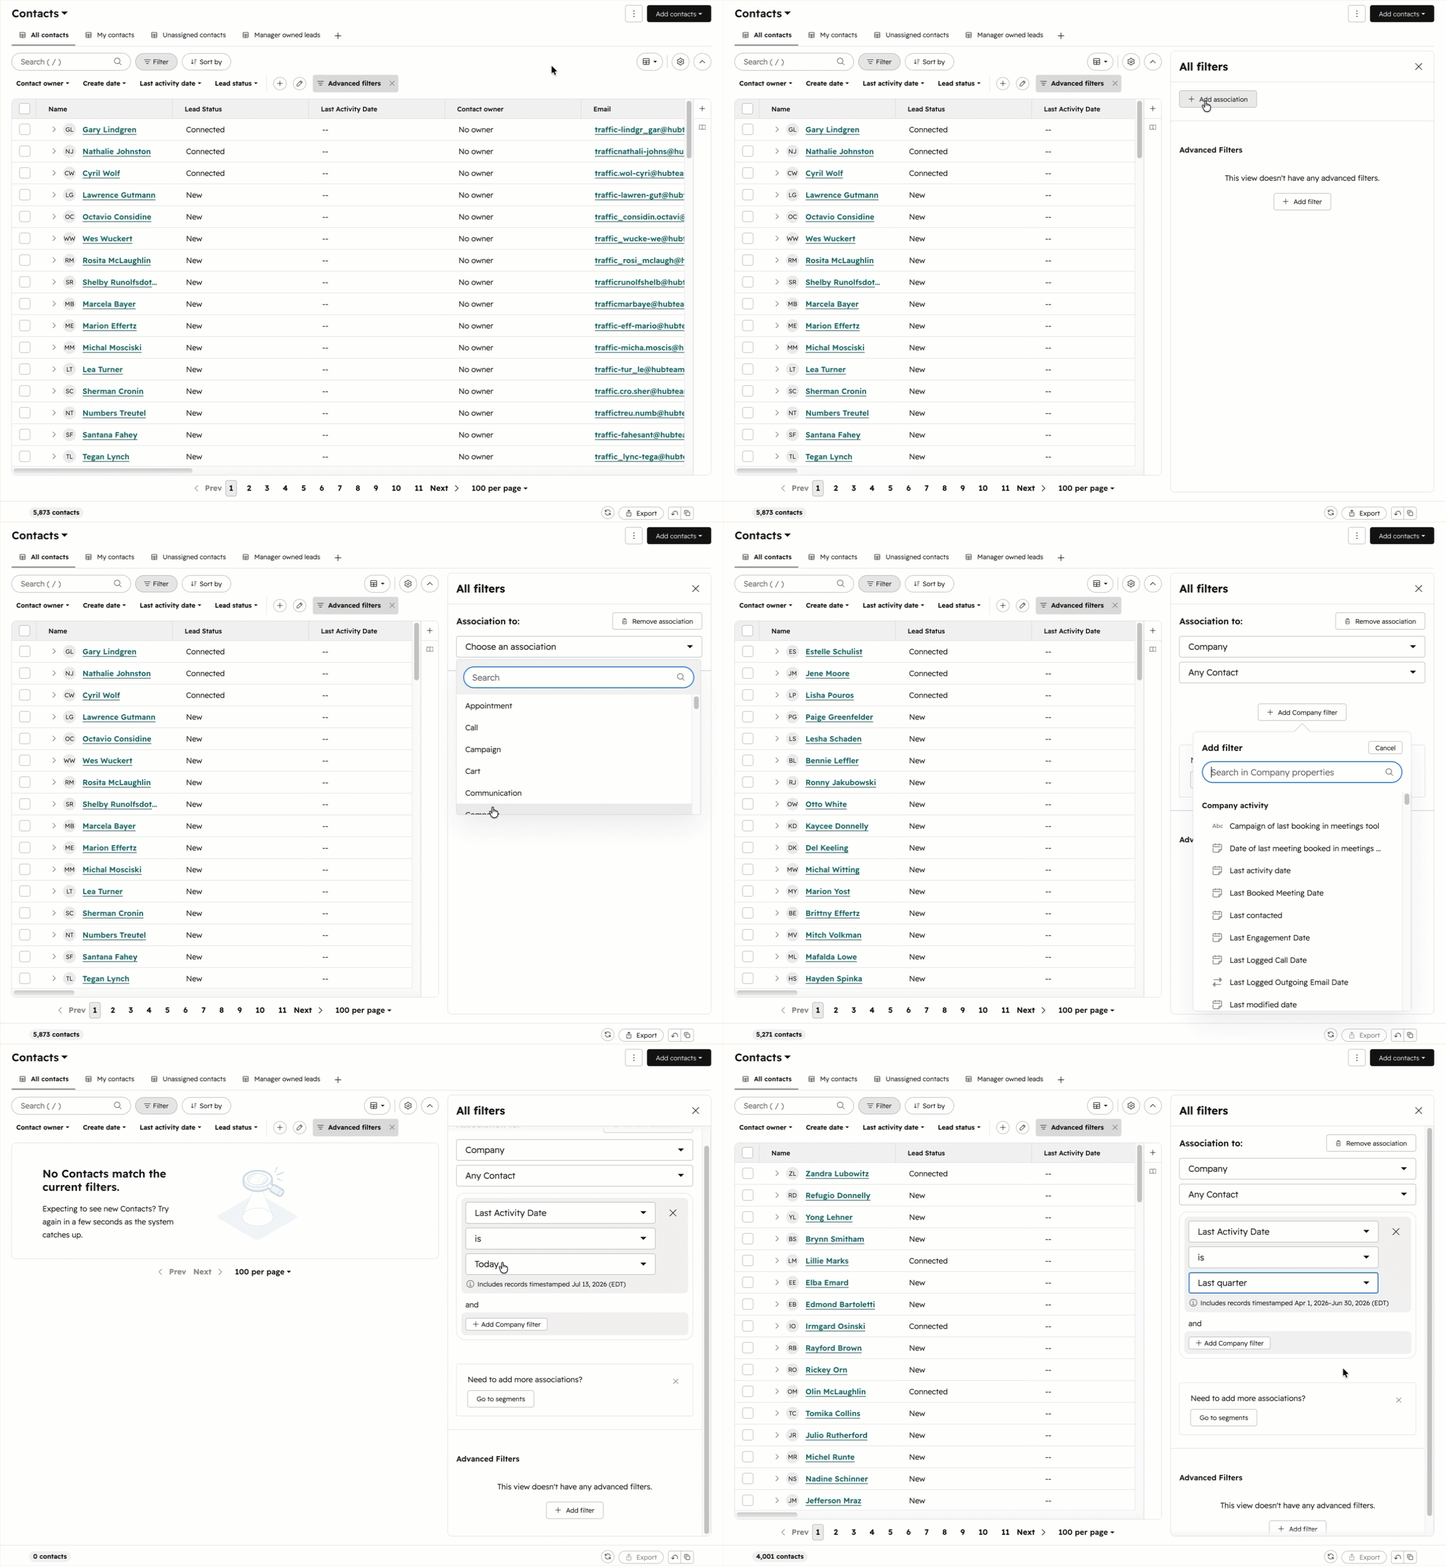
- Associated object (BETA): click Advanced filters to set filters using one associated object's properties and custom logic. In the right panel:
- Click Add association.
- Click the Choose an association dropdown menu, then select an object.
- Click the Any [object] dropdown menu to further refine associations by association label, if desired.
- Click Add [object] filter, then select a property. Add additional properties, if desired.
- The associated object property filter will be applied to the index page view.
Please note: if the object has more than 2 million associations, cross-object filtering will be unavailable.
- Advanced filters: click Advanced filters to set filters using the object's properties and custom logic. In the right panel:
- If the view doesn't have existing filters, click Add filter to set up the first filter. If the view has existing filters, click the name of a property to edit it.
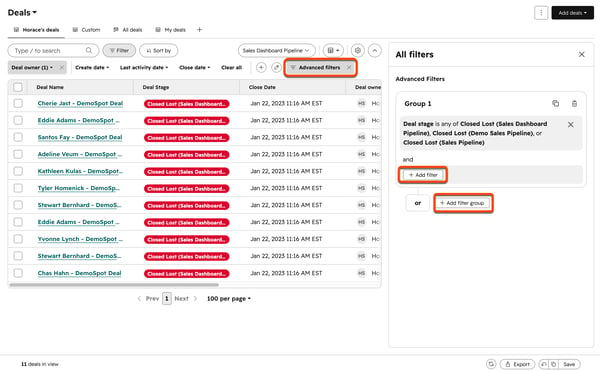
- Click Add filter to add a filter to the existing AND group. When you set a filter with AND, records must meet all of the criteria in the filter group to be included.
- Click Add filter group to add a filter to a new OR group. When you select OR, the records must meet the criteria in at least one filter group to be included.
- Select the property you want to filter by and set criteria for the property.
- For existing filters, you can:
- Click the clone icon above the group. When you clone a group, the new duplicate group will follow OR logic.
- Click the delete icon in the top right of the filter to delete an individual filter within a group.
- Click the delete icon next to the group name to delete the entire group.
- Once you’re finished, click the X in the top right corner. Your filters will be applied, but you must save the view for the filters to remain after a page refresh.
- If the view doesn't have existing filters, click Add filter to set up the first filter. If the view has existing filters, click the name of a property to edit it.
- Table column: on a column name, click the three vertical dots icon, then select Filter by this column. In the pop-up box:
- In the bottom right, click Save to save your filters as a saved view tab. You can also click the clone icon to copy your changes into a new saved view.
Learn more about creating and managing saved views.
Select filter criteria
Learn which filter options to use to create your desired partition of records.
