- Knowledge Base
- CRM
- Records
- Create and manage saved views
Create and manage saved views
Last updated: December 12, 2025
Available with any of the following subscriptions, except where noted:
On an object's index page, you can view and filter the object's records. There are default filtered views provided by HubSpot (e.g., My [records], Marketing contacts, New deals this month), and you can also create custom views with your own filters. Set visibility to everyone, your team, or private to you.
Create a saved view
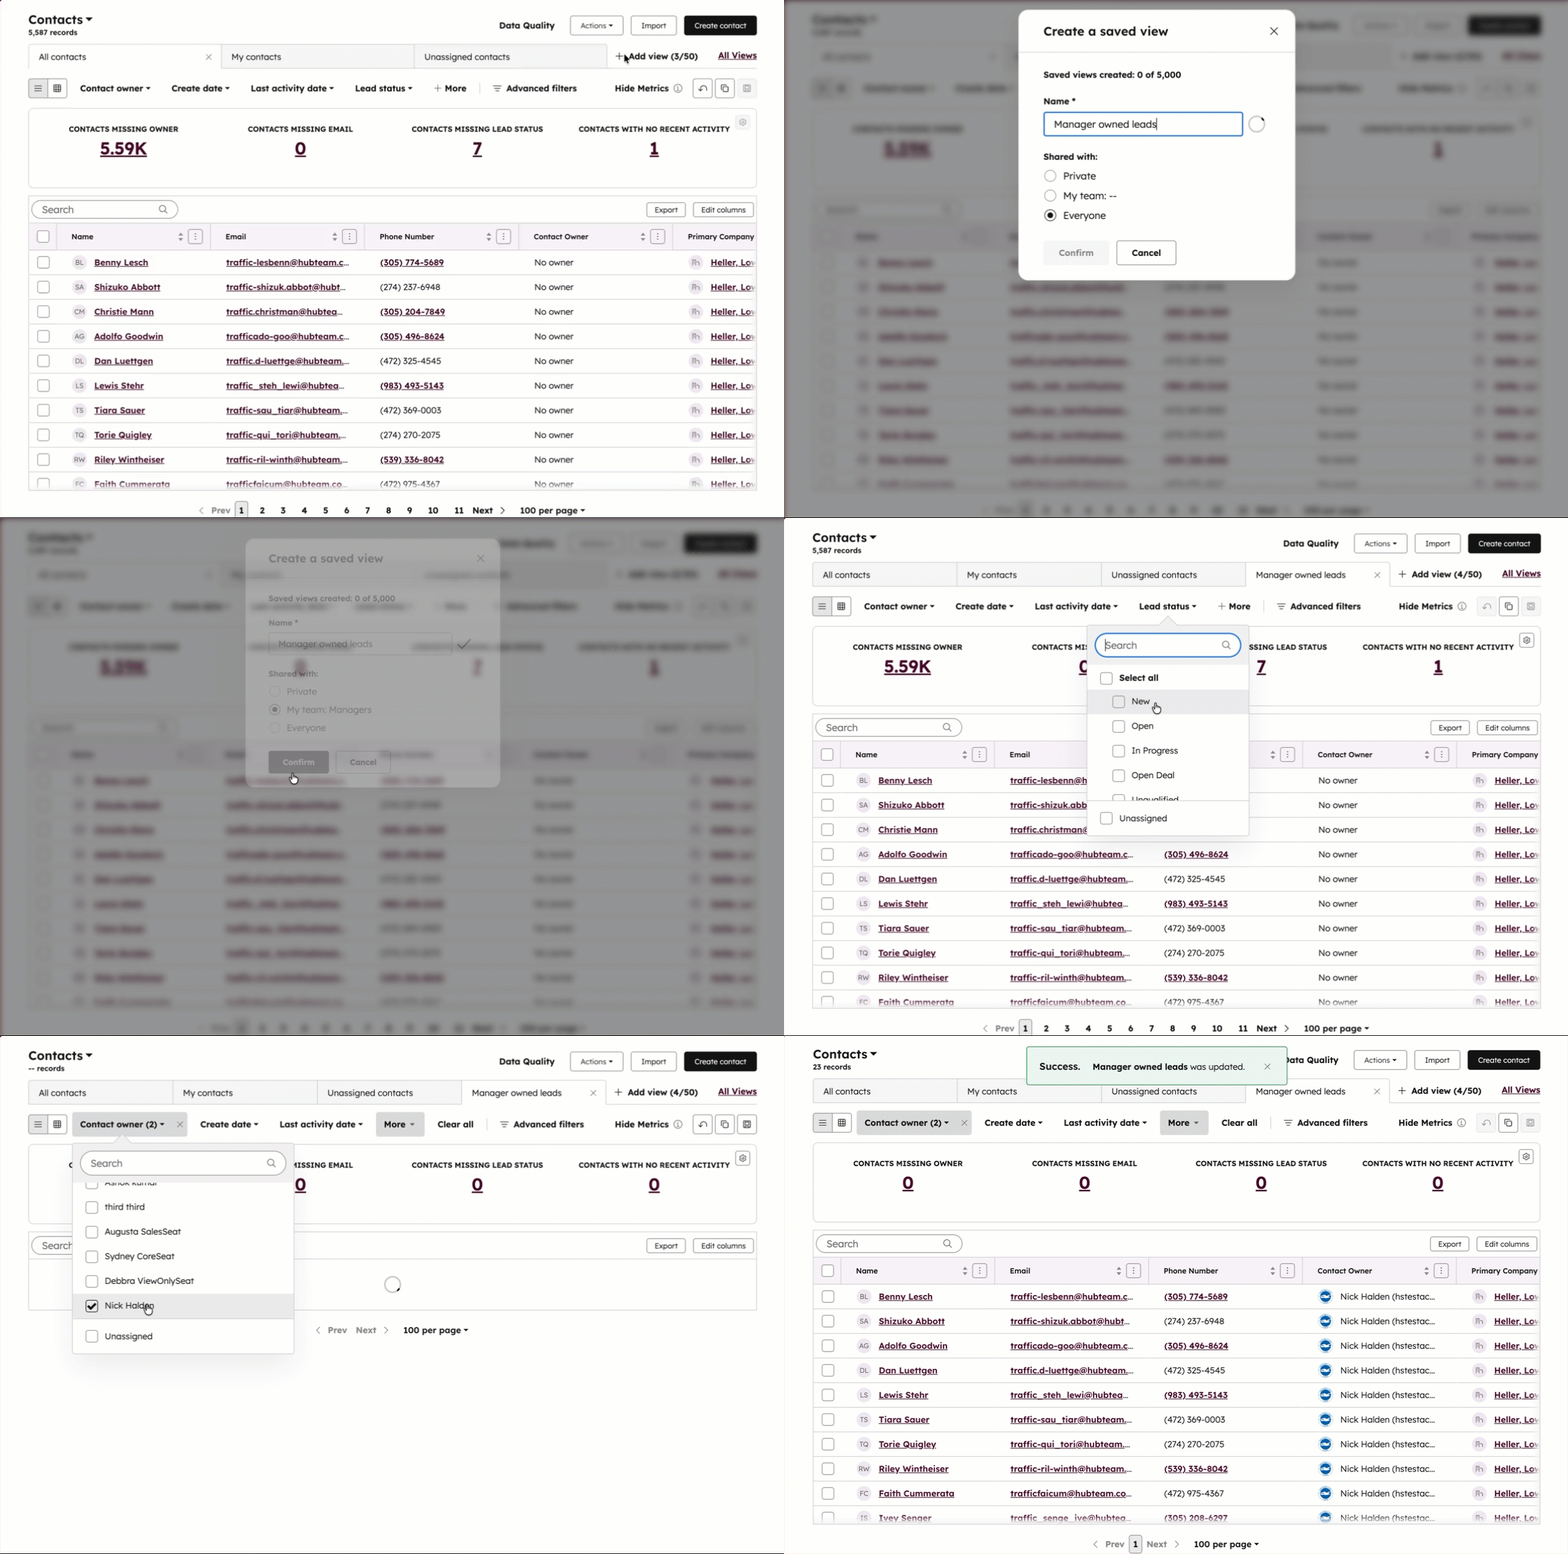
To save a custom view:
- Navigate to your records.
- Click + Add view, then click Create new view.
- Enter a name for the view.
- Select a visibility setting:
- Private: only you can access the view.
- My team: members of your team can access the view.
- Everyone: any user in your account can access the view.
- Click Confirm.
- Set filters for the view, then click the saveEditableView Save icon.
Once you’ve saved a view, learn more about bulk editing records.

Edit a saved view
Once you've created a view, you can edit its name, filters, columns, sort order, and visibility settings. Only Super Admins or the user who originally created the view can save changes. However, Super Admins can only edit filters, columns, and sort order.
- Navigate to your records.
- To edit a view's filters:
- Click the tab of the view you want to edit. If it doesn't appear as a tab, click + Add view, then select the view.
- Click the property dropdown menus or Advanced filters, then edit the filters.
- Click the saveEditableView Save icon.
- To edit a view's sort order, click the column header you want to sort by.
- To edit a view's columns, click Edit columns.
- To edit a view's name, click All views. Hover over the view, then click More > Rename. Enter a new name for the view, then click Confirm.
- To edit who can access a view, click All views. Hover over the view, then click More > Manage sharing. Select a new visibility setting, then click Save.
Configure view tabs
You can set which views are shown as tabs on your object index pages and set a default view to open first each time you navigate to the object. If you want to set the properties on your views, learn how to customize your index page columns or board cards.
If you're a Super Admin, learn how to configure index pages for all users.
Open, reorder, or close views
To decide which views are open as tabs and the order of the tabs:
- Click + Add view to the right of your tabs, then select a view from the dropdown menu to open an existing saved view. Once opened, tabs automatically remain pinned on the index page unless you close them. You can also view all available views, including both default and custom, by clicking All views.
- Click and drag a tab to a new position to reorder your views. If you drag a tab to the left most position, it will become the default view.
- Click the X on the view's tab to hide a view. You can reopen the view from the + Add view dropdown menu or the All views page.
Set the default view
To set the default view that opens when you navigate to an object's index page:
- Navigate to your records.
- If the view is hidden, click + Add view and select the view to open it.
- Click and drag the view's tab to the left most position.
For deals, tickets, and custom objects, the default view will be set for both list view and board view. This view will be the first tab to appear each time you navigate to the index page and applies only to your user profile.
Clone a view
To create a new view with the same filters and settings as an existing view:
- Navigate to your records.
- If the view is open, click the duplicate Clone icon above the table. If the view is hidden, click All views, hover over the view, then click More > Clone.
- In the dialog box, enter a view name, select a visibility setting, then click Confirm.
The view will be created with the same filters as the original.
Delete a view
Views can be deleted by the user that created the view and the account's Super Admin users. To delete a view:
- Navigate to your records.
- Click All views.
- Hover over the view, then click the More > Delete.
- In the dialog box, click Delete to confirm. The view will be deleted, but the records included in the view will not be deleted.