- Knowledge Base
- CRM
- Object Settings
- Manage saved and default index page views
Manage saved and default index page views
Last updated: December 3, 2025
Available with any of the following subscriptions, except where noted:
-
Additional subscriptions required for certain features
Manage all saved index page view tabs in one place. Filter by object or owner and make changes to names or filters. Set the default index view configuration for new users and suggest view tabs for all users in the account. Learn more about configuring a saved view tab.
Manage all views
Subscription required A Professional or Enterprise subscription is required to create a report from a saved view.
Permissions required Super Admin permissions are required to modify views that you don't own.
- In your HubSpot account, click the settings settings icon in the top navigation bar.
- In the left sidebar menu, navigate to Objects, then select an object.
- Click the Index Customization tab.
- Click All Views.
- On the view customization page:
- You'll see custom views for the object you selected in settings. Above the table, click the objects dropdown menu and select other objects you want to include.
- Click the Owner dropdown menu and select the users whose views you want to include.
- Click the name of the view to open it.
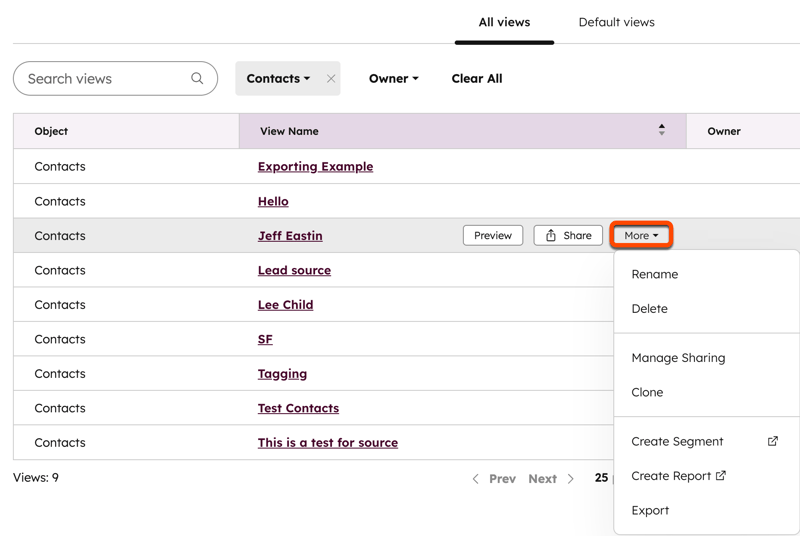
- Hover on a view and click Preview to review the filters and sharing settings in the right panel.
- Hover on a view and click Share to copy the link to the view to your clipboard.
- Hover on a view, click the More dropdown menu and select:
- Rename: change the name of the view.
- Delete: remove the view from the account.
- Manage Sharing: change who can access the view. Learn more about sharing.
- Clone: make a copy of the view and its filters.
- Create Segment: build a segment using the filters of the view.
- Create Report: build a report using the filters of the view.
- Export: export the records, properties, and associations contained within the view.
- Click Standard views to review HubSpot-provided views for each object in the right panel.

Set default view tabs
For new users and users who haven't customized index page tabs, the account-wide defaults will automatically appear when they navigate to that object. For all users, the default views will be included in the Admin promoted section shown when adding an existing view. Users can update their own view tabs at any time, which will override the account-wide defaults.
To set the default view tabs for an object:
- In your HubSpot account, click the settings settings icon in the top navigation bar.
- In the left sidebar menu, navigate to Objects, then select the object for which you want to edit the default view tabs.
- Click the Index Customization tab.
- Click All views.
- Click the Default views tab.
- On the view customization page:
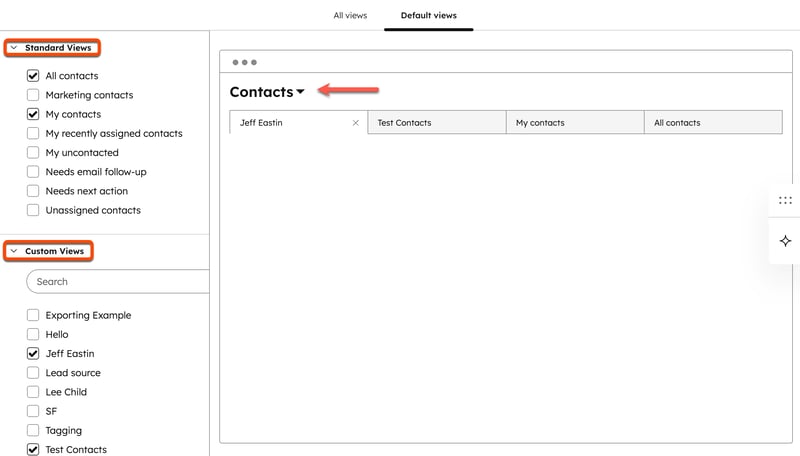
- You'll see views for the object you selected in settings. Click the [object name] (e.g., Contacts) dropdown menu and select a different object if desired.
-
- In the left sidebar, select the checkboxes for the views you want to appear. The Standard Views section includes HubSpot-created views, and the Custom Views section includes the user-created views with visibility set to Everyone.
-
- Click and drag a tab to change the order. If you place a tab in the left most position, it becomes the default view, which opens each time a user navigates to the index page. For objects with pipelines, the default tab also applies to the board view type.
- Click the X on a tab to remove it.
-
- Once you're done, in the top right click Save.
