- Knowledge Base
- Account & Setup
- Connected Email
- Troubleshoot the HubSpot Sales Office 365 add-in
Troubleshoot the HubSpot Sales Office 365 add-in
Last updated: November 6, 2025
Available with any of the following subscriptions, except where noted:
The information below helps with troubleshooting certain issues with the Office 365 add-in.
Please note: if you're using HubSpot Sales Outlook desktop add-in, check out this article instead.
Cannot install the Office 365 add-in
If you're having trouble installing the add-in, make sure you meet the following requirements:
- Use a supported version of Outlook. The following versions of Outlook are not fully supported:
- Outlook installed from the Microsoft Store is not compatible with the HubSpot Sales Office 365 add-in. Check your Outlook version to ensure it's Click-to-run.
- Office 365 from GoDaddy is not compatible with the HubSpot Sales Office 365 add-in, because GoDaddy currently does not support third party apps.
- Have access to the Microsoft store.
- Have the necessary permissions from your email administrators to use third party add-ins in your inbox.
- Install the add-in in each inbox if you're using multiple inboxes.
- Connect your inbox.
Add-in grayed out in Outlook desktop
If you're using Outlook for PC or Outlook for Mac, the add-in will be grayed out if the Reading Pane is turned off or hidden. Ensure that the Reading Pane is turned on by following this Microsoft article for Outlook for PC and this Microsoft article for Outlook for Mac.
If the Office 365 add-in in Outlook for PC is still grayed out in both your main Outlook inbox ribbon and within your Outlook message ribbon, there's an issue with your Outlook program itself. Try closing Outlook and reopening it.

If the add-in is enabled in your main Outlook inbox ribbon but grayed out in your Outlook message ribbon, try the steps below:

- Check to see if your email is being encrypted. You may need to contact your IT team for this.
- If your email is not being encrypted, try repairing Outlook:
- Open the Start menu in Windows.
- Search for and select Uninstall a program or Add or remove programs.
- Locate and click the Outlook or Microsoft Office program, then click Modify or Change.
- In the dialog box that appears, you’ll be asked to select the Repair mode. Select Online Repair, then click Repair.
Add-in hidden on Outlook on the web
When composing an email in Outlook on the web, in the main ribbon, click Apps, then select HubSpot Sales. Learn how to customize actions on your menu so the add-in always appears in the toolbar.

Stuck in an inbox connection loop
If the add-in prompts you to connect your inbox, but leads you in a loop, it's likely your inbox is an alias. Although Office allows you to sign in with an alias, you can only connect your primary email inbox account to HubSpot.
When you install the Office 365 add-in and you’re prompted to sign in, you must sign in with your primary email address. For example, if you have an email alias account of tom@acme.com, but your primary email address is tom.anderson@acme.com, you should connect with tom.anderson@acme.com. If you’re not sure what your primary email address is, check with your IT team.
Once you understand what your primary email address is:
- Follow these instructions to modify your profile in Outlook, and update your current email address to your primary email address.
- Connect your primary email address to the add-in instead of your alias.
With your primary email address connected, Outlook should allow you to continue using the alias and the inbox connection loop should end.
Stuck in a login loop
If you're using the Office 365 add-in on Outlook on the Web and are repeatedly asked to log in to your HubSpot account, check your web browser settings to ensure you aren't blocking third-party cookies.
- Review the documentation below for your specific browser:
- If you’re using Outlook on a PC, check the Internet Options on your device.
Unable to stay logged in to add-in
If you’re repeatedly prompted to log in to the Office 365 add-in, you can increase your inactive session timeout length.
- If the inactive session timeout length is set to one day, a user will be logged out if they're inactive for 24 hours. Super Admins or users with Security Center access permissions can customize the inactive session timeout length. This will increase the amount of time a user can be inactive before they’re logged out.
- The inactive session timeout length will take precedence over selecting Remember me when logging in.
If you're logged out before your inactive session timeout length, it may be because of browser cookies.
- Ensure you have allowed third-party cookies.
- If you're using a third-party login method like Microsoft, the cookie will be lost after closing Outlook, and you'll have to log in again. Instead, it is recommended to log in with your email and password and use the Remember me option when logging in.
Add-in pane not loading
If you're running macOS Catalina and Safari 13 on your device, the Office 365 add-in side pane may not load when using Outlook on the web or desktop. This is caused by security settings on Safari, which you can update following the steps below:
- On your device, open Safari.
- At the top of the screen in the menu bar, click Safari > Preferences.
- Click the Privacy tab.
- Clear the Prevent cross-site tracking checkbox.
![]()
Emails are not being tracked
There are several reasons why your email may not have been tracked when using the Office 365 add-in:
- Your inbox hasn't been connected. The HubSpot Sales Office 365 add-in requires a connected inbox.
- The add-in wasn't open when the email was sent. The add-in must be open in order for the email to be tracked. Learn how to pin the add-in open in your inbox, or to open the add-in:
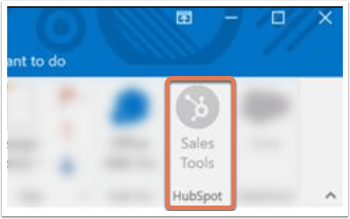
- If you're using an Outlook desktop account on a PC or Mac, click Sales Tools in the Outlook message ribbon. If the Sales Tools icon is grayed out, restart Outlook.
- If you're using an Outlook on the web or Outlook.com account, compose a new email and in the main ribbon, click Apps. Then select HubSpot Sales.
- Emails sent in Plain Text mode cannot be tracked. If you see that emails are sent in Plain Text, switch to HTML mode in the email client you're using with Office 365.
- The Track email opens box wasn't selected when the email was sent. You'll need to check the box for each email you'd like to track.
- Tracking is turned off because there's a conflict with another add-in or security software. Turn off all other add-ins installed in Outlook, then temporarily turn off any security programs to see if tracking resumes.
![]()
Azure Active Directory configuration error
You may receive an error that states, "You cannot access this application because it has been misconfigured. Contact your IT department and include the following information: Undefined Sign-On URL for application 'HubSpot Sales'". This indicates an issue with your company email provider's Azure Active Directory configuration.
This message is not sent from HubSpot, but from your Azure Active Directory configuration. You'll need to work with your IT resource to resolve this. In this case, HubSpot recommends that your IT team or Office 365 admin grant access to HubSpot. If they're centrally deploying the add-in, review this help documentation from Microsoft.
Debug logs
When working with HubSpot support to troubleshoot the Office 365 add-in, you may be asked to provide debug logs. When the add-in is installed it stores information in report logs. If your add-in isn't working as expected, these logs help the support team take a closer look into what's happening with the add-in.
- Compose a new email in Outlook.
- Navigate to the HubSpot Sales add-in:
- Outlook for Windows or Mac (classic): in the main ribbon, click Sales Tools.
- Outlook for Windows or Mac (new): in the main ribbon, click the three horizontal dots and select HubSpot Sales.
- Outlook on the web: in the main ribbon, click Apps and select HubSpot Sales.
- In the task pane, scroll down to the More section and click Add-in settings.
- Click Help & troubleshooting.
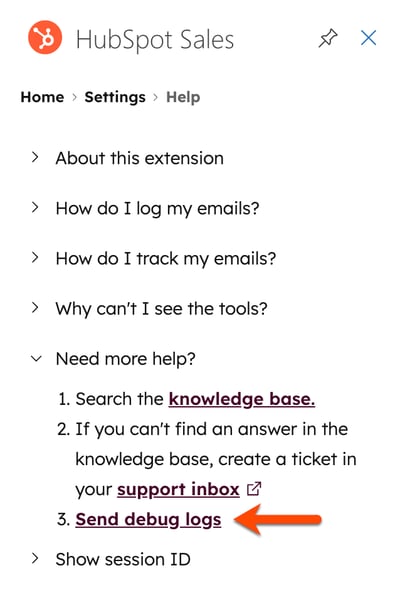
- Click to expand Need more help? and select Send debug logs. This will populate the debug log content in the email compose window and populate the To field with a default email address.
- To send the logs to the support specialist you’re working with, enter their email address in the To field, then click Send.
