Last updated: September 4, 2026
Available with any of the following subscriptions, except where noted:

-
 Additional subscriptions required for certain features
Use forms to collect payments by automatically redirecting visitors to a payment checkout page upon submission. This feature helps streamline the form conversion and payment process. Direct all visitors to a specific payment link once they submit the form. Or, with a Content Hub or Marketing Hub Professional or Enterprise subscription, use conditional logic to redirect visitors to different payment links based on their form responses.
For example, if you have an event registration form, you can send visitors to a specific payment link based on their selected event. When the form is submitted, the contact’s payment status will be available alongside the form submission data.
With this feature, collect payments through Stripe payment processing or HubSpot payments.
Subscription required A Starter, Professional, or Enterprise subscription is required to use HubSpot payments. Stripe payment processing is available for all subscriptions, and available internationally with some exceptions.
Permissions required
-
Edit forms permissions are required to create and edit forms.
- Manage payment links permissions are required to create and manage payment links.
Before you get started
Before you create a payment form, create a payment link.
Add a payment link to a form
When a visitor fills out your form, you can send them to a payment link so they can pay through a checkout page. Learn more about the buyer checkout experience.
The steps to add a payment link differ depending on whether you're using the updated or legacy form editor.
Use the updated form editor
-
In your HubSpot account, click More, then navigate to Marketing > Forms. If More doesn't appear in your account, navigate to Marketing > Forms directly.
- Create a new form or hover over an existing form and click Edit.
- In the upper left, click the Contents icon.
- In the left panel, click On submit.
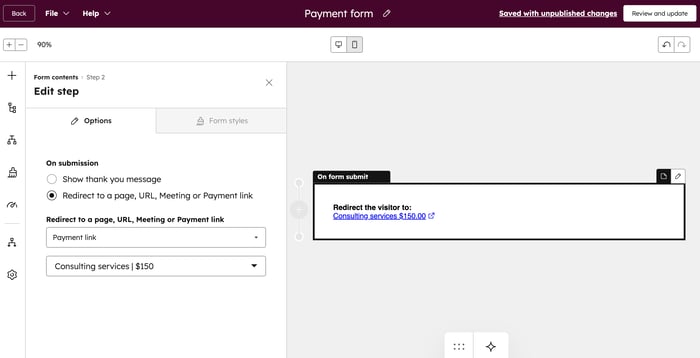
- In the left panel under On submission, select Redirect to a page, URL, Meeting, or Payment link.
- In the dropdown menu, select Payment link. In the subsequent dropdown menu, select the payment link that your visitors will be redirected to after they submit your form.
- In the top right, click Review and update to publish the changes to your live form.
Use the legacy form editor
- In your HubSpot account, click More, then navigate to Marketing > Forms. If More doesn't appear in your account, navigate to Marketing > Forms directly.
- In the top right, click Create form.
- Select Legacy Form Editor, then in the top right, click Next.
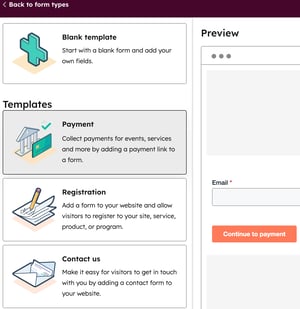
- Select Blank template to start with a blank form or select the Payment template.
- In the top right, click Start.
- To set up your payment links:
- If you've selected the Payment template, you'll be automatically directed to the payment link options in your form.
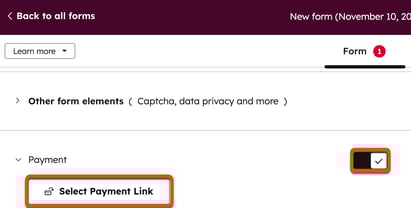
- If you're creating a form from scratch, in the left sidebar menu, toggle the Payment switch on, then click Select Payment Link.
- Click the Select a payment link dropdown menu and select a payment link.
- Enter a Label for your payment link.
- To add another payment link, click + Add an option.
- To edit a payment link label, click Edit.
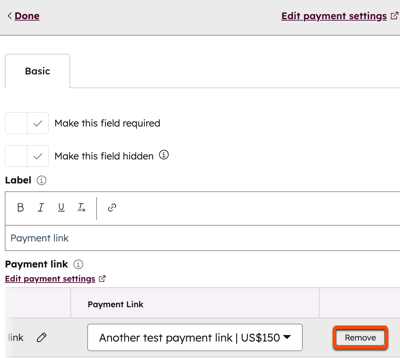
- To remove a payment link, hover over the link and click Remove.
- To reorder the payment links, click and drag a payment link using the drag handle.
- To sort your payment links alphabetically, click Sort.
- To have a payment link be preselected on the form, click the radio button next to the payment link.
- To clear any preselected options in your payment link field, click Clear preselected.
- Once you've set up your payment links, continue setting up the form.
When a visitor submits the form, they can select which payment link to use for submission. HubSpot will capture the form submission data and the visitor will then be redirected to the corresponding checkout page to complete their purchase. Learn more about the buyer checkout experience.
Please note: the payment field cannot be hidden or configured with progressive or dependent field logic.
Lock the email field at checkout
When redirecting buyers from a HubSpot form to a payment link, you can lock the email address entered on the form during checkout. This keeps the payment associated with the contact record created by the form submission and prevents buyers from entering a different email address.
- In your HubSpot account, click More, then navigate to Marketing > Forms. If More doesn't appear in your account, navigate to Marketing > Forms directly.
- In the table, click on the form name you want to update, or, hover over it, and click Edit.
- In the upper left, click the contents icon.
- In the left panel, click On submit.
- Under On submission, click the Redirect to a page, URL, Meeting, or Payment link dropdown menu. Then, select Payment link.
- In the second dropdown menu, select the payment link that your visitors will be redirected to after they submit your form.
- At the bottom, select the Connect form submission and payment to one contact checkbox.
After submitting the form, the buyer is automatically redirected to the payment link. The email address submitted on the form is automatically added to the payment link and can’t be changed during checkout.

Add a payment link with conditional logic
Subscription required A Marketing Hub or Content Hub Professional or Enterprise subscription is required to add conditional logic to forms.
Use the updated form editor to redirect visitors to a specific payment link based on their answers.
-
In your HubSpot account, click More, then navigate to Marketing > Forms. If More doesn't appear in your account, navigate to Marketing > Forms directly.
- Create a new form or hover over an existing form and click Edit.
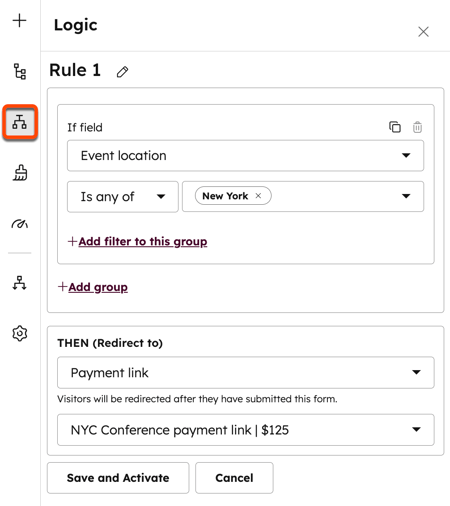
- In the upper left, click the Logic icon.
- In the left panel, click Add logic.
- In the Logic section, configure your conditional logic rules:
- Under If field, click the dropdown menus to select the form field and filter operator that will be used for the conditional logic.
- Under THEN, click the dropdown menu and select Payment link.
- In the subsequent dropdown menu, select the payment link that your visitors will be redirected to after they submit your form.
- Click Save and Activate.
Learn more about adding conditional logic to forms.
Review form submissions and payment status
When a visitor submits your form and completes their purchase, their payment status will be available in the form submission data.
-
In your HubSpot account, click More, then navigate to Marketing > Forms. If More doesn't appear in your account, navigate to Marketing > Forms directly.
- Hover over an existing form and click Actions. Then, select View submissions.
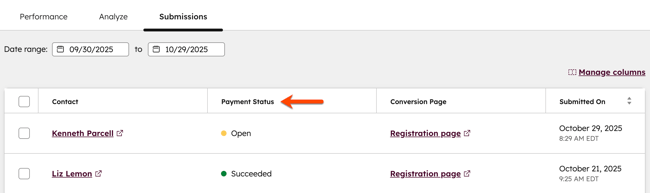
- On the Submissions tab, you can review the payments that have been submitted. The Payment Status column will display the status of the payment, which can include the following values:
- Open: the buyer submitted the form, but has not yet completed the payment checkout process.
- Pending: the payment is still processing. Once the payment has been processed, the status will either change to Succeeded or Failed. Learn more about payment processing times.
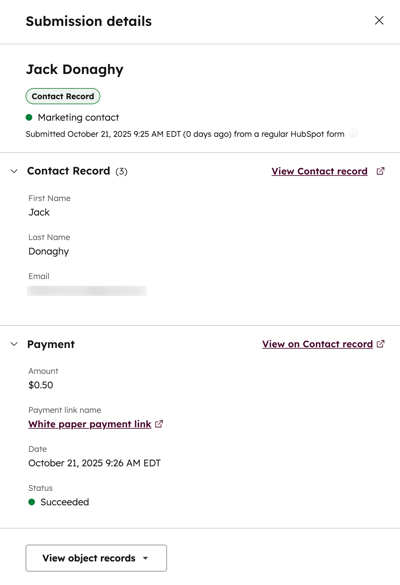
- Succeeded: the payment was collected from the buyer. If the payment has succeeded, the Payment section will display the payment Amount and the Date the payment was made.
- Failed: the buyer's payment method wasn't charged. This status only applies to payments made through bank debit methods, such as ACH, or subscription payments.
- Expired: the buyer submitted the form, but didn't complete the payment checkout process within 24 hours. A checkout session will expire after 24 hours. The buyer can return to the checkout page and click Here's a new link to start a new checkout session and complete their payment.
- To view the payment link and status of a specific form submission, hover over a submission and click View.
- In the right panel, you can view the name or email address of the contact, the date they submitted the form, and any form fields submitted in the form. In the Payment section, you can view the payment details, such as the Payment link name and payment Status. If the payment has succeeded, you can also view the payment Amount and the Date the payment was made.