- Knowledge Base
- Service
- Help Desk
- Create and use macros in help desk
BetaCreate and use macros in help desk
Last updated: November 20, 2025
Available with any of the following subscriptions, except where noted:
-
Service Hub Enterprise
In help desk, you can create and use macros to save your support team time and improve overall efficiency. Macros are prewritten responses that can be quickly applied from the reply editor, making them especially useful for handling common or repetitive situations.
Each macro is associated with a ticket-based workflow. When the macro is applied, the ticket is automatically enrolled in the linked workflow, which then carries out predefined actions such as updating the ticket status or reassigning the ticket owner. This helps streamline support processes and reduce manual effort, allowing your team to focus on more high-value tasks.
if you're a Super Admin, you can opt your account into the Support Macros beta.
Permissions required Super Admin and Workflow permissions are required to create and use macros in help desk.
Create macros
Please note: you can create up to 50 macros.
- In your HubSpot account, click the settings settings icon in the top navigation bar.
- In the left sidebar menu, click Inbox & Help Desk > Help Desk.
- In the Help desk customization section, click Macros.
- Click Create macro.
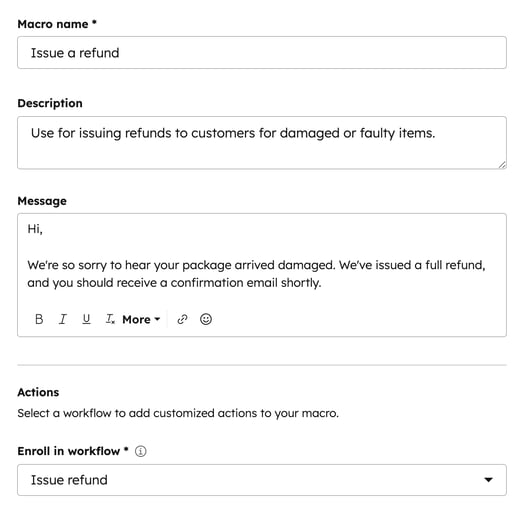
- In the Macro name field, enter a name for your macro.
- In the Description field, enter a macro description.
- In the Message field, enter the content of your macro. You can use the icons across the bottom of the editor to modify the text style and include multiple file attachments in your message.
- Click the Enroll in workflow dropdown menu and select an active, ticket-based workflow. When the macro is applied, the ticket will automatically be enrolled into the selected workflow. Learn more about creating workflows.

Use macros
- In your HubSpot account, navigate to Service > Help Desk.
- Click a ticket to view the corresponding conversation.
- In the reply editor, click the Macros dropdown menu and select a macro.

- Continue editing your response, then click Send and apply.
Once the macro has been applied, the ticket will automatically be enrolled in the associated workflow. Learn more about creating workflows.
Manage and edit macros
- In your HubSpot account, click the settings settings icon in the top navigation bar.
- In the left sidebar menu, click Inbox & Help Desk > Help Desk.
- In the Help desk customization section, click Macros.
- To edit the macro, click theverticalMenu menu icon and select Edit.
- To delete the macro, click theverticalMenu menu icon and select Delete.