- Knowledge Base
- Automation
- Workflows
- Assign and rotate ticket owners using workflows
BetaAssign and rotate ticket owners using workflows
Last updated: December 22, 2025
Available with any of the following subscriptions, except where noted:
-
Service Hub Professional, Enterprise
-
Smart CRM Professional, Enterprise
Use the Rotate record to owner workflow action to assign tickets to your paid sales and service users. You can use this action to assign users on the Ticket owner property or any custom HubSpot user property.
When setting up this workflow action, you can rotate ticket owners based on user availability and balanced distribution. For example, you can choose to route the tickets based on the number of open tickets that a user currently has, or based on random assignment. Learn more about ticket assignments.
Please note: if you're a Super Admin, you can opt your account into the Rotate ticket owners based on user availability beta.
Seats required When assigning users with this action, users must have paid service seats. Learn more about managing paid seats.
Before you get started
When assigning tickets using the Rotate record to owner action, please note the following:
- When assigning tickets to a team:
- The team must have at least one user with a paid sales or service seat. If not, it will not appear when setting up the workflow action.
- Only main team members will be eligible for assignment. Extra team members will not be included.
- If a user is over their set ticket capacity limit (Service Hub Enterprise only), they will become ineligible for assignment from Rotate Owner actions until they have reduced their active number of tickets.
- Deactivated users or users who no longer have a paid seat will show in routing rules with a red border and will not be included in the ticket assignments.
Assign tickets using workflows
To assign tickets using the Rotate record to owner action in a workflow:- In your HubSpot account, navigate to Automation > Workflows.
- Click the name of an existing ticket-based workflow or create a new workflow.
- Set your enrollment triggers.
- Click the + plus icon to add an action.
- In the left panel, click to expand the CRM section. Then, click Rotate record to owner.
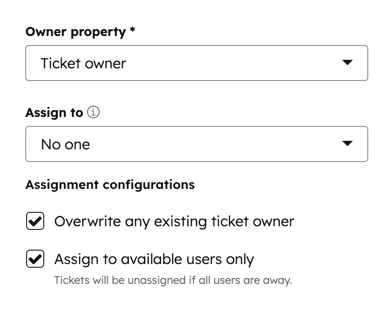
- Click the Owner property dropdown menu and select Ticket owner.
- Click the Assign to dropdown menu and select from the following:
- Customer agent: incoming tickets will be routed to the customer agent.
- Specific users and teams: assign incoming tickets to specified users or teams.
- Team only: route incoming tickets to teams without assigning a ticket owner. Tickets will appear in team-based views in help desk, including My Team's Unassigned and My Team's Open. Only teams with at least one user who has a Service Hub seat can be selected for team routing.
- Contact owner: assign incoming tickets to a contact's owner. The contact must have an owner assigned to their record and be tracked with a cookie.
- No one: incoming tickets will not be assigned to any team members.
- To assign a ticket to a customer agent, click the Assign to dropdown menu and select Customer agent. Learn more about setting up a customer agent.

- To assign the ticket to a specific user or team:
- Click the Assign to dropdown menu and select Specific users and teams.
- Click the second dropdown menu and select the checkboxes next to the teams to route to.
-
- Click the Distribution dropdown menu and select from the following:
- Load Balanced: automatically evaluate and assign the ticket to the user with the least amount of open, assigned tickets.
- Round Robin: assign tickets in a rotating, sequential order.
- Random: assign tickets randomly to eligible users in the assignment pool.
- Click the Distribution dropdown menu and select from the following:
 .
.
- To assign the ticket to a team without any specific contact assignments:
- Click the Assign to dropdown menu and select Team only (no specific user).
- Click the second dropdown menu and select the checkboxes next to the teams to route to.

- To assign the ticket to the associated contact's owner:
- Click the Assign to dropdown menu and select Contact owner.
- To set a fallback user or team, click the If there is no contact owner, assign to dropdown menu and select a user or team. If there is no contact owner or if the assignment fails, the fallback option will be used.

- If you do not want to assign the ticket to any user, click the Assign incoming tickets to dropdown menu and select No one.

- Set your assignment configurations:
- Overwrite any ticket owner: overwrite any existing ticket owners with a new ticket owner based on the assignment rules.
- Assign to available users only: users that are set to Away will not be assigned tickets, even if they are configured in the assignment rules. Only available users will be assigned tickets. If all users in the assignment pool are away:
- The Ticket Owner or Custom user property will be set to unassigned or (No owner).
- The Assigned Teams ticket property will be set to all of the target teams from the routing options.
- At the top, click Save.