- Knowledge Base
- Service
- Help Desk
- Set ticket capacity limits for users in help desk
Set ticket capacity limits for users in help desk
Last updated: December 10, 2025
Available with any of the following subscriptions, except where noted:
-
Service Hub Enterprise
-
Seats required
Set ticket capacity limits for users managing tickets in help desk. If automatic ticket assignment is enabled for a channel connected to help desk, users who reach their capacity limit will no longer receive tickets automatically. While tickets can still be manually assigned, users will see both their current ticket count and capacity, ensuring fair distribution and improving your team's overall efficiency.
Learn more about routing help desk tickets.
Super Admin or Add and edit users permissions are required to set ticket capacity limits in help desk.
Before you get started
- Tickets can still be assigned to users who've reached their limit manually or via workflows.
- Ticket capacity limits are based on the Ticket owner property and apply only to help desk tickets in an Open status. Tickets assigned to the user that are not from a channel connected to help desk do not count towards the user's ticket capacity limit. To manage limits for channels connected to the conversations inbox, learn more about setting chat capacity limits.
- Users who reach their capacity limit are not included in automatic assignment for help desk tickets. Tickets are routed to the next available user, and if all target users are at capacity, the ticket will remain unassigned until it is manually assigned.
Set ticket capacity limits
- In your HubSpot account, click the settings settings icon in the top navigation bar.
- In the left sidebar menu, navigate to Routing.
- Navigate to the Capacity limits tab.
- Hover over the user and click Edit capacity.
- In the right panel, select a Capacity type:
-
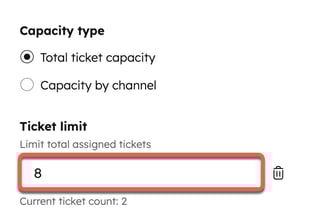
- Total ticket capacity: set a limit for the total number of tickets a user can be assigned at any given time.
- Click add Add limit.
- In the Ticket limit field, enter the maximum number of tickets. You can see the user's current ticket count here.
- Total ticket capacity: set a limit for the total number of tickets a user can be assigned at any given time.

-
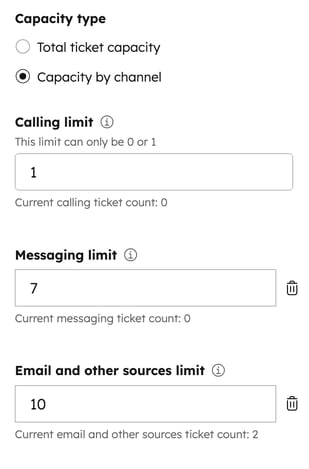
- Capacity by channel: set a limit for the total number of tickets a user can be assigned per channel:
-
-
- Calling limit: enter the maximum number of calling tickets a user can be assigned. The limit can only be between 0 or 1.
- Messaging limit: click add Add limit and enter the maximum number of tickets for live chat, WhatsApp, Facebook and custom channels.
- Email and other sources limit: click add Add limit and enter the maximum number of tickets for emails, form, and tickets without a defined channel.
-

- Click Save.
Edit ticket capacity limits for users
- In your HubSpot account, click the settings settings icon in the top navigation bar.
- In the left sidebar menu, navigate to Routing.
- Navigate to the Capacity limits tab.
- Select the checkboxes next to the users you want to edit.
- At the top of the table, click Edit capacity.
- In the right panel:
- Select a capacity type.
- In the Ticket limit field, edit the maximum number of tickets for that capacity type.
-
- To remove a ticket capacity, click the delete icon next to the limit.
- To remove the ticket capacity for multiple users, select the checkboxes next to the users. Then, select Delete capacity at the top of the table.

Set live chat behavior during max capacity
To specify the behavior for your live chat launcher when all agents are at max capacity:
- In your HubSpot account, click the settings settings icon in the top navigation bar.
- In the left sidebar menu, navigate to Inbox & Help Desk > Help Desk.
- Under Ticket sources and routing, click Channels.
- Hover over the chat channel and click Edit.
- Click the Availability tab.
- Under Availability behavior, click the Max capacity tab.
- Click the dropdown menu to customize live chat behavior during max capacity:
- Show a wait message: website visitors will still be prompted by your live chat launcher, but when they start a conversation, your configured wait message will appear in the chat window. Any new conversations will remain in the Unassigned view of help desk.
- Hide chat launcher: the chat launcher will not appear to any visitors to your website, and they won't be able to start any conversations with live agents.
- Do nothing: website visitors will be prompted by your live chat launcher, and if they choose to start a conversation, they'll go through the normal greeting experience without an indication that all agents are at max capacity. Any new conversations will remain in the Unassigned view of your help desk.

- In the bottom left, click Save.
Please note: if you've configured availability behavior for when all agents are away and at max capacity, the behavior you specified in the Away tab will take precedence if all agents are simultaneously away or at max capacity.