Last updated: July 7, 2025
Available with any of the following subscriptions, except where noted:
-
 Service Hub
Enterprise
Service Hub
Enterprise
You can create skills for your account's users and then route help desk tickets to users based on their skills. Skills can include languages that your team is fluent in, or custom skills (e.g., a specialization in a specific part of your business).
Please note: To set up skill-based routing, the following requirements must be met:
- You must have connected a channel to help desk.
- You must have Super Admin permissions.
- Any teams or users that you want to assign skills to must have a Service Hub Enterprise seat.
Create and manage skills
To create and manage skills in your account:
- In your HubSpot account, click the settings icon in the top navigation bar.
- In the left sidebar menu, navigate to Routing.
- Navigate to the Skills tab.
- All your current assignable skills will appear to review in the table. By default, HubSpot's supported languages will be listed as skills you can associate with members of your team, either as their main or secondary language.
- To edit a skill, click the Skill name.
-
- Hover over a skill and click Actions, then select from the following options:
- Rename skill: edit the name of the skill.
- Rename category: edit the name of the category:
- See rules with this skill: see which rulesets are assigned the skill.
- See users with this skill: see which users are assigned the skill.
- Hover over a skill and click Actions, then select from the following options:

-
-
- Delete: permanently remove the skill from your account. Skills cannot be deleted if they're currently assigned to a user in your account.
-

- To create a new skill:
- In the top right, click Create skill.
- In the dialog box, click the Category dropdown menu, then select a category.
- Enter a name for the skill.
- To create multiple skills per category, click Add another skill.
- Click Save.

The new skill will appear in the table and will be assignable to users and teams with a Service Hub Enterprise seat.
Assign a skill to a user
To associate a skill with a user:
- In your HubSpot account, click the settings icon in the top navigation bar.
- In the left sidebar menu, navigate to Users & teams.
- Hover over a user, click the Actions dropdown menu, then select Edit user.
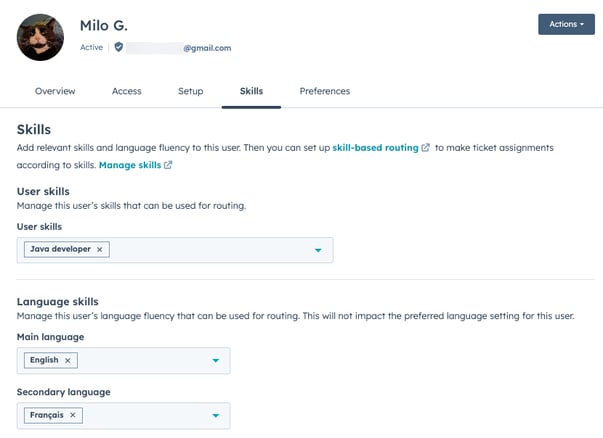
- Navigate to the Skills tab.
- Customize the user's custom skills by clicking the User skills dropdown menu and selecting the checkbox next to any custom skills you've created.
- Set the user's language skills in the Language skills section:
- Click the Main language dropdown menu and select the checkbox next to any language that the user is highly fluent in. This level of fluency implies that the user can handle industry-specific terms or situations where advanced fluency is required.
- Click the Secondary language dropdown menu and select the checkbox next to a language that the user has conversational fluency in. Setting a secondary language implies that the user is comfortable chatting with customers in that language but might not have enough knowledge to help them navigate industry-specific or legal copy where clear communication is important.
- When you're done customizing the skills associated with a user, click Save in the bottom left.
Skill-based routing rules for tickets
After you've configured and assigned skills to users in your account, Super Admins and users with Account access permissions can create routing rules for each channel connected to help desk.
Please note: each channel can have one ruleset.
To create and organize your rulesets and routing rules:
- In your HubSpot account, click the settings icon in the top navigation bar.
- In the left sidebar menu, navigate to Routing.
- Click Create ruleset.
- In the right panel, enter a name for the ruleset, then select a channel.
- Click Next.
- Customize a routing rule within the ruleset:
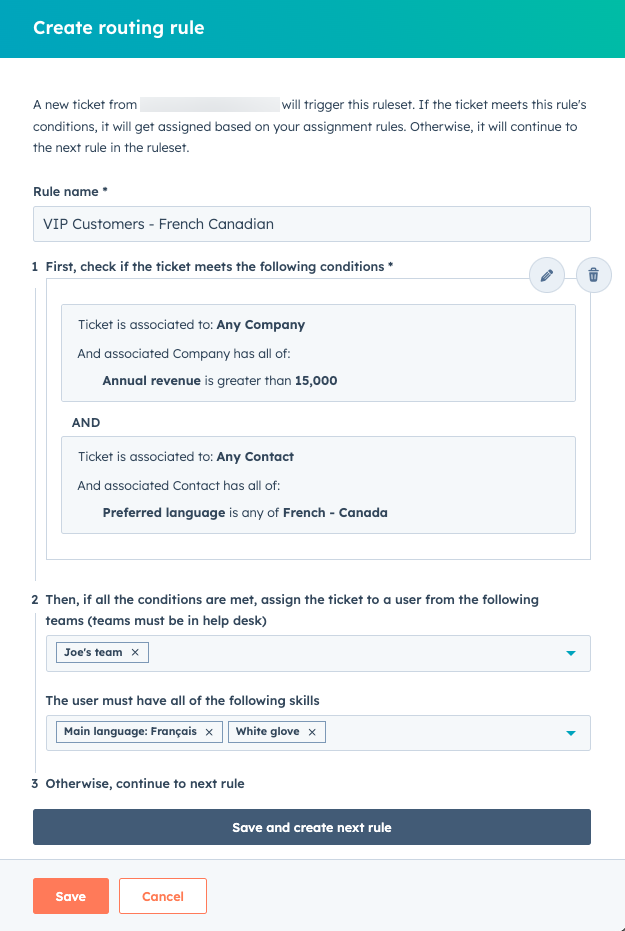
- Enter a rule name.
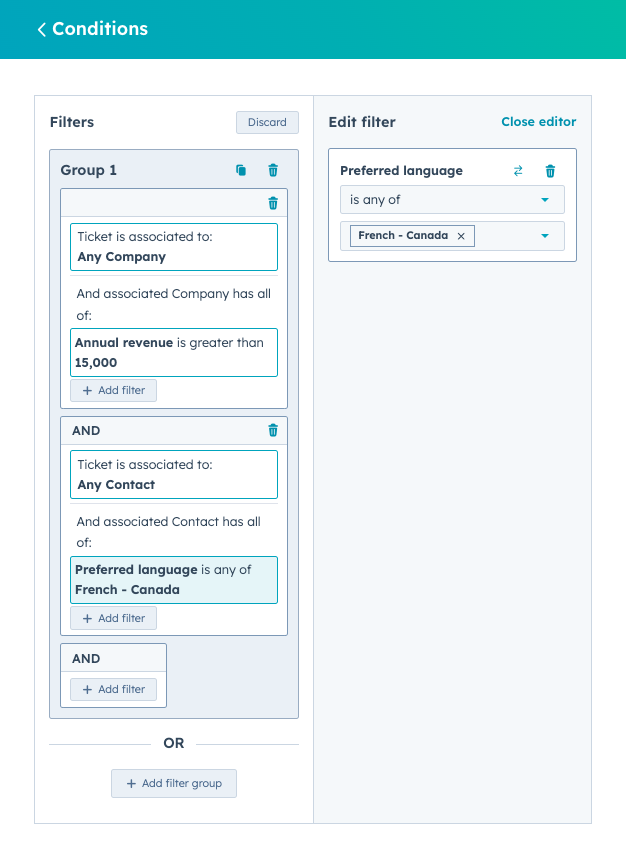
- Click + Add condition to configure which tickets will trigger the rule:
- Add filters based on ticket properties, which can be configured in the Edit filter section after you select a property.
- Filters can be combined within a single filter group by clicking + Add filter under the AND label, or by clicking + Add filter group under the OR label.
- When you combine filters using AND, lists must meet all of the criteria in order to be included in the resulting filter view.
- When you're done, click Save.
-
- Click the Any team dropdown menu and select the checkbox next to any team that the filtered tickets should be routed to.
- Click the Any skill dropdown menu and select the checkbox next to the associated skills of the users you want the tickets to be routed to.
- Both teams and users are optional fields, so it's possible to route based only on skills or only on teams.
- When you're done customizing your rule, you can click Save and create next rule if you want to create a new rule, or click Save in the bottom of the side panel to save your ruleset with the single rule and return to the ruleset page.
Review and edit routing rules
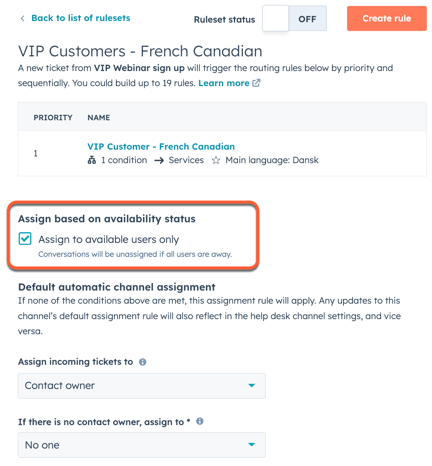
Once you've created a routing rule, the ruleset page will list each rule in a sequential list in priority order.
- These routing rules will execute sequentially: if the conditions of the first rule are not met, the second rule will be tried, and this process will be repeated until all the rules are tried.
- You can edit skill-based routing on both the channel settings page and the ruleset page. If a Super Admin or user with Account access permission changes the default routing rule on the ruleset page, the changes will be reflected on the channel settings page, and vice versa.
- The Assign to available users only setting is synced and applied to the default routing rule on the channel. For example, if you set the default routing rule to Contact owner, it will assign to available contact owners only.
- If no matches are found within a ruleset, the default routing rule will be used.
- You can change the priority order of routing rules on the ruleset page by dragging them into a different order. You can also hover over a rule to edit, clone, or delete the rule.

- To toggle a ruleset on or off, click to toggle the Ruleset status switch on/off.

Analyze your rule performance
You can analyze the performance of your rulesets by reviewing key metrics such as the number and percentage of tickets that matched specific routing rules. This allows you to assess how well your skill-based routing rules are performing and verify that the right tickets are being routed by each rule.
To view rule metrics and history:
- In your HubSpot account, click the settings icon in the top navigation bar.
- In the left sidebar menu, navigate to Routing.
- On the Rulesets tab, click a ruleset.
- In the top right of the table, click View metrics and history.
- In the right panel, you'll see performance metrics for your rules:
- Entered ruleset: the total number of tickets matched by each routing rule.
- Matched any rule: the total number of tickets that matched with at least one rule in a ruleset.
- In the table, view the Priority, Rule Name, Ticket Count, and Percent of tickets that matched a rule.

- To view a rules' history, hover over the rule and click View history.
- To filter tickets by date, click the date picker and select a date range.
- To select another rule, click the Show tickets that matched the rule dropdown menu and select a rule.
- To check if a specific ticket matched the rule, Click the Find one ticket dropdown menu and select a ticket.
Learn more about routing tickets in help desk.
