- Knowledge Base
- Service
- Feedback Surveys
- Create a custom survey using the new survey editor
Create a custom survey using the new survey editor
Last updated: November 12, 2025
Available with any of the following subscriptions, except where noted:
-
Service Hub Professional, Enterprise
Create custom surveys with the new survey editor to collect customer feedback. Use conditional logic to personalize surveys based on responses, link survey fields to properties, and style your surveys to match your brand.
Understand limitations & considerations
- The new survey editor is available for custom surveys using the shareable link delivery method.
- Once a survey has been created with the new survey editor, it can't be changed to the original survey editor.
Create a new custom survey
- In your HubSpot account, navigate to Service > Feedback Surveys.
- Click Create survey in the top right of the page.
- Click Custom survey, and then click Next.
- Click Shareable link, and then click Next.
- Click the New survey editor card, and then click Create survey.
- At the top of the page, click the edit edit icon and enter a survey name.
Add and edit survey fields
Add survey fields to collect customer feedback. Each survey field must be connected with a HubSpot property. To add a question or property to your custom survey:
- In your HubSpot account, navigate to Service > Feedback Surveys.
- Create a new survey or hover over an existing survey and click Edit.
- In the survey editor, click the addIcon Add icon.
- To add a question or property to your survey, click the question or property and drag and it into position in the survey preview.
- To edit survey fields, hover over the field in the survey preview and click the edit edit icon.
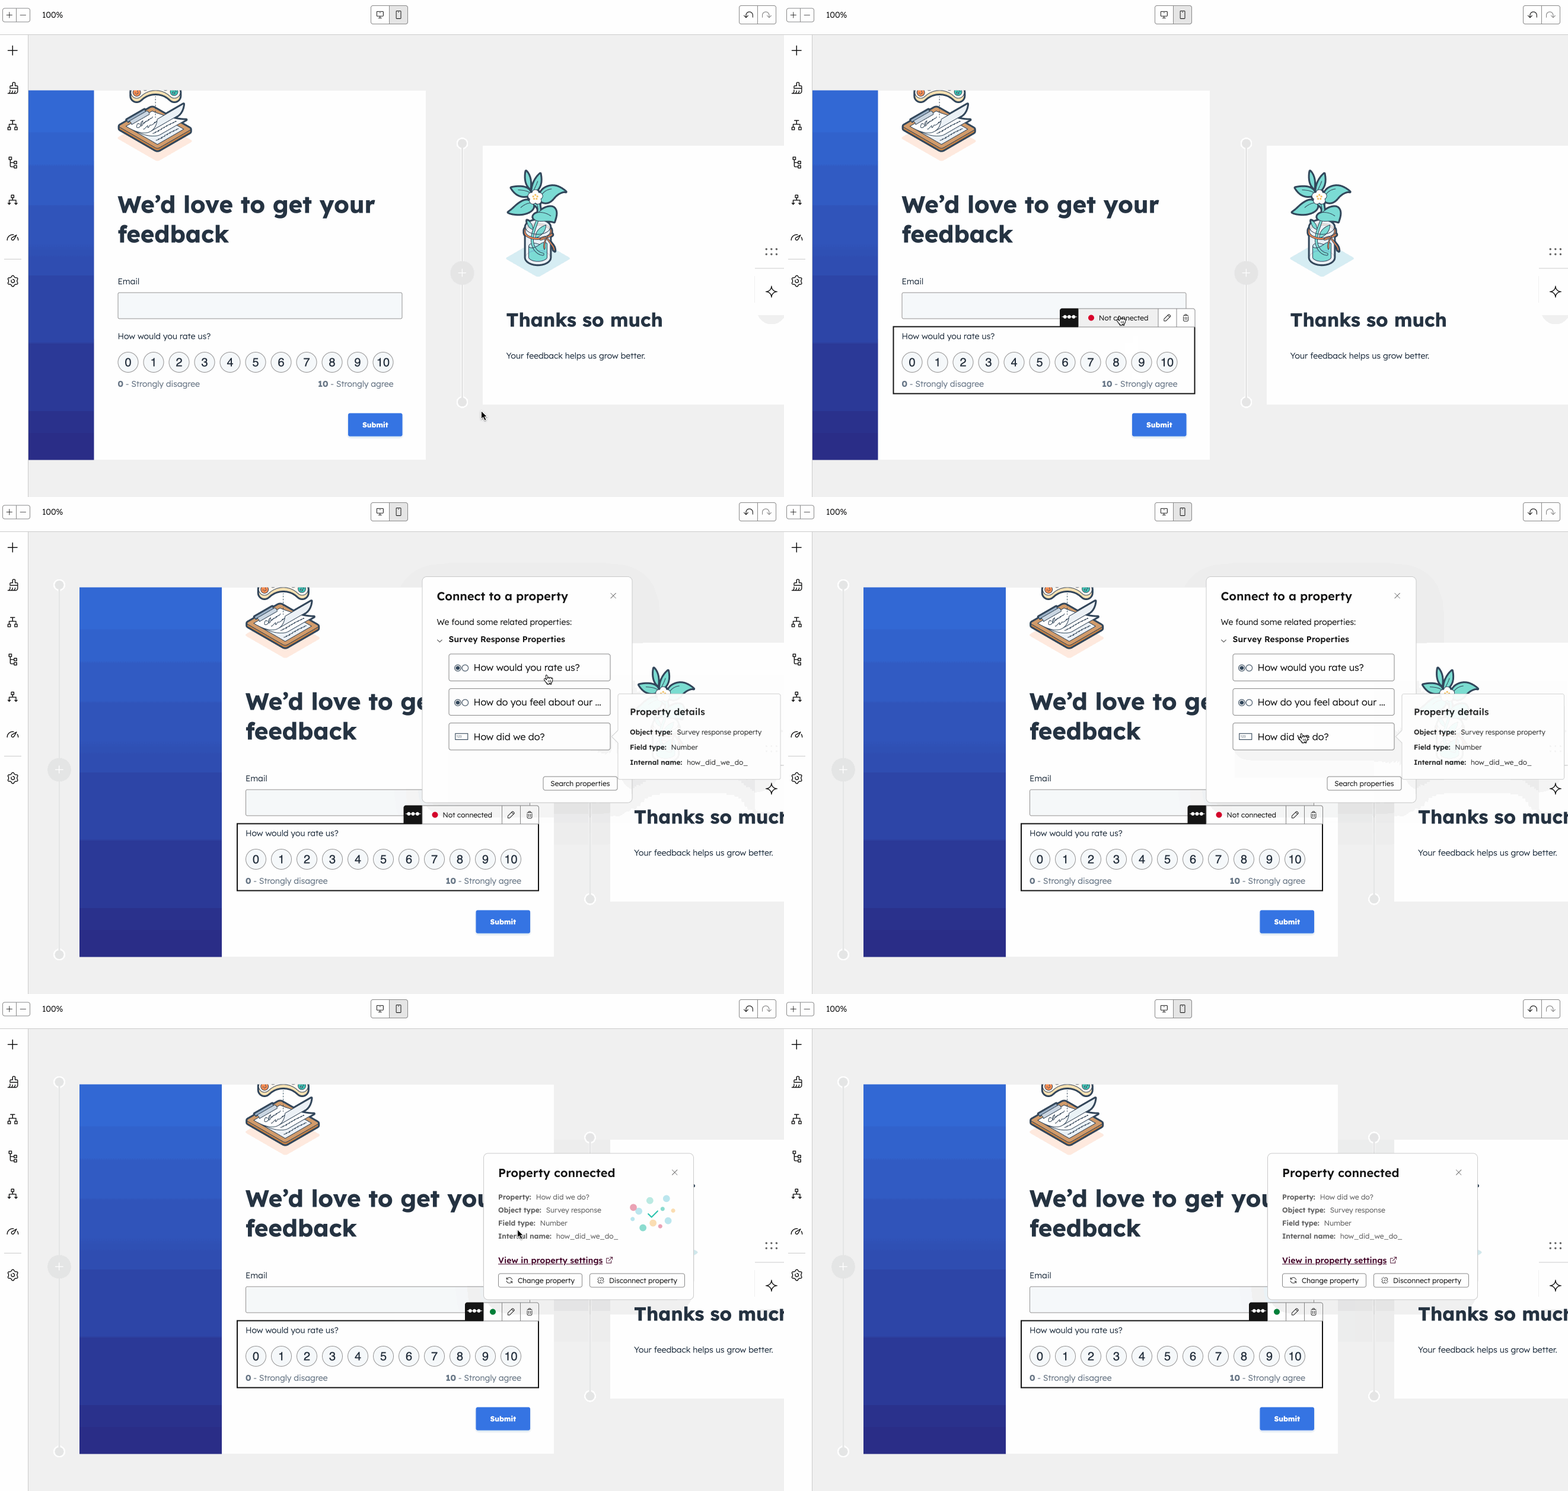
- To connect a property to a survey field, hover over the field in the survey preview and click Not connected. In the pop-up, select a property or click Search properties.
- If you click Search properties, the sidebar editor will expand on the left.
- In the sidebar editor, enter text in the search field.
- Click a survey property to connect it to the survey field.
- To create a new property, click Create new. In the right panel, enter text for the Property label field.
- When finished, click Save.

- To edit a field’s options, hover over the field in the survey preview and click the edit edit icon. In the sidebar editor, click to expand the Field options section. You can add or edit the Question, Placeholder text, Help text, Default value or set it as Required question. The options here may vary depending on the field's property type.
Add additional survey elements
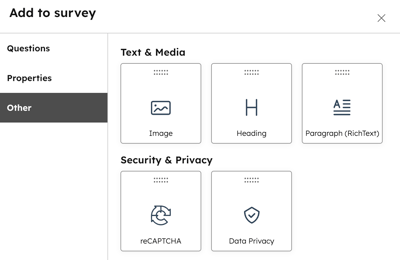
Add additional Text & Media or Security & Privacy to your custom survey.
- In your HubSpot account, navigate to Service > Feedback Surveys.
- Create a new survey or hover over an existing survey and click Edit.
- In the survey editor, click the addIcon Add icon.
- In the left sidebar, click Other.
- Click an element to drag and drop it into position on the survey preview.

Style your custom survey
Customize the text, buttons, headings, and background of your survey fields. Any changes you make here will be shown across all survey steps. It’s not possible to style individual survey steps separately.
- In your HubSpot account, navigate to Service > Feedback Surveys.
- Create a new survey or hover over an existing survey and click Edit
- In the survey editor, click the styles Styling icon.
- Click to expand the desired section you want to edit. The following sections can be expanded:
- Questions: customize the font, size, color, corner rounding, border style/width, and enable padding.
- Buttons: customize the font, size, color, or add a drop shadow, gradient, and padding.
- Paragraph (Rich Text): customize the font, size, color, and opacity.
- Heading: customize the font, color, opacity, and add a drop shadow.
- Background: customize the background color or image, and set a border style. You can also use AI assistants to generate images.
- Progress bar: customize the font, color, size, add a gradient, and set the border style.
Add conditional logic to your survey
Add rules to hide or show important questions, or direct users to a specific step based on their previous answer.
- In your HubSpot account, navigate to Service > Feedback Surveys.
- Create a new survey or hover over an existing survey and click Edit.
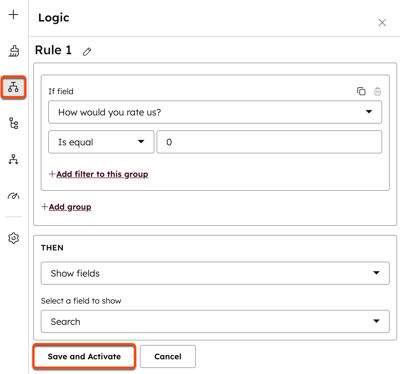
- In the survey editor, click the conditionalIcon Logic icon.
- Click Add logic. If you’ve included certain questions (e.g., CSAT or NPS) on a survey, default conditional logic rules will automatically apply.

- To add filters to a group within a rule, click + Add filter on this group.
- To add a new group to a rule, click + Add group.
- If you’ve added multiple filters or groups to a rule, click the AND OR dropdown menu between the filters and groups to apply AND or OR logic.
- In the Then section, click the dropdown menu to select on-form actions. You can choose from the following:
- Show fields: if the user's responses match the criteria set in your rules, show a specific field.
- Hide fields: if the user's responses match the criteria set in your rules, show a specific field.
- Skip to step: if the user's responses match the criteria set in your rules, skip to a specific step. To use this option, the survey must have at least three steps.
- When finished, click Save and Activate.
Manage conditional logic rules
- In your HubSpot account, navigate to Service > Feedback Surveys.
- Create a new survey or hover over an existing survey and click Edit.
- In the survey editor, click the automationsIcon logic icon.
- To add another rule, click Add logic.
- To edit a rule, hover over a rule to click the Actions dropdown menu and select Edit.
- To delete a rule, hover a rule to click the Actions dropdown menu and select Delete. In the dialog box, click Delete rule.
Add and edit survey steps
Create multi-step surveys to break surveys into smaller, more manageable sections.
- In your HubSpot account, navigate to Service > Feedback Surveys.
- Create a new survey or hover over an existing survey and click Edit.
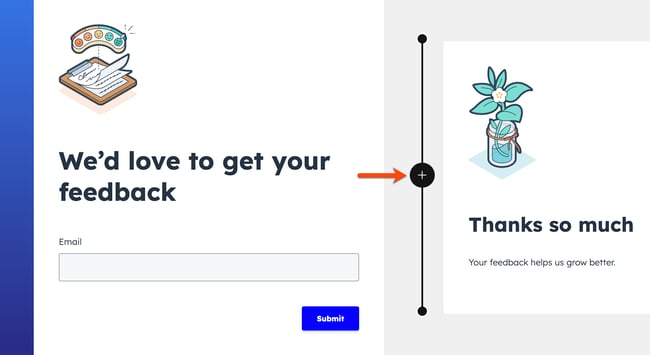
- In the survey preview, hover between two existing steps and click the + Add icon. A new step section will appear. Then you can manage survey fields and additional survey elements in the sidebar editor.

- To rearrange the order of a step, hover over the step. Then in the top left of the step, click to drag and drop the Step [#] to a new position.
- To clone a step, hover over the step and click the duplicate clone icon. You can't clone steps that include an email, reCAPTCHA, or data privacy fields.
- To delete a step, hover over the step and click the delete delete icon.
Edit the layout
Choose from predefined step layouts using the quick layout switcher and customize your survey background banner.
- In your HubSpot account, navigate to Service > Feedback Surveys.
- Create a new survey or hover over an existing survey and click Edit.
- In the survey preview, click a step. This will expand the survey editor on the left.
- To turn on the progress bar, click the Options tab and toggle the Progress bar switch on. This will add the progress bar to all survey steps.
- To edit the step layout, banner background, and progress bar, click the Style tab.
- In the Step layout section, select the desired layout card. To remove the layout, click Remove layout in the top right.
- In the Banner background section, toggle the Background color switch on to select a color, gradient, or opacity. To include an image, click Upload or Browse images. You can also click Generate with AI to use AI assistants to generate images.
Automate your survey
If you’ve added an NPS or CSAT question to your survey, you create a workflow to automate your follow-up actions.
- In your HubSpot account, navigate to Service > Feedback Surveys.
- Create a new survey or hover over an existing survey and click Edit.
- In the survey editor, click the Follow-up automation icon.
- Click Create new workflow. You'll be directed to the workflows tool to set up your workflow.
Customize survey settings
Configure the survey's settings, including user notification settings and what happens to the corresponding contact after they respond to the survey.
- In your HubSpot account, navigate to Service > Feedback Surveys.
- Create a new survey or hover over an existing survey and click Edit.
- In the survey editor, click the settings Settings icon.
- On the General tab, toggle the Set contacts created as marketing contacts switch on to automatically set any contacts who have responded to this survey as marketing. This includes both new and existing contacts.
- To customize response settings, in the left panel, click the Response settings tab. You can select one of the following options:
- Send to contact owner: automatically send a notification to the contact's owner. If a contact has no owner, no notifications will be sent. Learn more about object ownership in HubSpot.
- Send to other users: select the dropdown menu to select the default teams or individuals to send survey response email notifications to, regardless of contact ownership.
Preview and publish a custom survey
After creating or updating your custom survey, review and publish your survey to make the changes live. Then, share it as a standalone page with a share link.
- In your HubSpot account, navigate to Service > Feedback Surveys.
- Create a new survey or hover over an existing survey and click Edit.
- To preview a survey, click Preview in the top right of the survey editor.
- To publish a survey, click Review and publish or Review and update.
- To share a survey, click Share. In the dialog box, click Copy to copy the survey's page URL to your device's clipboard. Then in a browser window, paste the survey's page URL in the address bar. You can also share the survey page URL directly with others to give them access to the survey.