
Last updated: May 2, 2024
Available with any of the following subscriptions, except where noted:
|
|
Use the Microsoft Dynamics 365 integration with HubSpot to sync Microsoft Dynamics 365 objects with HubSpot records to keep information between the two systems up-to-date. With this integration, you can create Microsoft Dynamics sales orders from a deal record or through a workflow. If you have a paid Operations Hub subscription, you can also create custom field mappings between the two systems.
App requirements
- You must be a super admin or have App Marketplace Access permissions in your HubSpot account.
- You must have Read permissions for records in Microsoft Dynamics 365.
- To set up a two-way sync, you must have Read and Write permissions for each record type in Microsoft Dynamics 365.
Connect the app
- In your HubSpot account, click the Marketplace icon in the top navigation bar, then select App Marketplace.
- Search for the Microsoft Dynamics 365 integration, and select Microsoft Dynamics 365 in the results. In the top right, click Connect app.
- Enter your Microsoft Dynamics 365 subdomain and click Install app.
It is possible to connect two instances of Microsoft Dynamics 365 to HubSpot. Both instances will have the same syncing capabilities.
- In your HubSpot account, navigate to Reporting & Data > Integrations.
- Click Microsoft Dynamics 365.
- Click Actions > Manage accounts.
- In the right panel, click Connect another account.
Turn on the sync
After connecting the app you will need to turn the sync on. You can configure a one-way or two-way sync for your data.
- In your HubSpot account, navigate to Reporting & Data > Integrations.
- Click Microsoft Dynamics 365.
- Click Set up your sync.
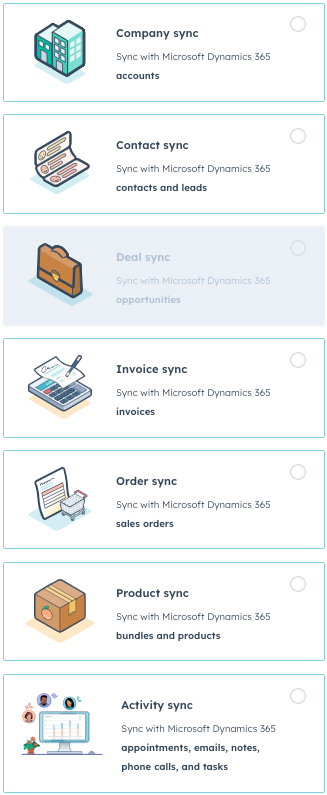
- Select the object you want to sync between HubSpot and Microsoft Dynamics 365. You can sync the following object types:
| HubSpot object | Microsoft Dynamics 365 object | |
| Company | Account | |
| Contact | Contact and Lead | |
| Deal | Opportunity | |
| Product | Bundles and Products | |
| Meetings | Appointments | |
| Notes | Notes | |
| Tasks | Tasks | |
| Invoice | Invoice | |
| Order | Sales orders | |
| Emails | Emails | |
| Calls | Phone calls |
- Click Next.
Turn off data sync
- In your HubSpot account, navigate to Reporting & Data > Integrations.
- Click Microsoft Dynamics 365.
- Click Actions > Turn off sync.
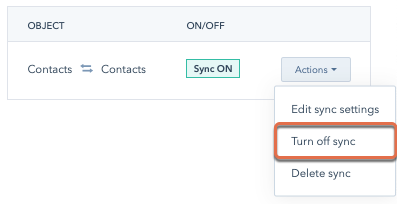
- In the pop-up box, click Turn off sync.
Once the sync has been turned off, you can turn it on again by clicking Edit sync settings, or delete the sync.
Create a Microsoft Dynamics sales order from a deal record
You can also manually create a Microsoft Dynamics sales order from a HubSpot deal record:
- In your HubSpot account, navigate to Sales > Deals.
- On the Sales Orders card, click Add > Create a Microsoft Dynamics sales order.
- On the Account tab, select the Microsoft Dynamics and custom form to create a sales order.
- Click Next.
- On the Customer tab, select the customer you want to create a sales order for.
- Click Next.
- On the Order tab, add sales order properties based on your chosen custom form type.
- On the Review tab, review the sales order and make any necessary edits.
- Click Create sales order.
Please note: if the line item price is changed on a HubSpot deal record, this will not sync to the created Microsoft Dynamics 365 sales order.
Create a Microsoft Dynamics sales order using deal-based workflows
Use deal-based workflows to automatically create Microsoft Dynamics sales orders when the workflow is triggered (Sales Hub Professional or Enterprise only).
- In your HubSpot account, navigate to Reporting & Data > Integrations.
- Under Connected Apps, click Microsoft Dynamics 365.
- Click the Feature Discovery tab.
- In the Create Microsoft Dynamics 365 sales orders from HubSpot section, click Install workflow action.
- In your HubSpot account, navigate to Automations > Workflows.
- To edit an existing workflow, hover over the workflow, then click Edit. Or, learn how to create a new deal-based workflow.
- In the workflow editor, click the + plus icon to add an action.
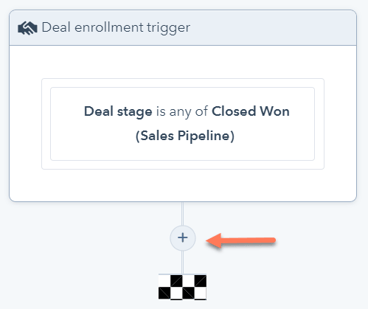
- In the actions panel, scroll down and select Create a Microsoft Dynamics 365 sales order.
- Set up your Microsoft Dynamics 365 sales order, the following fields are required:
- Microsoft Dynamics 365 account: a list of connected Microsoft Dynamics 365 accounts will display, select an account to create the sales order.
- Subsidiary: a list of subsidiaries associated with the selected Microsoft Dynamics 365 account will display, select a Subsidiary to create the sales order.
-
- Customer: select either Use first associated HubSpot contact or Use first associated HubSpot company to set as the designated Customer for the sales order.
- Items: set the deal's associated line items as the Items for the sales order.
- To add another field to the sales order, click Add another field and select a field.
- To populate the field with property values from the enrolled deal record, click Deal in this workflow. Then, select a property.
- To populate the field based on other actions in the workflow, click the action name and select an option. You can populate fields based on an action's outcome, or outputs from the action.
- To remove a field from the sales order, click the delete icon next to the field.
