- Knowledge Base
- Account & Setup
- Integrations
- Customize Breeze agents with HubSpot MCP Client
BetaCustomize Breeze agents with HubSpot MCP Client
Last updated: November 6, 2025
Available with any of the following subscriptions, except where noted:
With HubSpot MCP Client, you can connect your Breeze agents in Breeze Studio to external systems using the Model Context Protocol (MCP). This enables agents to access live data and carry out actions in various supported applications from within HubSpot Breeze Studio, without the need to write code or manage complex integrations.
For example, you can use data from deal status changes in HubSpot to draft documents in Notion or automatically generate follow-up tasks in Asana.
Supported MCP Servers
HubSpot MCP Client supports the following MCP Servers and actions:
- Notion: query and update databases and pages.
- Atlassian: retrieve and interact with Jira issues and Confluence content.
- Asana: view and manage tasks, projects, and timelines.
- Zapier: trigger and monitor automations across apps.
Please note: each supported MCP Server has its own configuration requirements and capabilities. It’s recommended that you review the information on the website for each supported MCP Server above.
Connecting Breeze Agent with HubSpot MCP Client
The process for connecting HubSpot MCP Client may vary slightly depending on the MCP Server you want to connect to. For example, some MCP Servers (such as Notion and Asana) use an OAuth-based connection, while others (such as Zapier) use a tokenized URL connection.
OAuth-based connection (Notion, Atlassian, Asana)
OAuth is the standard way to connect HubSpot to an MCP Server. This process may vary slightly between MCP Servers but generally follows these steps:
- In your HubSpot account, navigate to Breeze > Breeze Studio.
- On the Agents tab, click the name of the agent you want to edit.
- In the top right, click Configure agent.
- In the top right, click Clone to clone the agent.
- Back on the Agents tab, click the name of your cloned agent.
- In the top right, click Configure agent.
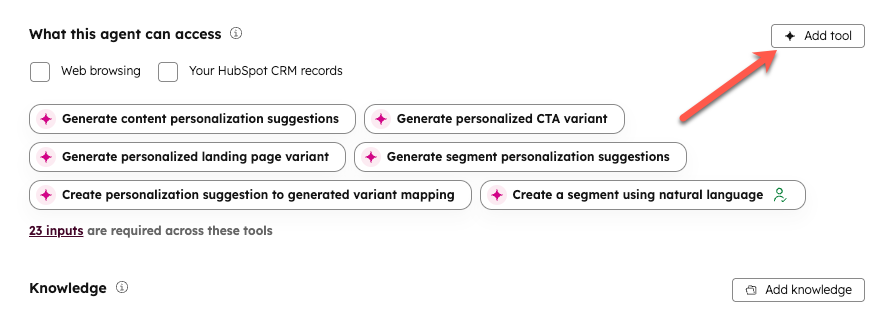
- In the What this agent can access section, click Add tool.

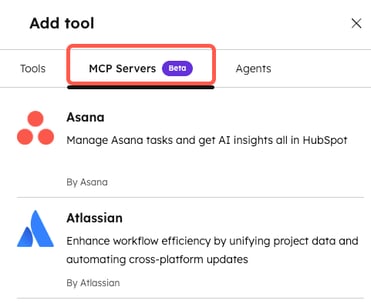
- In the right panel, click the MCP Servers tab.

- Hover over the MCP Server you want to connect. Then click Connect and add.
- Follow the on-screen prompts to authorize the connection.
Tokenized URL connection (Zapier)
Some MCP Servers, like Zapier, allow you to configure your own set of tools rather than a standard group. For these connections, you'll need to supply a custom URL provided by the vendor.
- Navigate to the Zapier MCP page.
- In the top left, click + New MCP Server.
- Click the MCP Client dropdown menu and select Other.
- Enter a name for the MCP Server in the Name field.
- Click Create MCP Server.
- In the Tools section, select the tools you want the MCP Server to use.
Please note: while MCP connections offer a wide range of tools, it’s recommended that you select only the few tools that are needed for your agent's tasks.
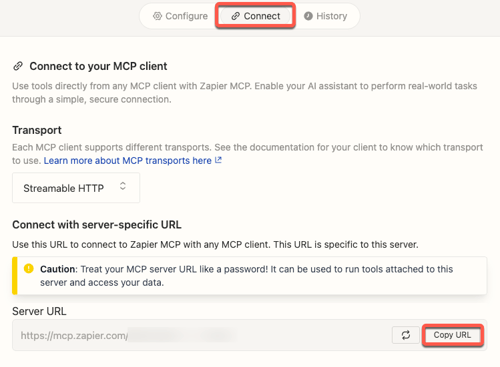
- At the top of the page, click the Connect tab.
- In the Transport section, ensure that Streamable HTTP is selected.
- In the Connect with server-specific URL section, click Copy URL next to the Server URL.

- Back in your HubSpot account, navigate to Breeze > Breeze Studio.
- In the Agents tab, click the name of your cloned agent.
- In the top right, click Configure agent.
- In the What this agent can access section, click Add tool.
- In the right panel, click the MCP Servers tab.
- Hover over Zapier and click Connect and add.
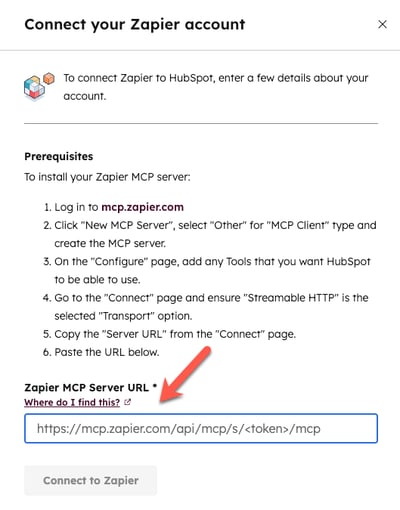
- In the pop-up window, in the Zapier MCP Server URL field, paste the Server URL you copied from Zapier.

- Then click Connect to Zapier.
Next steps
After setting up HubSpot MCP Client, learn more about configuring prompts for your agent.