Last updated: June 3, 2026
Available with any of the following subscriptions, except where noted:
Use credit memos to reduce or adjust the amount owed on an existing invoice. Credit memos help you document and track credits owed to customers, such as refunds, billing adjustments, or invoice corrections, so your financial records remain accurate.
Create credit memos from open invoices or from the credit memos index page. After applying a credit memo to an invoice, you can edit or remove it from the invoice.
Before you get started
Before you begin working with this feature, make sure to fully understand the considerations when using credit memos with invoices.
Understand limitations and considerations
The amount of the credit memo is applied to open and paid invoices in the following ways:
- Open invoices: the credit memo amount is subtracted from the invoice balance due. Any remaining credit amount is moved to the customer balance.
- Paid invoices: the full credit memo amount is moved to the customer balance.
Please note: if the customer is due a refund, you should issue a refund via the payments index page.
Create credit memos
Permissions required Super Admin permissions or Edit permissions for credit memos are required to create credit memos.
Create credit memos from an existing open invoice, or from the credit memo index page.
Create credit memos from an invoice
When creating credit memos from an invoice, the invoice details are automatically added to the credit memo. Credit memos created from an invoice can't be saved as a draft. If automated sales tax is applied to the invoice:
-
The invoice tax amount is automatically adjusted.
-
The tax is reduced based on how much of the original invoice is being credited
-
The tax adjustment can’t exceed the amount of tax originally charged on the invoice. This prevents the invoice from showing a negative tax balance.
- The Tax rate column is hidden and order-level discounts, fees, and taxes can't be adjusted.
To create a credit memo from an open invoice:
- In your HubSpot account, click More, then navigate to Commerce > Invoices. If More doesn't appear in your account, navigate to Commerce > Invoices directly.
- Click the invoice number.
- In the right panel, in the upper right, click Actions, then select Create credit memo.
- Configure the credit memo. Credit memos created from an invoice can't be saved as a draft.
Create credit memos from the index page
When creating credit memos from the credit memos index page, you must manually apply the credit memo to an invoice. If automated sales tax is applied to the invoice, the tax isn't automatically adjusted. If you require the automated sales tax to be automatically adjusted, create a credit memo from an invoice instead.
- In your HubSpot account, click More, then navigate to Commerce > Credit Memos. If More doesn't appear in your account, navigate to Commerce > Credit Memos directly.
- In the upper right, click Create credit memo.
- Configure the credit memo. Click Save in the upper left to save the credit memo as a draft. Edit drafts from the credit memo index page.
Configure credit memos
If the credit memo was created from the credit memos index page, save the credit memo as a draft at any time by clicking Save in the upper left. Draft credit memos can be managed from the credit memo index page.
Select a brand
If you use Brands, you can assign a credit memo to a brand, helping separate credit memos for different businesses. Learn more about using Brands.
Once a brand is selected:
-
The credit memo inherits the logo, colors, and fonts from the brand kit of the brand.
- The Brands column will be visible on the credit memos index page.
To update the brand:
- Click the Brand name in the upper right.
- Click the Brand dropdown menu and select a brand.
- Click Apply.

Set up credit memo billing
Associated a contact with the credit memo
- Click Add contact.
- In the right panel, search for and select a contact to add it to the credit memo. Or, click the Create new tab to create a new contact record to add to the credit memo. Enter the contact details and click Create.
- To edit the contact details, hover over the contact and click the edit icon. Update the contact details in the right panel and click Save. Editing the contact details will update the contact record in the CRM.
- To replace the contact, hover over the contact and click the replace icon. Select a new contact in the right panel. Or, click the Create new tab to create a new contact record to add to the credit memo. Enter the contact details and click Create.
- During creation, each credit memo can be associated with one contact. Once created, you can add additional contacts using the associations in the right sidebar.
Associate a company with the credit memo
If the contact is associated with a company, the company will automatically be added. To associate a company manually:
- Click Add company.
- In the right panel, search for and click a company to add it to the credit memo. Or, click the Create new tab to create a new company record to add to the credit memo. Enter the company details and click Create.
- To edit the company details, hover over the company and click the edit icon. Update the company information in the right panel and click Save. Editing the company will update the company record in the CRM.
- To replace the company, hover over the company and click the replace icon. Select the company in the right panel. Or, click the Create new tab to create a new company record to add to the credit memo. Enter the company details and click Create.
- To delete the company from the credit memo, hover over the company and click the delete icon.
- During creation, each credit memo can be associated with one company. Once created, you can add additional companies using the associations in the right sidebar.
Add a billing and shipping address to the credit memo
- If you've added a company, under Billing address and Shipping address, select the Same as company address checkboxes to use the same address as the company record for billing and shipping.
- To add different addresses, clear the Same as company address checkboxes and click Edit address. In the right panel, enter the address details and click Save.
- After adding a shipping address, to edit it, under Shipping address, click Edit.
- After adding a shipping address, to delete it, under Shipping address, click Delete.
Add a date and PO number to the credit memo
- In the upper right, under Credit memo date click the date picker and select a date.
- In the upper right, in the PO number field, enter a PO number.
Add line items
In the Line items section of the credit memo editor, you can add line items and include discounts, taxes, and fees. Learn more about line items and how they're used in HubSpot.
To add line items:
- Click the Currency dropdown menu and select a currency. Learn more about supported currencies.

- Click Add line item above the line items table in the upper right, then select one of the following:
- Select from product library: add a line item based on a product in your product library, including line items created using the Shopify integration.
- Search by product name, product description, or SKU. Click Advanced filters to refine your search.
- Select the checkboxes next to the products you want to add, then click Add. The products in your product library won't be affected.
- Create custom line item: if you have Create custom line items permissions, this option creates a new custom line item unique to the credit memo.
- In the right panel, under Line item information, enter the line item details.
- If you've set up tax rates in your tax library, under Adjustments and Tax, click the Tax rate dropdown menu and select a rate.
- Under Price, select the pricing model, and enter the unit price, quantity, and unit cost.
- Select the Save line item to the product library checkbox to add the custom line item to your product library. Learn more about adding products to your product library.
- Click Save, or Save and add another.

- Select from product library: add a line item based on a product in your product library, including line items created using the Shopify integration.
- To add taxes to individual line items, click the Tax rate dropdown menu and set tax rates on line items. Tax amount updates automatically. If you can't see the Tax rate column, click Edit columns.
- Select the Tax rate checkbox. To re-order a column, click the drag handle and move it to the desired position.
- Click Save.
- You can edit the columns displayed in the line item table, or if you're a Super Admin, you can set which columns to display to all users by default. Learn how to edit columns.
- Edit individual line item details in each column, such as unit price, quantity, or unit discount. Enter the updated value in the corresponding column. Learn more about unit discounts.

- To edit, clone, or delete a line item, hover over the line item, click Actions, then select an option:
- Edit: edit the line item for this credit memo only. The product library isn't affected.
- Delete: delete the line item from the credit memo.
- Clone: create a new line item with the same details.
- To reorder the line items, click and drag a line item using the drag handle.
Add one-time discounts, fees, and taxes
In the Summary section, you can add one-time discounts, fees, and taxes to the credit memo subtotal. Learn more about discounts. You can also add tax rates to use across your products and services, rather than adding one-time taxes to your subtotal.
- To add a one-time tax, fee, or discount, click + Add discount, fee, or tax then select an option.
- Enter a name for the discount, fee, or tax and a value in the text field. The tax, fee, or discount value can be based on a specific amount, or a percentage (%) of the total.
- To delete a discount, fee, or tax, click the delete icon to the right of it.
Please note:
- While the ability to add a tax, fee, or discount lives in HubSpot, your legal and accounting teams are the best resource to give you compliance advice for your specific situation.
- Up to six decimal places are supported when setting a line item's unit price in any currency and discounts are rounded based on the currency's precision at checkout. For example, if a line item is $11.90 USD and a 15% discount is applied, the $1.785 discount is rounded to $1.79. The buyer pays a total of $10.11.
Review the summary
Review the subtotal, applied taxes, discounts, and fees in the Summary section.

Add comments
Add notes for your buyer in the Comments field, such as payment terms or legal information.
Use the text options at the bottom of the text field to format your text, add a hyperlink, or insert a snippet (you can use snippets to create pieces of text. For example, if you regularly use the same terms on a credit memo, you could create it as a snippet to use each time you're adding comments to a credit memo).
Advanced settings
- Click to expand the Advanced settings section to set the language, locale, domain, and content slug of the credit memo.
- By default, the language used for titles and labels on the page is set to English. To change the language, click the Language dropdown menu then select a language. Titles, labels, and the credit memo currency will be displayed in the selected language.
- By default, the date and address format will use United States format. To change the format, click the Locale dropdown menu then select a country.
- To set a custom credit memo URL using any of your connected domains, click the Domain dropdown menu, then select a domain. To use a custom slug, in the Content slug field, enter a custom slug. A preview of the credit memo URL is displayed below the URL fields.
Preview and finalize a credit memo
Finalized credit memos are assigned an auto-generated number. The next number in the sequence is the number after the current highest finalized credit memo number. The number sequence can't be customized.
- Click Preview in the upper right to see how the credit memo will appear to the buyer. The credit memo will use the logo and colors of your brand, if you're using the Brands add-on, or the logo and colors set in your branding settings.
- To finalize the credit memo, click Create in the top right.
Apply a credit memo to an invoice
Permissions required Super Admin permissions or Edit permissions for credit memos are required to apply, edit, or remove a credit memo on an invoice.
If you created a credit memo from the index page, apply it to an invoice to keep records accurate and billing organized. Once a credit memo has been applied, you can edit or remove it from the invoice.
Please note: credit memos created from an invoice are automatically applied to that invoice.
Before you apply a credit memo to an invoice, keep in mind:
- Credit memos can't be applied to paid or voided invoices.
- The credit memo and the invoice must share the same billing contact.
- If automated sales tax is applied to the invoice, the tax isn't automatically adjusted. If you require the automated sales tax to be automatically adjusted, create a credit memo from an invoice instead.
- Credit memos can create a customer balance that can be applied to future invoices. When a customer balance is applied to a future invoice, the invoice balance due decreases, but the invoice tax amount is not recalculated.
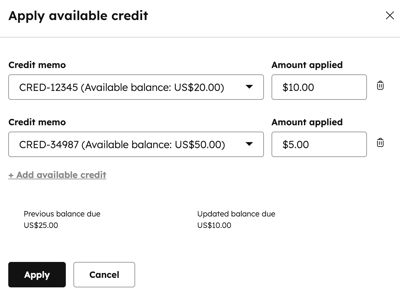
To apply a credit memo to an invoice:
- In your HubSpot account, click More, then navigate to Commerce > Invoices. If More doesn't appear in your account, navigate to Commerce > Invoices directly.
- Click the invoice number of the invoice.
- In the right panel, in the upper right, click Actions, then select Apply or manage credit.
- In the dialog box:
- Click + Add available credit.
- If more than one credit memo is available for the billing contact, click the Credit memo dropdown menu and select a credit memo.
- In the Amount applied field, enter the amount of credit. Credits can be for a partial or full amount of the invoice.
- To add another credit memo, click + Add available credit. To remove a credit memo, click the delete icon next to it.
- Click Save changes.
- Use the send invoice dialog box to send, download, or copy the link for the updated invoice.
Next steps
Learn how to:
- Manage credit memos including editing draft credit memos, managing applied credit memos, voiding, deleting, and exporting credit memos, and associating finalized credit memos with other records.
-
Manage invoices including editing, voiding, deleting, tracking, and exporting.
- Manage payments, including issuing refunds, resending receipts, downloading reports of your payments and payouts, exporting payment data, and more.
