- Knowledge Base
- Commerce
- Payments
- Manage payments
Manage payments
Last updated: January 5, 2026
Available with any of the following subscriptions, except where noted:
After you set up HubSpot payments or connect your Stripe account as a payment processing option, start collecting payments in HubSpot using invoices, payment links, quotes, legacy quotes, and subscriptions. You can also record manual payments on invoices without connecting a payment processor, while integrations, such as QuickBooks Online, will also record payments where applicable.
When you collect a payment through any of those methods, the payment details are stored in a payment record in HubSpot. Learn more below about managing your collected payments, including how to issue refunds, resend receipts, and download reports of your payments and payouts.
Permissions required Super Admin or Manage payments and subscriptions permissions are required to manage payments. Users with Manage payments and subscriptions access can view transaction and payout history, download payment and payout reports, resend receipts, cancel subscriptions, and issue refunds.
Please note: HubSpot payments is HubSpot's payment processing option and is only available to companies based in the United States, the United Kingdom, and Canada, who are in a Starter, Professional, or Enterprise account. Stripe payment processing is available for all subscriptions, and available internationally, with some exceptions. You can connect your existing Stripe account.
Collect payments
When a payment is processed, the following will occur:
- You'll receive a payment notification. If you don't want to receive notifications for completed payments, you can turn off email notifications for payments in your notification settings.

- The buyer will receive a copy of their receipt in their email inbox. The receipt displays in the language set in the buyer's Preferred language property. Learn more about the buyer checkout experience.
Please note:
- For recurring payments, the buyer receives a receipt each time they are charged. You will only receive a notification for the first payment made. You can use workflows to send internal notifications for subsequent payments.
- Notifications and receipts are only sent for payments collected via HubSpot Payments or Stripe payment processing, not other integration sources, such as QuickBooks Online.
- If the payment was against an invoice, the invoice will be attached as a PDF to the payment receipt.
- If the setting to create invoices is turned on, an invoice will be created in your account for payments from payment links, quotes, or subscriptions. The buyer will receive a copy of the receipt in their inbox, with the invoice attached as a PDF.
- A payment record will be created and associated with the relevant contact, company, subscription, invoice, and deal record. You can also access your payment records on the payments index page.
- A contact record will be created using the email address the buyer enters at checkout if no matching record exists.
- If your subscription includes marketing contacts (for example, contacts you email or target with ads), new contacts will automatically be set as marketing contacts. You can create a workflow to set existing contacts as marketing contacts upon payment.
- If you don't want contacts making payments to be set as marketing contacts, learn how to set contacts as non-marketing, including creating a workflow to automate that process.
Please note: the payments tool is intended for use in standard online payment transactions, and does not support the collection of sensitive payment information from your buyers orally or by phone. If you’ve submitted a payment on behalf of a buyer, it can result in the payment being associated with the wrong contact. This is because you’ve filled out a HubSpot form previously and are submitting the payment using a non-private browser window, which results in HubSpot using your existing cookies to associate the payment. To fix incorrectly associated payments, navigate to the payment record and update the associated contact record.
- A deal record will be created in your HubSpot account. The deal amount will be updated to the payment total, including any applied discounts. For recurring payments, a new deal record will not be created every time recurring payments are processed. Those payments are displayed on the subscription record.
- When a buyer purchases recurring line items using a payment link, quote, or legacy quote:
- HubSpot will create one subscription record when recurring line items share the same payment frequency and term length. For example, if a buyer purchases two monthly subscriptions with a one-year term length, HubSpot will group both recurring line items in the same subscription record. The subscription will be associated with the contact and deal record.
- HubSpot will create separate subscription records when recurring line items have different payment frequencies or term lengths. For example, if a buyer purchases one monthly and one annual subscription with a one-year term length, HubSpot will create two subscription records. The subscriptions will be associated with the contact and deal record.
- The buyer will be charged every billing cycle per the terms set on the quote or payment link, and they will be notified each time they are charged. You can also turn on reminder emails to notify the buyer 14 days before their next subscription payment. The associated subscription properties will also be updated in HubSpot. Learn more about managing subscriptions.
- An invoice will be created for each recurring payment, if the setting to create invoices is turned on in settings.
- As payment activities occur, such as a payment being submitted or refunded, the activities will automatically display on the payment's associated contact, deal, and company records.
Receive payouts
Payouts are the funds deposited into your bank account from your collected payments each day, minus any fees, refunds, or chargebacks.
- If you're using HubSpot payments, you can view payouts in HubSpot.
- If you've connected Stripe as a payment processing option, payout information won't display in your HubSpot account. Instead, download and manage payment reports in Stripe.
HubSpot will send a daily payout notification email that includes the payout total. Processing times differ by method:
- For card payments, processing time is two business days. During this time, the status will be Processing.
- For bank debit methods, such as ACH, the processing times vary. During this time, the status will be Processing:
- ACH: up to four business days to debit a buyer's bank account.
- BACs: up to five business days to debit a buyer's bank account.
- PADs: up to five business days to debit a buyer's bank account.
- SEPA: up to 14 business days to debit a buyer's bank account.

If there are days where the daily payout total is less than the refunds or chargebacks processed that day, HubSpot will debit your bank account to cover the difference. On these days, you'll receive a payout email from HubSpot that includes the amount debited from your account.

Learn more about auto-debiting and paused payouts in Stripe's documentation, HubSpot's partner for processing payments when using HubSpot payments.
Download payment reports
Please note: if you've connected Stripe as a payment processing option, the Payouts tab won't display in your HubSpot account. Instead, download and manage payment reports in Stripe.
Download reports that include your payment or payout details, as well as a payment reconciliation report to CSV, XLS, or XLSX. It isn't possible to export to PDF. You can also export payment records.
- In your HubSpot account, click the settings settings icon in the top navigation bar.
- In the left sidebar menu, navigate to Payments Account.
- At the top, click the Payouts tab. You can view your payout history, including individual payments and their statuses.
- To view more details about a payout, click the payout date to view the details in the right panel.
- To download a report of your account's payments or payouts, in the upper right, click download Download reports, then select one of the following report types:
- Payment reconciliation: view a list of payouts with itemized payment details. The report includes the transactions included in each payout, such as payments, refunds, and fees, in descending order. The report includes the ID, reporting category, customer name and email, payment ID, associated invoice number, payout ID, and payout status.
- Payment details: view all buyer transactions, such as one-time and recurring payments, refunds, transactional fees, and disputes. The report includes the balance transaction ID, reporting category, description, customer name and email, payment ID, and associated invoice number.
- Payout details: view all of the buyer payments that are included in your daily payout total, including the payout ID, balance transaction ID, and payout expected arrival date.
- In the dialog box, click the File format dropdown menu and select a format, then click Export. The export will be emailed to you and you'll be notified in-platform when the export is ready.
View payment records
When you collect a payment in HubSpot, the payment details are stored in a payment record on the payments index page.
Please note: if there aren't any payment records on the index page (e.g., no completed transactions), you will be redirected to the payments settings to complete your payments set up.
- In your HubSpot account, navigate to Commerce > Payments.
- Payment records are displayed in the table on the index page. In the Status column, view the payment status:
- Processing: payment processing time will depend on the payment method used. Once the payment is processed, the status will either change to Succeeded or Failed. Learn more about processing times.
- Succeeded: the payment was collected successfully.
- Failed: the payment method wasn't charged. This status only applies payments made via bank debit, such as ACH, or subscription payments.
- Partially refunded: the payment was refunded for an amount less than the buyer originally paid.
- Refunded: the total amount of the original payment was refunded.
- Processing refund: a refund request has been submitted. Refunds for payments made via bank debit, such as ACH, can take five to ten business days to process.

- Use the filters at the top to segment your payment records by status or payment date. Click + More to view more filters.
- To filter the index page by specific payment properties:
- Click advancedFilters Advanced filters above the table.
- In the right panel, search for and select the property you want to filter by, then set the filter criteria.
- To select another property to add to the filter, click + Add filter.
- To filter by the property you've selected, or another filter, under OR, click + Add filter group.
- Click the X in the upper right of the panel when you've set up your filter. Learn more about setting up filters and saving views.
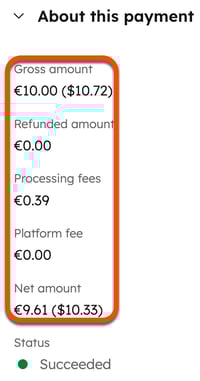
- To see more details about the payment, in the Gross amount column, click the payment amount to open the details in the right panel. It'll include a summary of the payment amount, payment date, buyer, and payment method. The right panel will also display different cards for payment history, line items, subscriptions, and record associations. Click a card to collapse or expand it.
- If you sell in multiple currencies, the related fees will be displayed along with the net amount received in your settlement currency when it differs from the payment currency. For example, if your connected bank account in Stripe is in U.S. dollars, but you collect a payment in Euros, you'll see both the gross amount, fees, and net amount in Euros, but the fees and net amount will also display in U.S. dollars. The FX rate is applied by Stripe.

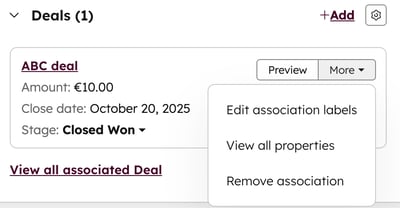
- If an association already exists, to view the associated record's details, hover over the associated record and click Preview. Or, click the More dropdown menu and select Edit association labels or Remove association.

- To add an association with an existing contact, company, or deal record, on the relevant card, click + Add.
Please note: if you make changes to the existing associations, the old association will be replaced with the updated association. You can only associate one subscription, contact, deal, and company record with a payment record, but a contact, company, deal, or subscription record can have multiple associated payment records.
View transaction fees
View the transaction fees associated with the payment from the payments index page.
- In your HubSpot account, navigate to Commerce > Payments.
- Click the Gross amount of a payment.
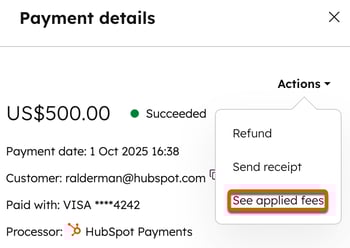
- In the right sidebar, in the upper right, click Actions, then select See applied fees.

- Applied fees (including international fees if applicable) will be displayed in the dialog box. Fee amounts are displayed in your settlement currency.

Issue refunds or send receipts
Issue a refund or send a receipt to the buyer from the payments index page. The payment must have been processed before you can issue the refund.
- In your HubSpot account, navigate to Commerce > Payments.
- Click the payment amount. The payment record will open in the right panel.
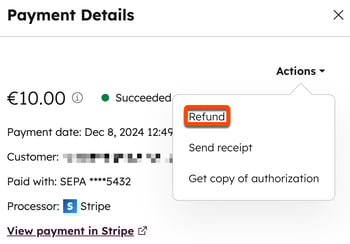
- In the upper right, click Actions, then select Refund. Issuing a refund does not impact the active subscription and billing will continue as scheduled.

- In the dialog box, enter the refund amount, then click the Reason dropdown menu and select a reason for the refund.
- Click Refund. HubSpot will deduct the original transaction amount from your future payouts or debit it from your bank account. Keep in mind that it can take 5–10 business days for the refund to appear on a buyer's statement.
Please note:
- If you're using HubSpot payments, HubSpot does not charge a fee for processing a refund. However, you won't receive a refund of the fee associated with the original transaction. If using Stripe as your payment processing option, refer to Stripe's documentation.
- Refunds for ACH direct debit payments must be initiated within 180 days from the date of the original payment.
- If using the QuickBooks Online integration, refunds do not sync to QuickBooks Online. They're available so you can manually reflect changes made in QuickBooks.
- To send a receipt to your buyer, in the upper right, click Actions, then select Send receipt. In the dialog box:
- Click the Choose receipt dropdown menu and select a receipt.
- The buyer's email address will be displayed by default. To change or add another recipient, in the Email address field, enter the email addresses.
- Click Send.
Retrieve a copy of the bank debit transaction authorization
To retrieve a copy of a bank debit transaction authorization, such as an ACH direct debit:
- In your HubSpot account, navigate to Commerce > Payments.
- Click the payment amount. The payment record will open in the right panel.
- In the upper right, click Actions, then select Get copy of authorization.

- In the dialog box, click Send. The authorization will be emailed to you.
Customize receipts
Customize the appearance of receipts in your settings.
- Learn how to update the company name that displays at the top of the receipt.
- Learn how to update the logo that displays at the top of the receipt.
- Learn how update your brand colors. A single colored bar is displayed at the top of the receipt.
Please note: any changes you make to the company name, logo, or colors in your account settings will apply to every payment link, regardless of which user created the link. These changes will also apply to other tools that use the default branding. Learn more about updating your logo and brand colors.

Disputed payments
If any payments are disputed by buyers, you can track the disputes from open to close. You can then take action on disputes within HubSpot. Learn more about the dispute resolution process.
How you're notified about disputes
- You'll be notified via email when a dispute is opened, won, or lost. These can be turned off in your payments notification settings. Click Counter dispute in the email to start a response to a dispute.

Please note: if you're using HubSpot payments, the open and lost dispute emails will contain either Payments underwriting will contact you or Money will be withdrawn from your account in three days. Learn more about chargebacks. If you're using Stripe as a payment processing option, Stripe manages the process directly so the text in the email will differ.
Below, learn how to:
- View dispute statuses on the payment record.
- Take action on open disputes that have a status of Disputed (action required).
- Track disputes on the payment record.
- Use dispute properties to get more information on a particular dispute.
View a list of payments with disputed statuses
The dispute status of a payment can be:
- Disputed (action required): the dispute has been opened and needs to be countered or accepted.
- Disputed (awaiting decision): the dispute has been countered and is awaiting the bank's decision.
- Disputed (won): the bank ruled in the merchant's favor.
- Disputed (lost): the bank ruled in the cardholder's favor.
To view payments with disputed statuses:
- In your HubSpot account, navigate to Commerce > Payments.
- At the top, click the Disputes tab.
- The disputed payments will be displayed.

The columns shown are:
- Gross amount
- Payment date
- Associated contact of the payment
- Payment method (e.g., card, ACH)
- Status
- Dispute created date
- Dispute reason (e.g., fraudulent, product not received)
- Dispute amount
- Dispute deadline
- Dispute closed date
- If you want to filter another view, in the upper left, click Status, select one or more of the dispute statuses, and save the view.

- To view details of the dispute, click the gross amount of a payment.
In the right panel, view the dispute information under Dispute details.
Respond to disputes
Respond to disputes with a status of Disputed (action required) from the payments index page, and upload evidence directly from the payment. To respond to a dispute:
- In your HubSpot account, navigate to Commerce > Payments.
- At the top, click the Disputes tab.

- Click the gross amount of the disputed payment.
- In the right panel, under Dispute details:
- Click Counter dispute to counter the dispute.
- Answer the dispute questions, then click Next.
- Fill in any additional details, then click Next.
- Upload your evidence, enter any additional information and click Review.
- The dispute will then be moved into the Disputed (awaiting decision) status.
- You can track the dispute on the payment record.
- Click Accept dispute to accept and close the dispute.

- Click Counter dispute to counter the dispute.
Track disputes
Track dispute activity and timelines from the payment record:
- In your HubSpot account, navigate to Commerce > Payments.
- At the top, click the Disputes tab.

- Click the gross amount of the disputed payment.
- Scroll to the History card to view the history of the payment details. The dispute details and payment timeline will be updated with the dispute status throughout the dispute process.
- Scroll to the Dispute details card to view the dispute information.

Dispute properties
Dispute properties can be added as columns to the payments index page, and used in other HubSpot tools such as segments, reports, and workflows. The dispute properties are:
- Dispute create date: the date the dispute was created.
- Dispute amount: the amount that was disputed.
- Dispute deadline: the deadline of a dispute decision.
- Dispute reason: the reason for the dispute.
Export payment records
Export payment records from the payments index page to CSV, XLS, or XLSX. It isn't possible to export to PDF. You can also download payout reports.
- In your HubSpot account, navigate to Commerce > Payments.
- Click Export in the upper right. In the dialog box:
- In the Export name field, enter an export name.
- Click the File format dropdown menu, and select a format.
- Click the Language of column headers dropdown menu and select a language.
- Click to expand the Customize section to customize the export further:
- Under Properties included in export select which properties to include in the export.
- Under Associations included in export, select the Include associated record name checkbox to include associated record names (e.g., the invoice name).
- Under Associations included in export, select whether to include up to 1,000 associated records, or all associated records.
- Click Export. Learn more about exporting records.
Use payment data in other HubSpot tools
Subscription required A Professional, or Enterprise subscription is required to create workflows and reports.
Use payment properties in other tools, such as workflows and segments, to automate and organize payment data across HubSpot.
Send a welcome email after a successful payment
Create a payments-based workflow to automatically send a welcome email to buyers as soon as a successful payment is made.- Create a new workflow using the Payments object.
- Use the Source property as a trigger to filter payments made by any payment link. Use the Source ID property if you want to create a workflow for a specific payment link.
- Select the Send email action, and select an email to send to anyone who completes a payment.

Create a task when a high-value payment has failed
Create a payments-based workflow to automatically create a task when a payment above a certain amount has failed.- Create a new workflow using the Payments object.
- Use the Status property as the trigger and set the status to Failed.
- Add additional criteria to the trigger for the Amount paid property, and set an amount.
- Choose the Create task action, and set up the task.

Create a segment of contacts who paid by card
Create a segment of contacts who made payments using a card.- Create a segment, selecting the Contacts object when creating the segment.
- Click + Add filter.
- Click the Viewing dropdown menu, and select Payments.
- Add Payment method is any of Card as a filter.

- Use the segment to create reports on payment methods, and more.
Identify customers with overdue payments
Create a segment for payments that are overdue. Use the segment to create follow-ups, alert an account manager or sales rep, and highlight missing revenue in reports.
- Create a segment, selecting the Payments object when creating the segment.
- Add the following filters:
- Status is any of Failed.
- Payment date is more than a specified number of days ago.
- Optionally, gross or net amount is more than X, if you wanted to only track payments of a certain value.

- Use the segment in a workflow to send reminders, create tasks for your team, and build reports that highlight missing revenue.
Next steps
- Learn how to use the commerce analytics suite.
- Learn how to create payment links.
- Learn how to create quotes.
- Learn how to create subscriptions.