- Knowledge Base
- Account & Setup
- Integrations
- Use QuickBooks actions in workflows
Use QuickBooks actions in workflows
Last updated: December 12, 2025
Available with any of the following subscriptions, except where noted:
-
Marketing Hub Professional, Enterprise
-
Sales Hub Professional, Enterprise
-
Service Hub Professional, Enterprise
-
Data Hub Professional
-
Commerce Hub Professional, Enterprise
The QuickBooks Online integration includes several workflow actions that allow you to automate the creation of QuickBooks invoices, sales estimates, and sales receipts. Below, learn how to use these actions in deal, quote, and payment-based workflows.
While a Marketing Hub, Sales Hub, Service Hub, Data Hub, or Commerce Hub Professional subscription is required to use QuickBooks workflow actions, the QuickBooks Online integration can be used with any HubSpot subscription.
Please note: QuickBooks Online actions in HubSpot workflows are only available for customers based in the United States.
Before you get started
To create invoices, sales estimates, and receipts in QuickBooks Online, HubSpot first checks the data between the two platforms before any data is synced to QuickBooks Online. This helps to ensure data accuracy and prevent unnecessary data from being created in QuickBooks online. Below are the requirements that contacts and line items must meet in order for HubSpot to create new assets in QuickBooks Online through workflow actions:
- Contacts:
- Legacy integration: in the legacy QuickBooks Online integration, the First Name, Last Name, and Email address contact properties are used to match the HubSpot contact record to a QuickBooks contact. A new contact will be created in QuickBooks if no match is found. If there are multiple contact records associated with the quote or deal record in HubSpot, the first associated contact will be used.
- New integration: in the new QuickBooks Online integration, a contact must match your data sync settings in order for HubSpot to create assets in QuickBooks Online, or the workflow action will fail. This helps prevent HubSpot from creating unnecessary contacts in QuickBooks Online. For example, if you're using the Create a QuickBooks invoice action, but the enrolled deal's associated contact isn't eligible to sync, HubSpot won't create the invoice in QuickBooks Online. Therefore, it's recommended to set your HubSpot workflows to enroll based on your data sync contact filters.
- Line items: line items in HubSpot must be associated to the quote or deal records enrolled in the workflow to create an invoice, sales estimate, or sales receipt in QuickBooks. HubSpot will match a line item in HubSpot with the product in QuickBooks. If no match is found, the invoice, sales estimate, or sales receipt will not be created.
It's recommended to turn on product sync in your QuickBooks settings. QuickBooks products are used for deal and quote line items to ensure that an invoice, sales estimate, or sales receipt is created.
Add QuickBooks actions to your deal or quote-based workflow
You can add QuickBooks actions to HubSpot workflows to create an invoice, sales orders, or estimates in your QuickBooks account. To add these actions:
- In your HubSpot account, navigate to Automation > Workflows.
- Click the name of a workflow to edit an existing workflow. Or click Create workflow to create a new workflow.
- Click the + plus icon.
- In the left panel, select a QuickBooks action:
-
- To create an invoice, click Create a QuickBooks invoice.
- To create an estimate, click Create a QuickBooks estimate.
- To create a sales receipt, click Create a QuickBooks sales receipt.

- Click the Which QuickBooks account do you want to create an invoice/estimate/sales receipt for? dropdown menu and select the QuickBooks account.
- Click the Payment Terms dropdown menu and select a value (only available for the Create a QuickBooks invoice action).
- Click the Customer dropdown menu and select a customer.
- Click the Products dropdown menu and select a product.
- Click the Create a product in QuickBooks if it doesn’t exist? dropdown and select either Yes or No.
- Click Save.
- Finish editing your workflow, then click Review and publish to review the workflow.
- Click Turn on to turn the workflow on.
Please note: invoices created will be associated to the workflow object. For example, if you create an invoice using a deal-based workflow, the invoice will be associated to the enrolled deal.
To enroll a paid quote in a workflow:
- In your HubSpot account, navigate to Automation > Workflows.
- To create a new workflow, in the upper right, click Create workflow.
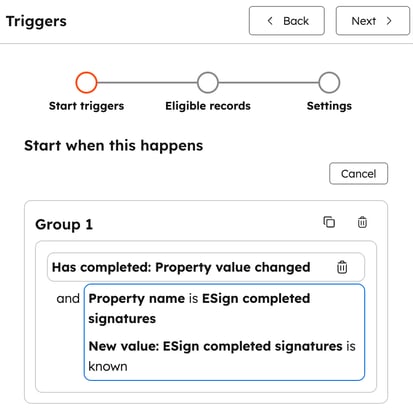
- In the left panel, search for and select the trigger ESign completed signatures. Then click Next.

- Add any other optional quote condition for enrollment.
To enroll a paid deal in a workflow:
- In your HubSpot account, navigate to Automation > Workflows.
- To create a new workflow, in the upper right, click Create workflow.
- In the left panel, search for and select the trigger Deal name, then contains any of Payment Link. Then click Next.
- Add any other optional deal condition for enrollment.

Using QuickBooks actions with HubSpot payments
You can also create paid invoices and sales receipts using workflows if you have HubSpot payments set up. Sales receipts can be created for all types of products. Paid invoices can only be created for non-taxable line items.
Please note: it is only possible to use these actions with payments-based workflows.
To use QuickBooks Online actions in a payment-based workflow:
- In your HubSpot account, navigate to Automation > Workflows.
- To create a new workflow, in the upper right, click Create workflow.
- In the left panel, search for and select the payment trigger for your workflow.
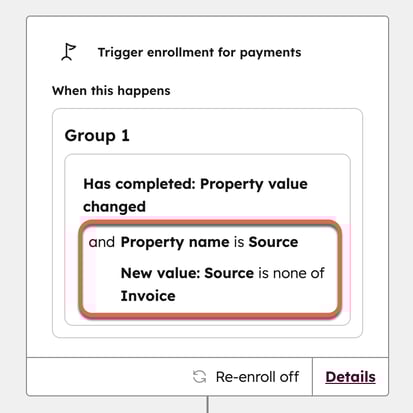
- For each group of enrollment triggers you add, you should also add a Source is none of Invoice filter. This will prevent HubSpot from enrolling payments already made with invoices, which would create duplicate invoices in QuickBooks Online. Then click Next. You'll then be taken to the workflow editor.

- Click the + plus icon.
- In the left panel, select a QuickBooks action:
-
- To create an invoice, click Create a QuickBooks paid invoice. This will create a paid invoice in QuickBooks using your HubSpot payment data.
- To create a sales receipt, click Create a QuickBooks sales receipt. This will create a sales receipt in QuickBooks using your HubSpot payment data.
- Click the Which QuickBooks account do you want to create an invoice/sales receipt for? dropdown menu and select the QuickBooks account.
- Click the Customer dropdown menu and select a customer.
- Click the Products dropdown menu and select a product.
- Click the Create a product in QuickBooks if it doesn’t exist? dropdown and select either Yes or No.
- Click Save.
- Finish editing your workflow, then click Review and publish to review the workflow.
- Click Turn on to turn the workflow on.
Create a QuickBooks expense with workflows
You can also create a QuickBooks expense with a HubSpot workflow action. This action will create an expense in QuickBooks to reflect your HubSpot payment fee. To create an expense:
- In your HubSpot account, navigate to Automation > Workflows.
- To create a new workflow, in the upper right, click Create workflow.
- In the left panel, search for and select the payment trigger for your workflow. Then click Next. You'll then be taken to the workflow editor.
- Click the + plus icon.
- In the left panel, select Create a QuickBooks expense.
- Fill out the required fields.
- Click Save.
Create a QuickBooks refund receipt with workflows
To create a refund receipt in QuickBooks when a full refund occurs in HubSpot payments:
- In your HubSpot account, navigate to Automation > Workflows.
- To create a new workflow, in the upper right, click Create workflow.
- In the left panel, search for and select the payment trigger for your workflow. Then click Next. You'll then be taken to the workflow editor.
- Click the + plus icon.
- In the left panel, select Create a QuickBooks refund receipt.
- Fill out the required fields.
- Click Save.