- Knowledge Base
- Account & Setup
- Integrations
- Using the QuickBooks Online data sync integration for invoices
Using the QuickBooks Online data sync integration for invoices
Last updated: September 10, 2025
Available with any of the following subscriptions, except where noted:
If you've configured the data sync integration to sync invoices from HubSpot to QuickBooks, use the below steps to create and sync an invoice to QuickBooks, and review common questions about synchronizing invoices to QuickBooks.
Sync an invoice
Once the sync is set up, follow these steps to sync your first invoice from HubSpot to QuickBooks Online:
- Create your invoice.
- Click Finalize.
- The integration will detect the new invoice, check the invoice details against any filters set up, and if eligible, will sync the invoice to QuickBooks Online.
-
- If any invoice fails to sync, a banner will display at the top of the invoices index page. Clicking Sync failure details will open the Failing to sync panel in the QuickBooks integration settings.
- You can also check if the invoice sync was successful by looking at the Integrations sync card on the invoice preview panel, or by looking at the CRM syncs table in the QuickBooks integration settings. If the sync for some invoices is failing, click the count of invoices in the Failing column to see more information about the invoices that are failing.

View the invoice object
Invoices created in HubSpot, or synced from QuickBooks Online can be viewed in HubSpot’s invoice object. You can also create custom invoice object properties.
To view the invoice object:
- In your HubSpot account, navigate to Commerce > Invoices.
- This will bring you to your invoice index page, showing all invoices.
- Use the search bar or click Advanced filters to find specific invoices.
- Click the invoice to open the right panel and view its properties, payments made, and associations. Scroll to the Integrations sync section to view the sync status.

Invoices synced from QuickBooks Online won't be automatically associated to a HubSpot deal record.
Review payments on invoices
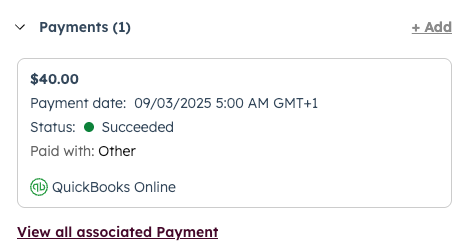
Review the source, payment date, and status of payments on invoices from the invoice record:
- In your HubSpot account, navigate to Commerce > Invoices.
- Click the invoice you'd like to view payments for.
- In the right panel, scroll to Payments to view associated payment information and status.

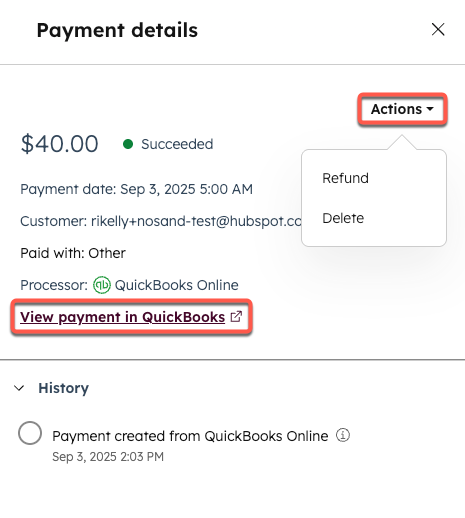
- Hover over the payment and click Preview to view more details about the payment.
-
- If the payment was taken using QuickBooks, click View payment in QuickBooks to be redirected to the payment record in QuickBooks.
Please note: when a paid invoice is synced from HubSpot to QuickBooks, the associated processing fees for your chosen payment processor in HubSpot, either Stripe or HubSpot payments, will not create an accounting expense in QuickBooks automatically. To account for this, you can create a report of all invoices and payments received, and sum the Processing fees and Platform fees properties, then enter the total amount as an expense in QuickBooks.
-
- To refund the payment, click Actions, then select Refund. Click Continue to refund. In the dialog box, enter the refund amount, then click the Reason dropdown menu, and select a reason for the refund.
- To delete the payment, click Actions, then select Delete. In the dialog box, click Delete to confirm.

Please note:
- Refunds against payments are not synced automatically. For a payment made using a HubSpot payment processor, either Stripe or HubSpot payments, you can record a credit memo or refund receipt in QuickBooks. For a payment made using QuickBooks, the corresponding payment in HubSpot should be manually refunded using the step above.
- The delete action does not sync to QuickBooks Online. It is available so you can manually reflect changes made in QuickBooks.
Learn more about managing invoices.
Download a PDF of a synced invoice
Download the PDF of a synced invoice without leaving HubSpot.
- Navigate to an object associated with an invoice (e.g., contact, company, payment).
- In the right panel, scroll to the Invoices card. If you can't see the invoices card, learn how to add it to an object.
- Click the invoice number to download the PDF.
Create custom invoice object properties
To create custom invoice object properties:
- In your HubSpot account, click the settings settings icon in the top navigation bar.
- Click Properties.
- Click the Select an object dropdown menu and select Invoice properties.
- Create your properties.
The invoice object can be used to segment contacts, trigger workflows, and create custom reports.
Please note: when syncing multiple invoices to HubSpot to the same deal record, the properties above will be updated by the most recently updated invoice in QuickBooks.
Frequently Asked Questions
How do I sync PO number, or other invoice fields to/from QuickBooks?
PO number isn't a default field on QuickBooks invoices and must be added as a custom field. For this reason, the HubSpot QuickBooks Online integration can't define an out of the box field mapping for it. Users in an Data Hub Starter, Professional or Enterprise account can define custom mappings. Using custom field mappings, you can identify QuickBooks invoice fields (e.g., Tracking Number, PO number, Shipping Method) and sync those values to and from HubSpot and QuickBooks.
How do I represent discounts, taxes, and fees on my invoices?
When using the QuickBooks Online integration, you can add one-time, order-level discounts to HubSpot invoices, but are prevented from adding taxes, and fees to your invoices, because QuickBooks Online doesn't have the same concept of invoice-level taxes and fees.
Instead of using invoice-level taxes and fees, the following is recommended:
- Taxes: can be added as a line item to the invoice, ideally using a product that's synced from QuickBooks, and is linked to your QuickBooks income/expense account tracking the amount of tax collected. These tax line items won't be connected to the QuickBooks Online Tax Center for tax reporting.
- Fees (e.g., shipping fees, credit card fees, late fees): can be added as their own line item on the invoice, ideally using a product that's synced from QuickBooks.
Should I turn off my Create paid invoice and Create paid sales receipt workflow actions, if I use two-way invoice sync?
At minimum, it's recommended to update your workflow to filter out payments coming from invoices (e.g., payments where the source = invoice). If the workflow isn’t updated, duplication will occur, because invoice payments will also trigger paid invoice creation. Only one payment will occur, but there'll be two invoices for the payment.