
Last updated: May 28, 2026
Available with any of the following subscriptions, except where noted:

-
 Additional subscriptions required for certain features
All object index pages have a table view, but objects with pipelines also have an updated board view, where records are shown as cards moving through stages in a pipeline. Edit and move records between pipeline stages. Learn how to create stages for pipelines on objects such as deals, projects, and services.
- Free and Starter accounts created after March 30, 2026.
- Accounts enrolled in the Streamlined Index & Flexible CRM Views public beta. As a Super Admin, learn how to enroll your account into a public beta.
Otherwise, refer to the manage records in board view article.
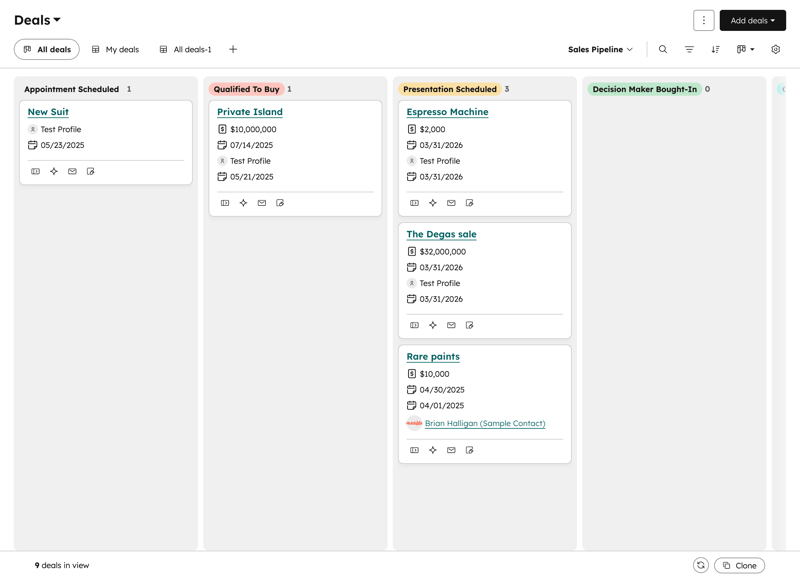
Verify if this article applies to your account by comparing your board to the image below. In your HubSpot account, navigate to CRM > Deals.
Configure your board view
Subscription required A Starter, Professional, or Enterprise subscription is required to use multiple pipelines.
Your account may use personalized names for each object (e.g., opportunity instead of deal). This article refers to objects by their HubSpot default names.
- Navigate to your records (e.g., In your HubSpot account, navigate to CRM > Deals.).
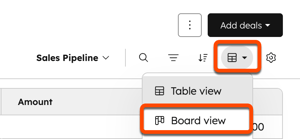
- In the upper right, click the view type dropdown menu and select Board view.
- Click the pipeline dropdown menu and select a pipeline.
- Customize the board card appearance.
- To configure stage/status options:
- Hover on the name of a stage, then click the hide stage icon at the top of the column to hide the records in a stage/status. If a column is already collapsed, click the show stage icon to expand it.
- Hover on a stage name, then click the three vertical dots icon and select an option:
- Add [record]: create a record in the selected stage/status. The pipeline and stage/status properties are automatically filled in.
- Rename stage/status: change the name of the selected stage/status.
- Edit stage/status color: change the color of the selected stage/status.
- Group board by: change the enumeration property used to display the board stages (e.g., Deal Type instead of Deal Stage).
- Manage stage automation: configure stage-specific automations.
- Manage stage settings: configure stage-specific settings.
- To manage filters:
- Click the toggle filters icon to show or hide the filters bar.
- Above the board, click the property dropdown menus to use quick filters. Learn how to configure quick filters.
- Above the board, click Advanced filters to set custom
ANDorORlogic filter groups. Learn more about using advanced filters.
- Click the name of a saved view to open a view with defined filter criteria. Learn more about creating view tabs.
- To view more details about a record:
- Click a board card or the name of an associated record to view the record in a right panel preview.
- Click the name of a record to open the full-page record.
Edit or delete records in bulk in the updated board view
Permissions required Bulk delete permissions are required to delete multiple records at once.
To bulk edit property values of records in your board:
- Navigate to the records you want to edit. You can open a saved view, or apply filters to find the records you want to edit.
- Press and hold Cmd(MacOs) or Ctrl (Windows) on your keyboard, then click the cards you want to edit.
- At the top of the board, click Select all [number of records] to select all records in your pipeline if desired.
- At the top of the board, click Edit
- To edit the values of a specific property in these records, at the top of the table, click Edit.
-
In the dialog box, click the Property to update dropdown menu and select the property you want to edit.
-
In the field that appears, enter or select a new value for the selected property. For multi-select properties:
- To add new values while maintaining the existing values, select Append to current value(s).
- To overwrite the existing values, select Replace current values.
-
Click Update. For text or single-select properties, this will overwrite the old values in the property for these records.
-
- Navigate to the records you want to edit. You can open a saved view, or apply filters to find the records you want to edit.
- Press and hold Cmd (MacOs) or Ctrl (Windows) on your keyboard, then click the cards you want to edit.
- At the top of the board, click Delete.
- In the dialog box, enter the number of records and click Delete.
Sort your pipeline cards
You can select which property is used to determine the sort order of your records in each column. For example, you can sort tickets by the most recent value for Create date or sort deals by high to low values for the Amount property.
- Navigate to the pipeline view for which you want to sort the cards.
- In the upper left, click sort by.
- In the pop-up box, select the property and sort direction. The type of property determines the sort order (e.g., Z -->A, 0-->9).
- In the bottom right, click Save to save your sort for saved views you created.
Move records between pipeline stages or pipelines
Subscription required A Starter, Professional, or Enterprise subscription is required to use multiple pipelines.
Please note: keyboard shortcuts are available to Free and Starter accounts created after March 30, 2026.
To move records between pipeline stages:
- Navigate to the pipeline you want to edit.
- Press and hold Cmd (MacOS) or Ctrl (Windows) on your keyboard, then click the cards you want to move.
- Click and drag a selected card to another stage or status.
- Once the record is moved to a new stage or status, the column's record count is updated and the cards within the column are re-sorted based on your sort criteria.
To move records between pipelines:
-
Press and hold Cmd (MacOS) or Ctrl (Windows) on your keyboard, then click the cards you want to move.
-
At the top of the board, click Edit.
-
In the dialog box, click the Property to update dropdown menu and select Pipeline.
-
Click the Stage/Status dropdown menu, then select the stage/status and pipeline to which you want to move the records (e.g., Appointment scheduled (Sales Pipeline)).
-
Click Update.
You can also edit an individual record's pipeline or stage/status while viewing a record.
Please note: when moving a deal to a different stage, weighted totals must be recalculated based on the deal's probability, which may also be updated based on the new stage. While recalculating, a delay icon will appear next to the weighted amount.
