- Knowledge Base
- Marketing
- Social
- Manage your social account settings
Manage your social account settings
Last updated: November 14, 2025
Available with any of the following subscriptions, except where noted:
-
Marketing Hub Professional, Enterprise
-
Additional subscriptions required for certain features
Manage your connected social accounts in HubSpot to control how your team publishes and tracks your social content. In your account's social settings, you can:
- Set up auto-publishing to automatically post new blog articles to your social channels.
- Manage which users and teams have access to each social account.
- Set default accounts to post from when creating new social posts.
- Configure email notifications to receive social activity and reporting summaries.
- Assign social accounts to specific brands.
You can also add links to your social media pages on your HubSpot template with the Follow Me module, and connect your Bitly account to HubSpot to use your own branded short domain when shortening links in social posts.
Set up blog auto-publishing
If your blog is hosted on HubSpot, you can set up blog auto-publishing to publish a new post on your social accounts whenever you publish a new blog post.
These posts include the blog post title, meta description, link, and featured image. Each post will be published 15 minutes after your blog post is published. Learn more about blog auto-publishing in HubSpot.
Please note: blog auto-publishing is not available for Instagram accounts because links are not allowed on Instagram posts.
To set up blog auto-publishing:
- In your HubSpot account, click the settings settings icon in the top navigation bar.
- In the left sidebar menu, navigate to Marketing > Social.
- In the Blog Auto-Publish column, next to the social account you want to auto-publish to, click Choose blog or Manage blogs. This option is only available in social accounts where Accounts access is set to Everyone.
- In the dialog box, click the Choose blog dropdown menu and select one or more blogs.
- Click Submit.

Manage users access to a social account
Permissions required Super Admin permissions are required to manage which users and teams have access to specific social accounts.
Explicitly giving a user or team access to a social account will limit access for all others. Users or teams without access can't view or manage posts from that account in the social tool. Learn more about limiting access to your HubSpot assets.
- In your HubSpot account, click the settings settings icon in the top navigation bar.
- In the left sidebar menu, navigate to Marketing > Social.
- In the Account access column, click Only me, Everyone, or [number of teams and users].
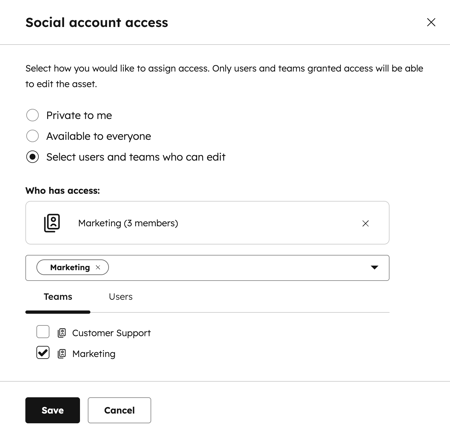
- In the right panel, select from the following options:
- Private to me: limit access to your user account only. The account won't be included in the social summary email notification.
- Available to everyone: all users in the account will have access.
- Select users and teams who can edit: only specified users in the account will have access. The account won't be included in the social summary email notification. Only users in a Marketing Hub Enterprise account can limit access by users and teams.
- If you're selecting specific users or teams, in the search bar, search for and select the checkbox to the left of the user or team.
- To remove access from an account, clear the checkbox next to the user or team's name, or click the X in the Who has access section.
- At the bottom of the panel, click Save.

Understand user permissions for social publishing
The level of access a user has to publish to a social account depends on their social publishing permissions and whether the user has account access.
| The user's social permissions | The user has account access | The user does not have account access |
| Draft only (Marketing Hub Enterprise only) |
The user can create drafts. Learn more about Draft only social publishing permissions. |
The user cannot create drafts or view the social account's name in the social settings. |
| Their accounts only
|
The behavior will differ depending on whether the user connected the social account:
|
The behavior will differ depending on whether the user connected the social account:
|
| All accessible accounts |
The user will have full access to the social account. |
The behavior will differ depending on whether the user connected the social account:
|
| The user will have full access to the social account. |
||
Please note: if you select Report on posts published from all sources when you connect an X account, the Share checkbox will be turned off and automatically toggled on. To turn on the Share checkbox and change your share settings, you'll need to reconnect the account and choose Report on posts published from HubSpot only.
Select default social accounts to post from
To select specific social accounts by default when creating new social posts:
- In your HubSpot account, click the settings settings icon in the top navigation bar.
- In the left sidebar menu, navigate to Marketing > Social.
- In the Default column, click to toggle the Default switch on. Any changes will be saved automatically.
Please note:
- If you have a Marketing Hub Enterprise account, you can only select up to 60 default accounts to post from.
- You can only set one default X account.
Configure which social posts to include in your reporting data
When you connect your social account, the posts and interaction data included in social reports depend on the network of the account you connected:
- Facebook, Instagram, LinkedIn, and YouTube: posts published either from HubSpot or from the external social network will be available for reporting.
- X: When you connect your account, you can choose whether you want to report on posts published from all sources, or posts published from HubSpot only. If you want to change your post visibility settings for X, you'll need to disconnect your social account, then reconnect it with the desired setting.

Review post visibility for social accounts
To view which social posts HubSpot reports on for your connected social accounts:
- In your HubSpot account, click the settings settings icon in the top navigation bar.
- In the left sidebar menu, navigate to Marketing > Social.
- In the Accounts table, review the Post Visibility column:
- All posts: social posts from all sources are visible in social reports.
- HubSpot: social posts published from HubSpot only are available for social reports.

Configure email notifications for social activity and report summaries
By default, you'll receive an email summary of interactions, conversations, and X followers. Super Admins and individual users with connected social accounts can edit or turn off these notifications in the social settings.
- In your HubSpot account, click the settings settings icon in the top navigation bar.
- In the left sidebar menu, navigate to Marketing > Social.
- At the top, click the Email Notifications tab.
- In the Inbox section, select the radio button to choose the email notification frequency for social roundup emails. These emails don't include data from externally published posts.
- In the Reports section, select the Yes, send me a monthly email with my social reports checkbox to turn on or turn off these emails. This email summary includes data for posts published from HubSpot and externally published posts.
Please note:
- Instagram and YouTube interactions and activities are not included in any social email notifications.
- Only data for social accounts set to Available to everyone will be included. If access to a social account has been restricted to specific users or teams, the social account will not be included in any social email notifications.
- Only new X followers will be included in this email notification. New followers from other networks such as Facebook, Instagram, or LinkedIn will not be included.

Assign social accounts with Brands
Subscription required A Marketing Hub Enterprise subscription and the Brands Add-on are required to assign social accounts with a brand.
Connected social accounts can only be associated with one brand at a time. Learn more about associating your assets with Brands.
To assign a social account with a specific brand:
- In your HubSpot account, click the settings settings icon in the top navigation bar.
- In the left sidebar menu, navigate to Marketing > Social.
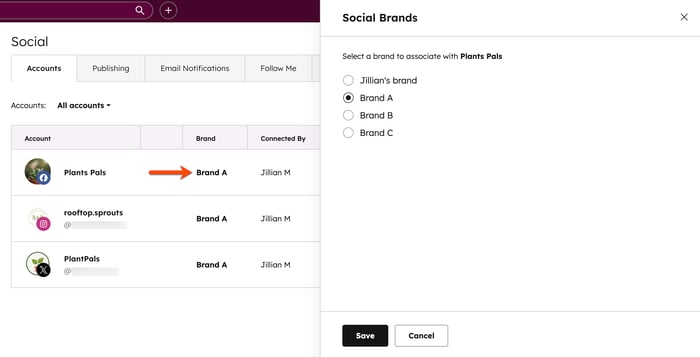
- In the Brand column, click Unassigned or the [Brand name] if the social account is already assigned to a brand.
- In the right panel, select the Brand to associate with that social account.
- At the bottom, click Save. The social account will be moved to that selected brand.
- You can also navigate to a specific brand and then connect a social account to be assigned under that brand. Learn more about how to navigate between brands.
- When switching between brands in the social account settings, only social accounts associated with the brand will appear in your social settings.
- When switching between brands in the social tool, only data and assets (e.g., posts, replies) associated with the social accounts assigned to the selected brand will appear in the social tool.
