- Knowledge Base
- Automation
- Workflows
- Add data to Google Sheets with workflows
Add data to Google Sheets with workflows
Last updated: November 4, 2025
Available with any of the following subscriptions, except where noted:
-
Marketing Hub Professional, Enterprise
-
Sales Hub Professional, Enterprise
-
Service Hub Professional, Enterprise
-
Data Hub Professional, Enterprise
-
Smart CRM Professional, Enterprise
-
Commerce Hub Professional, Enterprise
Use the Create Google Sheet row action or Update data in a Google Sheet action to send data from HubSpot properties to your spreadsheet. For example, you can use this action to send contact data from new leads to a spreadsheet for your sales outreach team.
Before you can add data to Google Sheets with workflows, you'll need to connect Google Sheets to your HubSpot account. You can connect the app from the App Marketplace or from within a workflow.
Before you get started
Keep the following in mind when sending data to Google Sheets from HubSpot:
- By default, HubSpot sends internal property values to Google Sheets. For dates, HubSpot sends unix timestamps in milliseconds.
- If you have an Data Hub Professional subscription, you can format the date property into your desired format by adding a Format data action before the Create Google Sheets row action. Then, in the Property dropdown menu of the Google Sheets action, select the date output from the Format data action.
- You can also convert dates from milliseconds in Google Sheets by adding the following formula to a separate column in the spreadsheet: =A1/1000/60/60/24 + DATE(1970,1,1). Replace A1 with the column that the unix timestamp is in.
- When using the Create Google Sheet row action, data is not added to existing rows. Instead, the action inserts a new row into the sheet. This can affect referenced cells and any formulas used. To avoid this, ensure that only populated, existing rows are referenced. To add data to existing rows use the Update existing Google Sheet rows action.
- Avoid manually adding data to the sheet that HubSpot is sending data to. If you need to manually add data to the spreadsheet, you should create a new sheet and reference existing data from the first sheet.
- It is generally not recommended to use formulas in the Google Sheets that you're updating. Updating cells in formula-heavy Google Sheets can result in slower action execution times or errors in the workflow.
- Google Sheets automatically recalculates all dependent formulas whenever cells are modified. The larger and more formula-heavy the spreadsheet becomes, the longer each update operation will take to complete.
- Instead, it's recommended to use as few formulas as possible or to apply your formulas only after all updates to the spreadsheet.
- It is not recommended to update the same sheet in multiple workflows as doing so can result in data duplication. Instead, it's recommended to only use a single workflow for each sheet.
- When selecting a spreadsheet in the workflow editor, the sheets available are tied to the sheets that the connecting user has access to. For a sheet to appear as an option, it must meet at least one of the following requirements:
- Belong to the connecting user's drive.
- Previously shared with the connecting user.
- Belong to a shared drive that the connecting user has access to.
- If you disconnect the Google sheets integration and reconnect with another user, the sheets available may be different. It's recommended that you check any dependent workflows before disconnecting and reconnecting.
Please note: at times, when adding data a request can time out and a duplicate row may be created. To resolve, the duplicate data can be deleted in your account.
Set up your spreadsheet
When setting up your spreadsheet, do take note of the following:- The header row must start in the first column of the first row.
- Each column header should be labeled so that HubSpot can identify and send data to it. HubSpot cannot send data to unlabeled columns.
- Ensure all columns in your table range have column headers. Avoid having blank column headers between columns as this can cause issues and prevent the spreadsheet from updating as expected. For example, if your spreadsheet uses columns A to C, do not leave the column B header blank.
- The spreadsheet cannot exceed 5,000,000 cells.
Connect Google sheets to HubSpot
Before you can add data to Google Sheets with workflows, you'll need to connect Google Sheets to your HubSpot account.
You can connect the app from the App Marketplace.
Add new Google Sheet rows
When using the Create Google Sheet row action to add data your Google sheet, ensure your spreadsheet has been correctly formatted. Aside from the header row, do not include any other data in the sheet you're sending data to.
This action does not add data to existing rows. Instead, the action inserts a new row into the sheet. This can affect referenced cells and any formulas used. To avoid this, ensure that only populated, existing rows are referenced.
To add new Google Sheet rows:
- In your HubSpot account, navigate to Automation > Workflows.
- To edit an existing workflow, hover over the workflow, then click Edit. Or, create a new workflow.
- In the workflow editor, click the + plus icon to add an action.
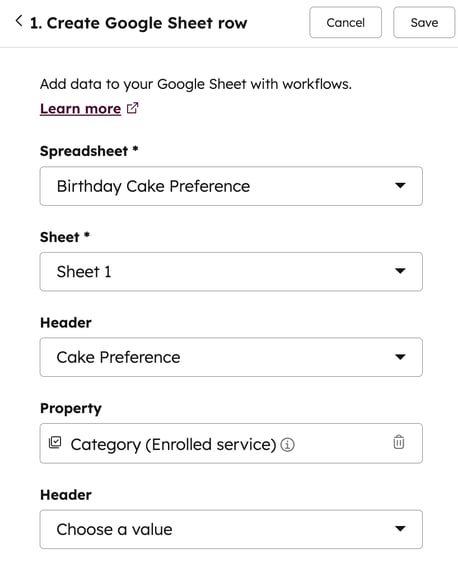
- In the left panel, under Google Sheets, select Create Google Sheet row.
- Click the Spreadsheet dropdown menu and select the spreadsheet you want to send data to. You can select from the spreadsheets that are owned by or have been shared with the user who connected Google Sheets to HubSpot.
- Click the Sheet dropdown menu and select the sheet you want to send data to. The Sheet field refers to the tabs at the bottom of your spreadsheet.
- Set up your Google sheet column header and corresponding HubSpot property. HubSpot will add data to empty rows below any existing data in the sheet. Each action can add up to 20 cells of data per row.
- Click the Header dropdown menu and select the Google sheet column header to send the data to.
- Click the Property dropdown menu and select the corresponding HubSpot property you'll send data from.
- After setting up your workflow action, click Save.

Update existing Google Sheet rows
When using the Update existing Google Sheet rows action, ensure your spreadsheet has been correctly formatted.
This action will update data that is in your Google Sheet. By default, no additional rows will be added to your Google Sheet, only existing rows will be updated.
To update your existing Google Sheet rows:
- In your HubSpot account, navigate to Automation > Workflows.
- To edit an existing workflow, hover over the workflow, then click Edit. Or, create a new workflow.
- In the workflow editor, click the + plus icon to add an action.
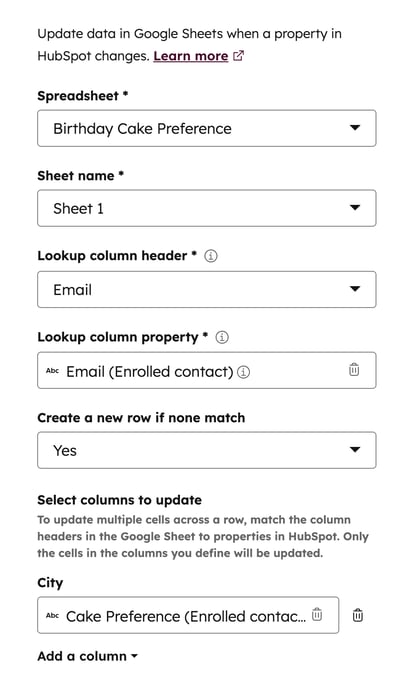
- In the left panel, select Update data in a Google Sheet.
- Click the Spreadsheet dropdown menu and select the spreadsheet you want to send data to. You can select from the spreadsheets that are owned by or have been shared with the user who connected Google Sheets to HubSpot.
- Click the Sheet dropdown menu and select the sheet you want to send data to. The Sheet field refers to the tabs at the bottom of your spreadsheet.
- Set up unique identifiers to match the data in Google Sheets to the data in HubSpot. When the value of a cell in the selected Lookup column header matches the value of the selected HubSpot property for the enrolled record, the row containing the matching cell will be updated. If there are multiple rows with matching values, only the first row containing the matching cell will be updated.
- Click the Lookup column header dropdown menu and select a column header in the spreadsheet. This should correspond to a HubSpot property to use as a unique identifier for the update. For example, a unique identifier could be a contact's email address because it is unique to them.
- Click the Lookup column property dropdown menu and select a property corresponding to the Lookup column header to use as an identifier for the update.
- In the create a new row if none match dropdown menu:
- If you want to create a new row if there is no matching Lookup column header and Lookup column property, click Yes. This will create a new row containing only properties set in the Select columns to update section.
- If you do not want to create a new row if there is no matching Lookup column header and Lookup column property, click No.
- Set up the columns in the spreadsheet that you want to update:
- Click the Select columns to update dropdown menu, a list of column headers from the selected spreadsheet will display. Then, select the column that you want to update.
- Click the dropdown menu under the column header and select an option. You can either choose to update the data with an existing property value from the enrolled record or with the outcome of an earlier workflow action.
- To add another column to update, click Add a column.
- To delete a column, click the delete detedelete icon next to the column header.
- Click Save.

Troubleshoot errors when using Google Sheets with HubSpot
If you're unable to locate a specific sheet or encountering an error when setting up your workflow actions, it is likely an issue with the user accounts used to connect to Google Sheets. For example, if the user has been deactivated in the HubSpot, you may encounter the following error: "Spreadsheet" options could not load due to 3rd-party API failure.
To resolve this issue, it is recommended to disconnect your Google sheets integration and reconnect the integration using an active HubSpot user and a Google account that has access to the sheets that you'd like to update.