Last updated: July 6, 2026
Available with any of the following subscriptions, except where noted:
-
 Marketing Hub
Professional, Enterprise
Marketing Hub
Professional, Enterprise
-
 Sales Hub
Professional, Enterprise
Sales Hub
Professional, Enterprise
-
 Service Hub
Professional, Enterprise
Service Hub
Professional, Enterprise
-
 Data Hub
Professional, Enterprise
Data Hub
Professional, Enterprise
-
 Smart CRM
Professional, Enterprise
Smart CRM
Professional, Enterprise
-
 Revenue Hub
Professional, Enterprise
Revenue Hub
Professional, Enterprise
After creating your workflow and setting enrollment triggers, use the Edit records action to update or clear your record's property values. You can also use this action to copy values from one property to another, both within the same record and with associated records.
Before you get started
- If you've turned on Sensitive Data in your account, you can edit records using personalization tokens from Sensitive Data properties, but not Highly Sensitive Data. Learn more about how Sensitive Data is used in workflows.
- When editing an associated record, such as a deal from a contact-based workflow, the association must exist before the Edit record action.
- When updating a contact's default Lifecycle stage property, you can only set a value further down the funnel. To move a contact’s lifecycle stage backwards, add another Edit record action to clear the Lifecycle stage value first.
- If you're using the Edit record action to copy a property value to another property within the same record or in an associated record:
- The source and target properties must be compatible. Learn more about compatible property types.
-
- The source property value should be populated. If the source property has no value, the target property may remain unpopulated or receive an empty value, and the action may result in an error. It is recommended to use a branch to check for populated property values before the Edit record action.
- To copy values from an enrolled record to associated records, enroll records when the source property is known.
How to set up the Edit record action
- In your HubSpot account, click More, then navigate to Automation > Workflows. If More doesn't appear in your account, navigate to Automation > Workflows directly.
- Click the name of an existing workflow or create a new workflow.
- Set your enrollment triggers.
- Click the + plus icon to add an action.
- In the left panel, click to expand the CRM section. Then, click Edit record.
- Click the Target object dropdown menu and select an object type.
- If you've selected an associated object, click the Association to object dropdown menu and select an association label. Learn more about association labels.
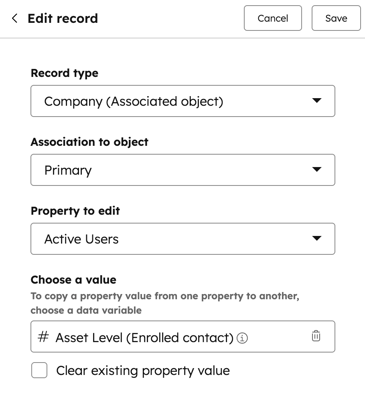
- Click the Property to Edit dropdown menu and select the property that you'd like to update. The following steps will vary depending on the property type selected.
How to use the Edit record action with single checkbox and other select-type properties
For checkbox and other select-type properties, except for multi-checkbox properties:- Click the Property to edit dropdown menu and select a value.
- Click the Change type dropdown menu and select from the following:
- Replace: clear all previous property values and add only the selected property values.
-
- Clear: clear all property values from the record's property
- If you've selected the option to replace a property value, click the Choose a value dropdown menu and select a replacement value. Or, to use a value from another property, click Choose data token.

How to use the Edit record action with multiple checkbox properties
If you're updating a multiple checkbox property, you can select multiple options:
- Click the Property to edit dropdown menu and select a value.
- Click the Change type dropdown menu and select from the following:
- Append: add the new property values to the existing property values. For example, the action has been configured to set the property value to option B. If the contact's property value was option A, after passing the action, the contact will have both option A and option B.
- Replace: clear all previous property values and add only the selected property values. For example, the action has been configured to set the property value to option B. If the contact's property value was option A, after passing the action, the contact will only have option B.
- Remove: remove specific property values. For example, the action has been configured to remove the property value option B. If the contact's multiple checkbox property value was option A and option B, after passing the action, the contact will only have option A.
- Clear: clear all property values from the record's property
- If you've selected the option to Append, Replace or Remove, click the Choose a value dropdown menu and select the property values that you've like to take action on.

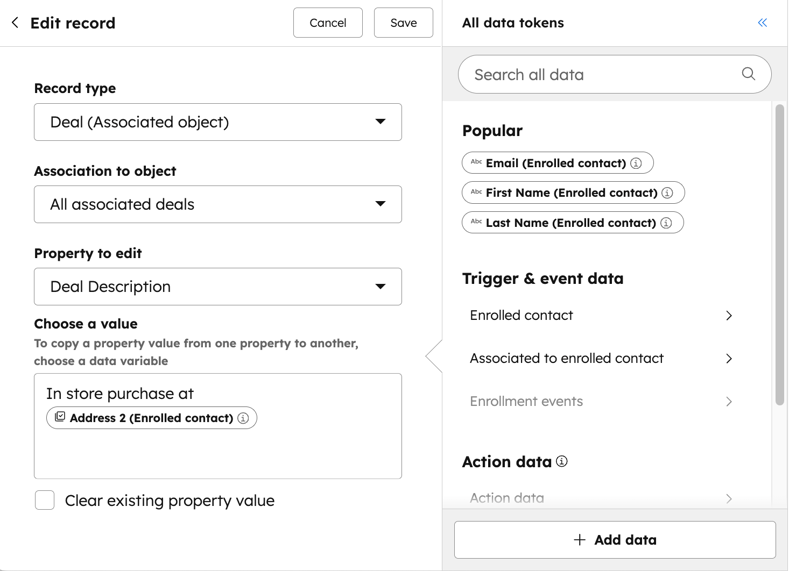
How to use the Edit record action with text input properties
For text input properties:- In the [property name] field, enter the property value.
- To copy and use values from another property, in the Insert data panel, search for and select a property. You can combine both custom text and values from other properties.
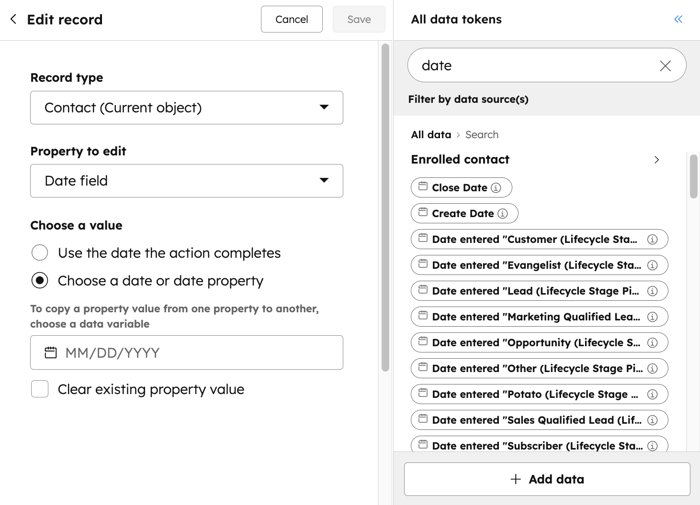
How to use the Edit record action with date picker properties
For date picker properties, you can select from the following options.- Use the date the action completes: set the property value to the date when the record reaches this step in the workflow.
- Choose a date or date property: set the property value to the specified date. When using this option, you can also copy other date picker properties. In the left panel, click the date picker. Then, select a property. You cannot select non-date picker properties.
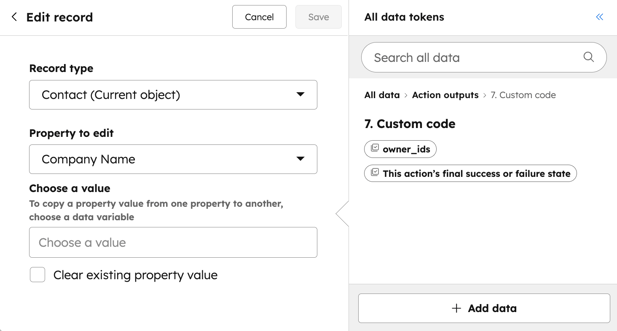
How to use outputs from earlier actions to update your records
To use the output value from your Edit record action in the same workflow, for example, if you'd like to update your record with the output from a Format data or data agent action.- In the Action data section, click More action data.
- Click the action name, then select the output.
- To clear the property value, select the Clear existing property value checkbox.
How to clear property values with the Edit record action
- To clear all property values from the record's property, select the Clear existing property value checkbox.
What are the different ways to use the Edit record action?
The following examples outline the different ways you can use the Edit record action in workflows to automate more complex processes:
- Update property values based on actions: update your record's property values based on interactions with your content. For example, you may want to set a contact's Industry to a value like Construction when they submit a specific form.
- Mirror property values between associated records: use this action to match property values between associated records to ensure your data is kept up to date. For example, you may want to copy a company's Industry property to the associated contact's Industry property. Depending on your workflow, you can add an enrollment criteria and turn on re-enrollment based on the source property is known so changes to the property value are continuously updated.
