
Last updated: June 28, 2024
Available with any of the following subscriptions, except where noted:
|
|
Use the Format data workflow action to fix, format, and maintain your CRM data. For example, you can capitalize contact or company names, or calculate values based on properties.
You can also convert data into single-line or multi-line text properties, or format and add data to a Google spreadsheet.
Formatting data with workflows is a two-step process. First, you'll prepare your data by setting up a Format data action. Then, you'll set up another workflow action to use the data.
Format your data with default formatting options
To format your data with default formatting options:
- In your HubSpot account, navigate to Automations > Workflows.
- Click the name of an existing workflow, or create a new workflow.
- In the workflow editor, click the + plus icon to add a workflow action.
- In the actions panel, select Format data in the Data ops section.
- In the right panel, ensure that the Custom mode switch is turned off.
- In the left panel, select the property or value to format:
- To format property values of enrolled records, click the View properties or action outputs from dropdown menu and select Enrolled record. Then, select a property.
- To format outcomes of previous actions, click the View properties or action outputs from dropdown menu and select Action outputs. Then, click to expand the Previous action name, then select an action output.
- Click the Format dropdown menu and, select a formatting option.
- Click the Output type dropdown menu, then select an output type. Depending on the formatting option selected, data can be formatted as a text, number, date, or datetime value.

- To automatically save your formatted data to an existing property:
- Select the Yes, save the value into a property checkbox.
- At the top, click Save and continue. This will automatically create a new Edit record action. By default, the action's fields will be auto-populated and set to update the same record and property. You can further customize this action, learn more about using the Edit record action.
-
- Then, click Save.
- After setting up your action, click Save.

Default formatting options
When using the Format data action, the following default formatting options are available:
- Add a number: add a specific number to the property or value. Enter the desired value into the Number to add field.
- Add an amount of time: add an amount of time (e.g. hours, days) to a datetime value. Enter the amount of time into the Amount to add field, then use the Unit of time dropdown menu to select the unit of time.
- Calculate nth root of a number: calculate the root value of a number. Enter the root number into the Nth root number field.
- Capitalize first letter: capitalize the first letter of the value. All other characters in the value will be changed to lowercase. Only works for characters in the Latin alphabet.
- Change all characters to lowercase: change all characters in the value to lowercase. Only works for characters in the Latin alphabet.
- Change all characters to uppercase: change all characters in the value to uppercase. Only works for characters in the Latin alphabet.
- Change to title case: change the value to title case. The first letter of every word in the value will be capitalized, all other characters will be changed to lowercase. Only works for characters in the Latin alphabet.
- Convert to Unix timestamp: convert the value to a Unix timestamp.
- Cut a character or several characters: remove specific characters from the value. Enter the characters that you want to remove into the Characters to cut field. For example, for the postal code
02145, you could enter02into the field, which would result in the value of145. - Divide a number: divide the value by a specific number. Enter the number you want to divide by into the Number to divide by field.
- Escape and URL encode: returns the value in a URL-encoded format. For example, from hello world to hello%20world.
- Format date and time: change the datetime format of the value.
- Date format: the new date format for the value.
- Time zone: the timezone the value should be formatted to in IANA TZDB format. By default, returns UTC time.
- Locale: the locale to use for the value, such as en-US or hi-IN.
- Get absolute value of a number: returns the absolute value of a number. You can use this option to ensure that a number is positive.
- Multiply by a number: multiply the value by a specific number. Enter the number you want to multiply by into the Number to multiply by field.
- Remove HTML tags: remove all HTML tags from the value.
- Replace characters: find and replace specific characters in the value.
- Characters to replace: the string of characters in the value to be replaced.
- Replacement characters: the replacement value for the specified Characters to replace.
- Number of instances to replace: the count of times the Characters to replaced values will be replaced. By default, all instances of the character will be replaced.
- Round a number: increase or decrease your value to the nearest defined decimal place.
- Decimal to round to: choose whether to round to a whole number or select the decimal value to round to.
- Rounding method: select from Always round up, Always round down, or Round to the nearest number.
- Subtract an amount of time: choose to subtract an amount of time from a date property. Enter a value into the Amount to subtract field and select a unit of time from the Unit of time field.
- Test if a number is divisible: check if the value is divisible by a specified number. Enter the number you want to check in the Number to divide by field.
- Trim leading and trailing whitespace: remove all leading and trailing whitespace from the value.
Format your data with a custom formula
To format data with a custom formula:
- In your HubSpot account, navigate to Automations > Workflows.
- Click the name of an existing workflow, or create a new workflow.
- In the workflow editor, click the + plus icon to add a workflow action.
- In the actions panel, select Format data in the Data ops section.
- In the left panel, click to toggle Custom mode on.
- In the Formula section, enter your custom formula.
- Click Insert to add one of the following elements in your formula:
- Action output: the output value from an earlier action in the same workflow.
- HubSpot property: the property value belonging to the enrolled record.
- Function: an operator used to set up the formula, such as capitalizing the first letter or adding a number.
- A preview will automatically populate with an example result:
- If your formula uses a variable, like a property value, the preview will automatically show a result using default values.
- To see a preview with other examples, click Edit sample data and enter a different test value for each field.

- To automatically save your formatted data to an existing property:
- Select the Yes, save the value into a property checkbox.
- At the top, click Save and continue. This will automatically create a new Edit record action. By default, the action's fields will be auto-populated and set to update the same record and property. You can further customize this action, learn more about using the Edit record action.
- After setting up your action, click Save.
Custom formula examples
Using custom formulas, you can customize complex formatting options for your outputs. Learn more about the functions you can use with custom formulas. For example, you can calculate the following:
- Removing special characters from phone numbers:
cut(cut(cut([phone], "-"), "*"), "#")

- Calculating your sales representative's commission amount:
([Amount] * [commission_rate])

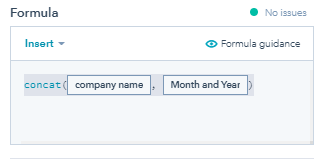
- Concatenating strings values from different properties:
concat([company_name], [month_and_year])
Please note: while it is possible to copy and paste functions into the Formula section, any tokens used such as Action outputs or HubSpot properties must be manually inserted.
Use formatted data
After you've added the Format data action, you’ll need to set up additional actions to use your formatted data. Within the format data action, you can automatically update an existing property with the formatted data.
You can also add the formatted data to your Google Sheet if you've installed the Google Sheets integration.
Update existing properties with formatted data
Set up a Copy property value action to update properties with the newly formatted data. The action can use formatted data from any previous Format data action.
- In your HubSpot account, navigate to Automations > Workflows.
- Click the name of an existing workflow, or create a new workflow.
- In the workflow editor, click the plus icon + to add a workflow action.
- In the actions panel, select Copy property value.
- In the left panel, click the Property or value to copy from dropdown menu, then click to expand a Format data action. To use the previously formatted value, select [output type] value.
- Click the Target property type dropdown menu, then select the type of property that you want to copy the data into.
- Click the Property to copy "[output type] value" to dropdown menu to select the property that you want to update. To create a new property, click Create a new [object] property.
- Click Save.
With the Copy property value action set up, your workflow can now use previously formatted values to update CRM properties.
Add formatted data to Google Sheets
If you've installed the Google Sheets integration, you can add formatted data directly to your spreadsheet without updating any properties in HubSpot. For example, if the contacts' names in the sheet need to be formatted in lowercase, but you still want their names to remain capitalized in HubSpot.
You can connect the Google Sheets app from the App Marketplace or from within a workflow.
- In your HubSpot account, navigate to Automations > Workflows.
- Click the name of an existing workflow, or create a new workflow.
- In the workflow editor, click the plus icon + to add a workflow action.
- In the actions panel, select Create Google Sheet row.
- Click the Spreadsheet dropdown menu. Then, select the spreadsheet you want to send data to. You can select from the spreadsheets that are owned by or have been shared with the user who connected Google Sheets to HubSpot.
- Click the Sheet dropdown menu. Then, select the sheet you want to send data to. The Sheet field refers to the tabs at the bottom of your spreadsheet.
- Set up your Google sheet rows to use formatted data:
- Click the Header dropdown menu. Then, select the corresponding columns in your Google sheet.
- Click the Property field.
- In the data panel, click the View properties or actions output from dropdown menu and select Action outputs.
- Click to expand a Format data action. To use the previously formatted value, select [output type] value. This action can use formatted data from any previous Format data action.
- Repeat until you have completed your new row.
- Click Save.

With the Create Google Sheet row action set up, your workflow can now use previously formatted values to add new rows in your Google Sheet without affecting existing properties. Learn more about adding data to Google Sheets with workflows.
