- Knowledge Base
- CRM
- Inbox
- Set up the conversations inbox
Set up the conversations inbox
Last updated: September 26, 2025
Available with any of the following subscriptions, except where noted:
The conversations inbox is a central location in your HubSpot account where messages from all of your connected channels will appear. You can view ongoing conversations and reply to messages.
Depending on your HubSpot subscription, you can either edit the default conversations inbox or create new inboxes.
Please note: all accounts created after April 1st, 2024 cannot create tickets from channels connected to the inbox. Instead, learn how to manage tickets in help desk. Otherwise, you can use the inbox as a shared inbox.
Set up the default inbox
When you first create a HubSpot account, HubSpot will automatically create a conversations inbox and provision a fallback email address. You can edit the fallback email address, or connect additional channels to start receiving messages in the inbox. You can also edit which users and teams have access to the conversations inbox.
- In your HubSpot account, click the settings settings icon in the top navigation bar.
- In the left sidebar menu, navigate to Inbox > Inboxes.
- To rename the inbox:
- Next to the Current view dropdown menu, click the Actions dropdown menu and select Rename inbox.
- In the dialog box, enter a name for the inbox and click Rename.
- To connect a channel to start receiving messages in the inbox, click Connect a channel, then select a channel. Learn more about connecting channels to the inbox.
- To connect a Slack account to the inbox, in the Slack Integration section, click Connect Slack. Learn more about setting up the Slack integration.
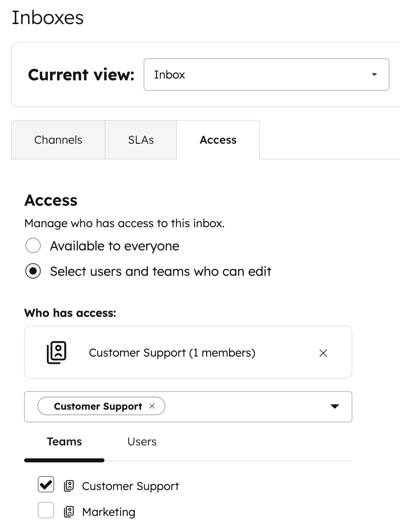
- To manage which users and teams can access the inbox, click the Access tab and select an option:
- Available to everyone: every HubSpot user in the account can access the inbox.
- Select users and teams who can edit: only selected users or teams can access this inbox.
- Click Save.
Please note:
- All inboxes are automatically set to Available to everyone. If you wish to limit access further, follow the steps above to manage access.
- If you choose Specific users and teams, users with Account access or Super admin permissions can view any conversations inbox in the account, but cannot take actions in the inbox, such as replying to a thread, unless they are selected as team member in the inbox's Access settings. However, users with Account access or Super admin permissions can still reply to one-one emails from the record.
- Incoming conversations can only be automatically assigned to users with a paid seat, but free users can still assign and respond to unassigned conversations if they have access to the inbox.
Edit the fallback email address
A fallback email is an email that HubSpot provisions that allows you to use certain HubSpot tools, such as ticket automation, if you haven't connected a team email address yet. The fallback email is also used if your team email address is suddenly disconnected from the conversations inbox.
When setting up the inbox, you have the option to customize the fallback email address to immediately start sending emails. If you don't want to use the fallback email address, learn how to connect a team email address to start receiving emails in the inbox.
- In your HubSpot account, click the settings settings icon in the top navigation bar.
- In the left sidebar menu, navigate to Inbox > Inboxes.
- Next to the fallback email, click Edit.

- To turn on the fallback email address for sending, on the Configuration tab, select the Use the HubSpot email for sending messages checkbox.
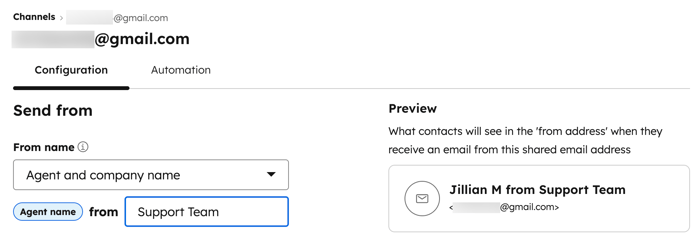
- To customize the From name that appears, click the From name dropdown menu and select an option.
Please note: you cannot use the same from name for multiple fallback emails. The from name value must be unique to the fallback email address.
-
- Agent and company name: the user's name and the company name will appear when the contact receives an email. Enter the company name in the text field.
- Company name: select this option to display the company name only. Enter the company name in the text field.
- To customize the From address, select one of the following options:
- Use default: the default from address for users in a paid account will appear as [username]@[subdomain].hs-inbox.com. The default option for free users will display as [username]@[subdomain].hubspot-inbox.com.
-
- Customize from address: if you enter an email address that isn't recognized, you will need to verify that you have access to that domain. Click connect your domain to connect and authenticate your email sending domain.
- You can configure the fallback email as a forwarding address in your mail client settings so emails sent to that email address are forwarded to the conversations inbox. Click Copy next to the Forwarding address field, then add it as a forwarding address in your mail client settings.
- To include a team email signature:
-
- Click Add team signature. This signature only applies to emails sent directly from the conversations inbox. Learn how to set up your email signature for emails sent from CRM records.
- In the text box, customize your team email signature in the Simple editor, or click HTML and edit the signature in HTML. Use the rich text toolbar at the bottom to format the text, insert a link, or insert an image. To insert a personalization token that will populate the sender's name, click the Insert Token dropdown menu and select Full name, First name, or Last name.
Please note:
- Email clients handle custom HTML differently. When adding more styling, there is increased risk of it not rendering when you compose an email. Learn more about HubSpot's best practices for creating an HTML email.
- If you want to customize the font of your signature, you can use the face attribute in a font tag in the HTML editor but be aware that many fonts are not supported across email clients.

- On the right, preview how the from name, from email, and email signature will appear in the contact's inbox, then click Save.
- By default, when an email is forwarded to the inbox, the email will log to the original sender's contact record. To turn off this setting so that emails log to the sender who forwarded the email, click to toggle the Choose original sender of email forwards switch off.

Please note: only the original CC recipients will be shown in the conversation inbox and record timeline. Any recipients added to the CC field when forwarding the email will not be displayed.
- To configure your assignment rules, click the Automation tab.
- If you’re assigned to a Sales or Service seat, you can set routing rules to automatically route incoming emails to specific users and teams in your account:
- Click to toggle the Automatically assign conversations switch on.
- Click the Assign to dropdown menu and select a routing option:
-
-
- Specific users and teams: assign incoming emails to the users or teams selected. Select the users or teams from the Specific users and teams dropdown menu.
- Contact owner: assign incoming emails to a contact's owner. The contact must have an owner assigned to their record and be tracked with a cookie. If the owner is offline, the submission will be emailed to the visitor's owner.
- By default, incoming conversations will only be assigned to agents that are available. If no agents are available, the email conversation will be unassigned. You can clear the Assign to available users only checkbox to turn off assignment based on agent availability.
-
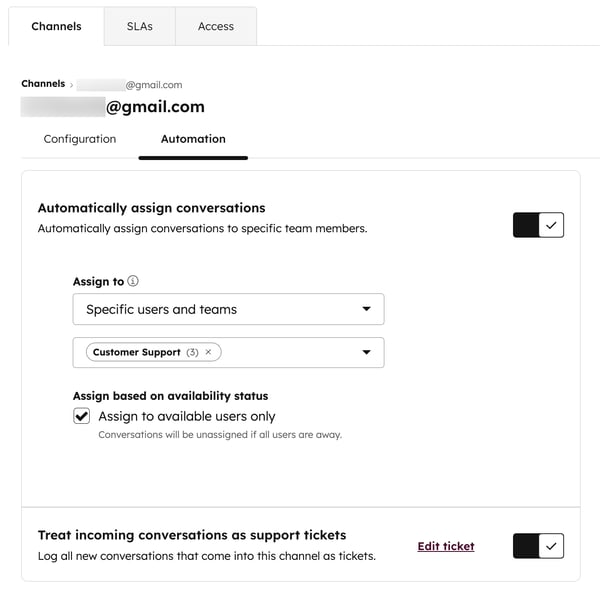
Please note: incoming messages can only be automatically routed to users with assigned Sales or Service seats. If the user does not have access to a paid seat, you cannot include them in your automatic assignment rules.
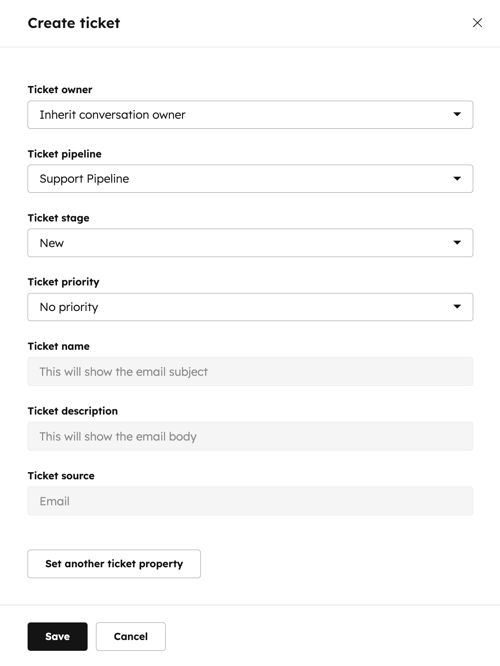
- To edit the default ticket properties, including the ticket pipeline and stage:
- Click Edit ticket next to the Treat incoming conversations as support tickets setting.
- In the right panel, use the dropdown menus to edit the properties.
- By default, if you have set up automatic assignment rules in the inbox, the ticket owner will be the same as the conversation owner. To change the ticket owner, click the Ticket owner dropdown menu and select another option.
-
- Click Save.
- To finish editing your fallback email address, click Save.
If you made any changes to your configuration or routing rules, your contacts will see the updated from name, from address, and email signature when they receive an email from you.
Create a new inbox (Professional or Enterprise only)
Users in a Professional or Enterprise account can create multiple conversations inboxes. This is useful if you have multiple teams that need access to the conversations tool, but you want to keep your messages segmented and organized. For example, you can create a sales inbox to manage inquiries about pricing and packaging and a customer support inbox for your support team to manage incoming requests.
- In your HubSpot account, click the settings settings icon in the top navigation bar.
- In the left sidebar menu, navigate to Inbox > Inboxes.
- Next to the Current view dropdown menu, click the Actions dropdown menu and select Create new inbox.
- In the Team inbox name field, enter a name for your inbox.
- Click the Who has inbox access dropdown menu to choose who can see this inbox. You can also add or remove team members after creating your inbox.
- Everyone: every HubSpot user in the account can access the inbox.
- Specific users and teams: only selected users or teams can access the inbox.
Please note: incoming conversations can only be automatically assigned to users with a paid seat, but free users can still assign and respond to unassigned conversations if they have access to the inbox.
If you choose Specific users and teams, users with Account access or Super admin permissions can view any conversations inbox in the portal, but cannot take actions in the inbox, such as replying to a thread, unless they are selected as team member in the inbox's Access settings.
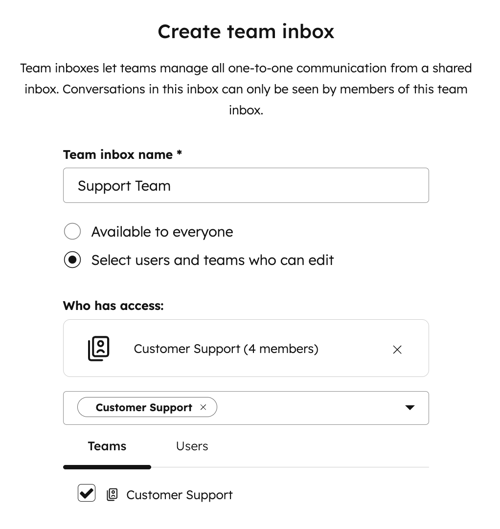
- Click Next.
- Select a channel to connect, or click Connect a channel later.
Learn more about connecting channels to the conversations inbox.
When you navigate to the inbox settings, a list of connected channels will appear. You can edit the existing channels' settings or connect additional channels. Learn how to compose and reply to emails in the inbox or chat with your website visitors.
Manage channel status
You can turn off a connected channel in your inbox settings:
- In your HubSpot account, click the settings settings icon in the top navigation bar.
- In the left sidebar menu, navigate to Inbox > Inboxes.
- Click to toggle the Status switch on or off for a connected channel.

If a channel is turned off, you will no longer be able to send messages from the channel in HubSpot. Furthermore, any incoming messages to the channel will not appear in the conversations tool, and will not be logged to the CRM.