- Knowledge Base
- Commerce
- Payments
- Create and use discount codes
Create and use discount codes
Last updated: November 10, 2025
Available with any of the following subscriptions, except where noted:
Discount codes
In addition to creating payment links with unit discounts and one-time order discounts, you can create discount codes that buyers can use when going through checkout. Discount codes can either be currency-based or percentage-based and can be deactivated at any time. After creating a discount code, you can apply it to a payment link. Learn more about the types of discounts and how they affect payments.
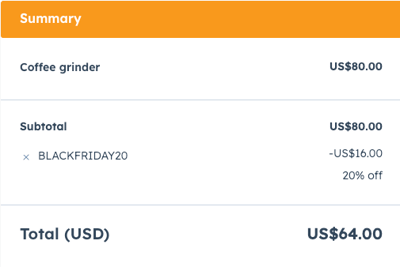
For example, during a seasonal sale, you could create a BLACKFRIDAY20 discount code. You can create or update existing payment links to allow discount code usage and deactivate the code once the sale ends.
Learn how to create and use discount codes for payment links below.
Before you get started
Review the following considerations when using one-time discounts:
- You can turn on discount codes for payment links that include unit discounts, but not for payment links that include a one-time discount.
- Buyers can't enter a discount code on payment links that are embedded using the embed code.
- It's not possible to apply 100% discounts.
Create a discount code
- In your HubSpot account, click the settings settings icon in the top navigation bar.
- In the left sidebar menu, navigate to Objects > Products.
- At the top, click the Discount codes tab.
- In the upper right, click Create discount code.
- In the right panel, configure the discount code. You can update these settings at any time:
- Name: enter the internal name for the discount code.
- Discount code type: click the Discount code type dropdown menu to select either Fixed amount or Percentage.
- Currency: if your account is set up to use multiple currencies, click the Currency dropdown menu and select a currency.
- Value: enter the discount amount.
- Code: enter the code that the buyer will use at checkout (e.g., BLACKFRIDAY20).
- Code status: click the Code Status dropdown menu and select either Active or Inactive. An inactive discount code can't be applied at checkout.
- Click to expand the Options section to set the maximum number of redemptions, and an expiry date for discount codes:
- In the Maximum discount usage field, enter the number of times a discount can be used.
Please note: while the Maximum usage count field allows you to set a maximum number of redemptions, a technical limitation may result in an over-redemption in some circumstances. A redemption is counted once the payment of the transaction, with the discount applied, is processed. This payment process involves a delay, and can take a few seconds for a card transaction, or a few days for an ACH transaction. A fix for this issue is being developed. In the meantime, please be aware of this behavior, and review your discount code activity regularly in the discount code table.
-
-
- Click the Code expiration date picker and select an expiration date. Expiration is set to 23:59 of the date you have chosen, based on your account time zone setting.
- Click Save.
-
Enable payment links to use discount codes
By default, payment links aren't enabled to use discount codes. To enable a payment link to allow customers to use discount codes:
- In your HubSpot account, navigate to Commerce > Payment Links.
- To update an existing payment link, click the name of the payment link. Or, create a new payment link.
- At the top, click the Settings tab.
- Under Checkout, click to toggle the Discount codes switch on.
- At the top, click the Preview tab. The preview screen now displays the + Add discount code option on the buyer checkout page.

- In the top right, click Create if creating a new payment link, or Save if updating an existing payment link.
Manage discount codes
To view, update, or delete a discount code:
- In your HubSpot account, click the settings settings icon in the top navigation bar.
- In the left sidebar menu, navigate to Objects > Products.
- At the top, click the Discount codes tab.
- Any created discounts are displayed in the discount code table. If you have set a maximum number of redemptions, they're tracked in this table.

- To update a discount code, click the name of the discount code, then update the details in the right panel. Here, you can change the status from Active to Inactive.
Please note: discount code deactivation is immediate, meaning any customers who try to check out with that code after deactivation will receive an error during checkout.
- To delete a discount code, hover over the discount code, click Actions, then select Delete.
- To restore deleted discount codes:
- In the upper right of the table, click Restore discount codes externalLink.

- In the upper right of the table, click Restore discount codes externalLink.
-
- Select the checkboxes next to the discount codes you want to restore and click Restore in the upper right.

- Select the checkboxes next to the discount codes you want to restore and click Restore in the upper right.
-
- In the dialog box, enter the number of discount codes to restore, then click Restore.
Next steps
- Learn how to embed payment links on your HubSpot website, marketing email, or an external site.
- Learn how to manage payments.