- Knowledge Base
- Sales
- Sales Workspace
- Create and manage leads using the HubSpot mobile app
Create and manage leads using the HubSpot mobile app
Last updated: November 25, 2025
Available with any of the following subscriptions, except where noted:
-
Sales Hub Professional, Enterprise
Users with an assigned Sales Hub seat can quickly and efficiently manage their contact and company leads using the HubSpot mobile app. This includes reviewing leads, moving them through lead stages, and performing prospecting activities, such as making calls and sending emails.
Manage leads
To manage your leads using the HubSpot mobile app:
- Open the HubSpot app on your mobile device.
- Tap Menu, then tap Leads in the left sidebar. If you selected Sales as your Selected Experience, you can click the Leads icon at the top of the app.

- To change views and view your leads, tap the board icon in the top right.

- Scroll to the left to review your leads categorized by lead status.
- To return to the list view, tap the list icon in the top right.
- To view another lead, tap Pipeline in the top right. Then, tap the pipeline you'd like to view, or tap All pipelines to view all.

- To add views:
- Tap Add Views at the top.
- Select the checkboxes next to the views you want to add.
- Then, tap Done in the top right.

- To change views, tap the view from the list on the top. By default, you'll view All leads. Swipe to the right to scroll through the options.
- To sort your leads, once you're in a view, click Sorted by X. Then tap the lead property you want to sort by or tap View all lead properties to select from all lead properties. Once you select a property click Apply.

- (Android only) If you're a Super Admin tap Lead owner at the top, then select the lead owners whose leads you'd like to view. Select unassigned to view unassigned leads.
- To create a lead, tap + Lead in the bottom right. Then, enter the information for the lead, and click Save. You can also add leads from the associations tab. Or to add a from the mobile app home screen, click + Create in the bottom right.
- To view or take action on an individual lead, tap the lead's name.
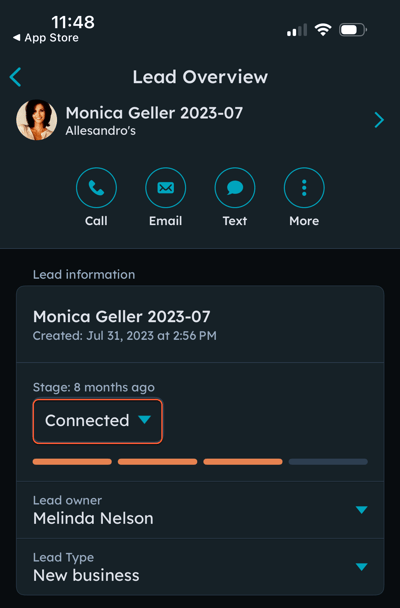
- On the Lead overview page, review the lead's full details. To navigate to the lead's activity, associations, or about information, tap the arrow in the upper right.

- On the Activity tab, review your activities with the lead. Tap the Filter activity dropdown menu to filter the activities. You can also tap the associated icon to add a note, create a task, or log an activity.
- Tap the Associations tab to view associated objects and leads. To add an association, tap the add add icon, tap the assocation, and tap Done.
- Tap the About tab to review the lead's properties. Tap Edit to edit properties. Tap Save to save any property changes. To delete a lead, tap Edit, then, at the bottom, tap Delete.
- Use the action icons to take actions, such as making a call or enrolling the lead in a sequence. To access all available actions, tap More. HubSpot will automatically update the lead's stage when performing actions. For example, if you email a lead in a New stage, their stage will automatically update to the Attempting lead stage. Learn more about configuring lead pipeline stages.

- To update the lead's stage, tap the Stage dropdown menu, then tap the new Stage. Your options will depend on the stages configured in your lead pipeline settings.

-
- When setting a lead to a Qualified stage that requires deal creation, you'll be prompted to create a deal. The deal will automatically be associated with the contact and their associated company if applicable.
-
- When setting a lead to a Disqualified stage, you'll be prompted to enter disqualification details, depending on your disqualification settings. By default, you'll need to enter a disqualification reason, and you can add an optional note.
- Tap Save to save your changes.
- To update the lead's owner, tap the Lead owner dropdown menu, then tap the new Owner.
- To update the lead's type, tap the Lead type dropdown menu, then tap the new Type.
- In the Recent Communications section, you can review communication activities associated with the lead, such as calls made, sequence activity, email and SMS messages sent and received, and meetings booked. To view more details about an activity or take action on it, tap the activity.

Prospecting
leads
Thank you for your feedback, it means a lot to us.
This form is used for documentation feedback only. Learn how to get help with HubSpot.