- Knowledge Base
- Automation
- Workflows
- Use journey automation
BetaUse journey automation
Last updated: October 30, 2025
Available with any of the following subscriptions, except where noted:
-
Marketing Hub Enterprise
Use journeys to build engaging and personalized marketing automation experiences all within the same view, instead of building across a handful of workflows. Marketers can build out marketing strategies, including lead generation, lead nurturing, or customer re-engagement campaigns.
After creating your journey, you can analyze your journey's performance and report on your marketing automation efforts.
Create journeys
When creating journeys, enroll contacts using an enumeration property and selected lists. You can assign each journey stage to a different property value. Each stage will work as an automated flow. Contacts will move through the journey on different paths depending on their progress through each stage.
In each journey, you can set one goal exit end based on your goals, corresponding to the journey property value selected. However, you can have multiple unsuccessful ends based on different property values.
For example, you can set up a journey with the new default Journey stage property. Then, create stages for each of the Journey stage property values and add actions to automatically execute at each stage. Finally, set Journey stage property values for your goal exit and other exits.
Create a new journey
Each user can create up to 10 journeys. To create a new journey:- In your HubSpot account, navigate to Marketing > Journeys.
- In the top right, click Create journey.
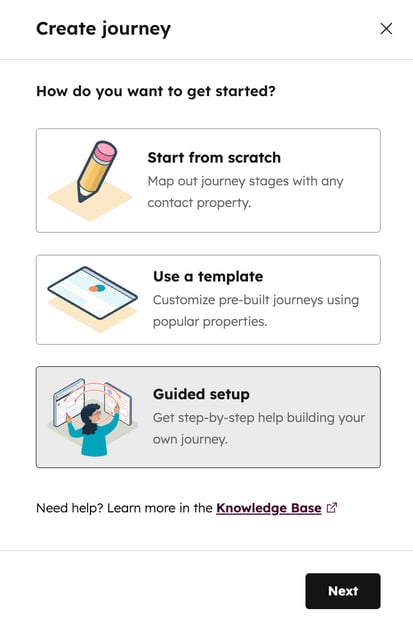
- To create a journey from scratch:
- In the right panel, select Start from scratch.
- In the bottom right, click Next. You'll be directed to the journey editor. Then, continue setting up your journey.
- To create a journey from a template:
- In the right panel, select Use a template.
- In the bottom right, click Next.
- Select your template. Then, click Next. You'll be directed to the journey editor. Then, continue setting up your journey.
- If you're creating a journey for the first time, to learn how to create a journey from scratch:
- In the right panel, select Guided setup.
- In the bottom right, click Next. Then, follow the guided tour to create a new journey.
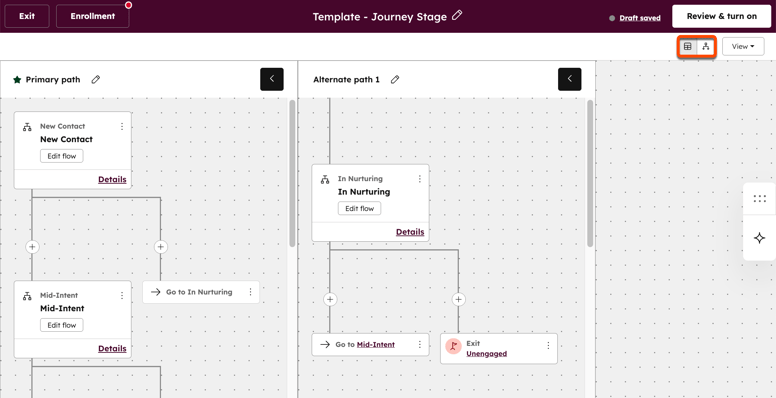
- In the journey editor, you can review your journey as different engagement paths, or as a single journey tree. To select your view, in the top right, click the engagement path icon or the tree icon.
Set up journey enrollment
When building a new journey, select your lists for enrollment and center your journey around a property such as Journey stage or lifecycle stage. You can use any enumeration property such as a dropdown select, multiple checkboxes, or radio select type property.
When setting up a journey, you can assign specific property values to different journey stages. When a contact is updated with a specific property value, they will enroll in the corresponding stage. After setting up your journey, it is still possible to change the journey's enrollment property and property values used for each stage.
Please note: you cannot select the same eligibility lists and property as another journey. To set up a new journey, you must select different lists or a different property for enrollment.
To set up your enrollment criteria:
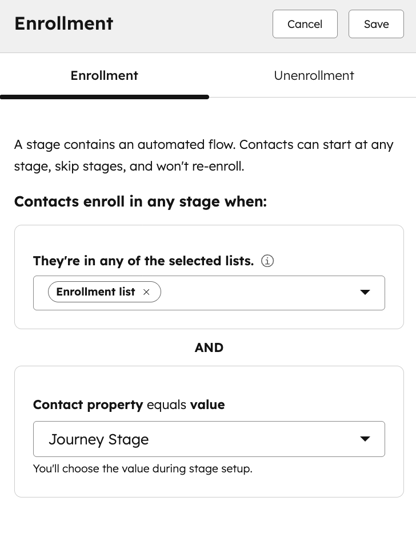
- In the top left, click Enrollment.
- Click the They're in any of the selected lists dropdown menu and select the contact lists with contacts eligible to enroll in the journey.
- This doesn't mean that contacts will automatically enroll. Contacts will still need to meet either the journey's starting criteria or any of the stage values to enroll.
- Contacts will still continue on the journey even if removed from lists after enrolling.
- You can select up to 5 lists. Learn more about using lists.
- Click the Contact property equals value dropdown menu and select a property.
Set up journey unenrollment
To set up unenrollment criteria in the journey editor:
- In the top left, click Enrollment.
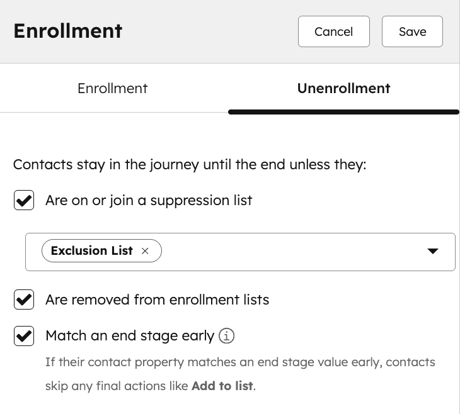
- In the left panel, click the Unenrollment tab.
- Select the checkboxes next to the unenrollment criteria that you'd like to apply:
- Are on or join a suppression list: unenroll contacts from the journey when they're added to any of the selected suppression lists.
- Are removed from enrollment lists: unenroll contacts from the journey if they're no longer in the enrollment lists.
- Match an end stage early: unenroll contacts from the journey if they match an end stage in the journey. When selecting this, contacts will skip any final actions associated with the end stage.
Change the journey enrollment criteria
If you've previously set up your journey with a different property, to update the property used:- In the top left, click Enrollment.
- In the left panel, click the Contact property equals value dropdown menu and select a new property.
- At the top, click Save.
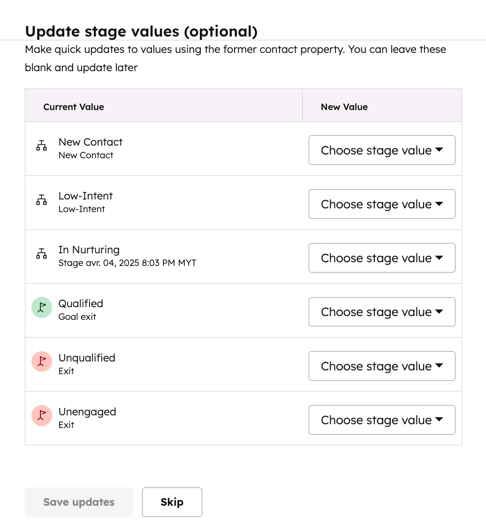
- In the dialog box, select a corresponding stage value based on the new property.
- At the bottom, click Save updates. To select the stages' property values later, click Skip.
Select a journey's starting stage
Select a property value from the enrollment property to begin enrolling contacts into your journey:
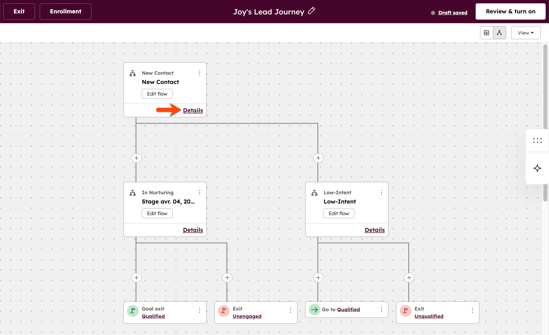
- In the journey editor, from the starting stage, click Details. In the left panel, set up your journey starting stage:
-
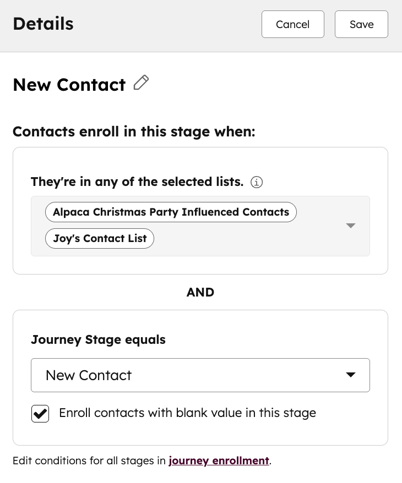
- Click the first dropdown menu and select a property. If you've previously selected a property when setting up enrollment, the property will appear by default.
- Click the second dropdown menu and select a property value to set as your enrollment stage value.
- To enroll new contacts with no property value for the selected property, select the Enroll contacts with blank value in this stage checkbox.
- In the top, click Save.
Configure your journey stages and actions
Please note: Please avoid sharing any sensitive information in your enabled data inputs for AI features, including your prompts. Admins can configure generative AI features in account management settings. For information on how HubSpot AI uses your data to provide trustworthy AI, with you in control of your data, you can refer to our HubSpot AI Trust FAQs.
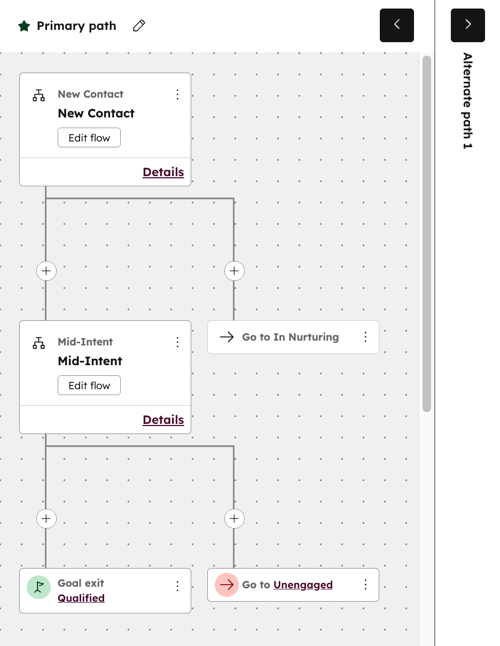
To add more stages and actions to each of your journey stages:- In the journey editor, hover over the line and click the + icon. Then, select Add new stage. When adding a new stage to an unsuccessful path:
- If you're in the tree view, this'll create a new branch.
- If you're in the engagement path view, this'll create a new alternative path section in the editor. You can click the collapse icon to collapse and expand each section.
- You can add up 10 stages per journey.
 .
.
- After adding a stage you can add actions to your newly added stages. In the stage, click the menu icon and select Edit flow.
- You must add at least one action for each stage.
- You can add up to 50 actions per stage.
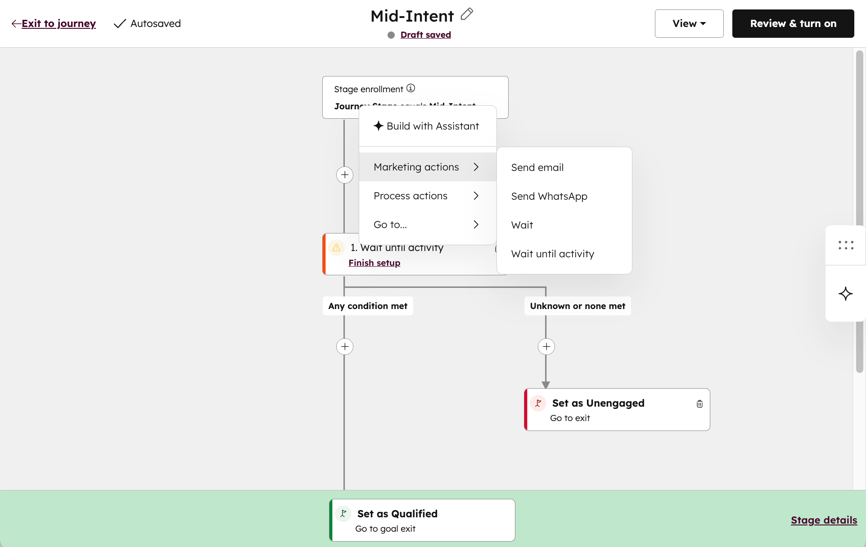
- To add an action in your stage, click the + plus icon. Then, you can use Breeze Assistant (beta) or manually add actions to your stages.
- To use Breeze Assistant to add actions (beta), click Build with Assistant. Then, enter your prompt and click the send icon. Actions will be suggested based on the request.
- When manually adding an action, you can select from the following action types:
- Marketing actions: select from the following marketing actions.
- Send Assets: send an automated marketing email, SMS, or WhatsApp message to the contact. When setting up this action, you can trigger all three asset types to send at once.
- Wait: add a delay for a specified amount of time.
- Wait until activity: delay until a specific user activity occurs. For example, delay until the user submits a form, visits a specific page on a website, replies to an email, or more.
- Process actions: select from the following process actions.
- Create task: create and add a task to the enrolled contact. This task will also appear on the tasks page. Learn more about using tasks.
- Set property: set a specific property value for the enrolled contact. You can configure the stage used for the journey automation.
- Send notification: send an in-app or internal email notification. You can send the notification to specific users, teams, or the enrolled contact's existing owners.
- Go to: associate the stage with a successful or unsuccessful end.
- Marketing actions: select from the following marketing actions.
- After setting up your actions, in the top left click Exit to journey.
 .
.
- In the main journey editor:
- To route a contact back to an earlier stage, hover over the line and click the + icon. Then, select Go to stage. This option can only be selected for stages, go to paths cannot be added between stages.
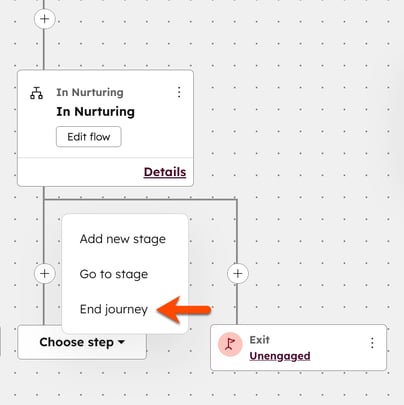
- To end a journey, hover over the line and click the + icon. Then, select End journey. This will automatically add a Goal exit or Exit.
Determine the success of your journey
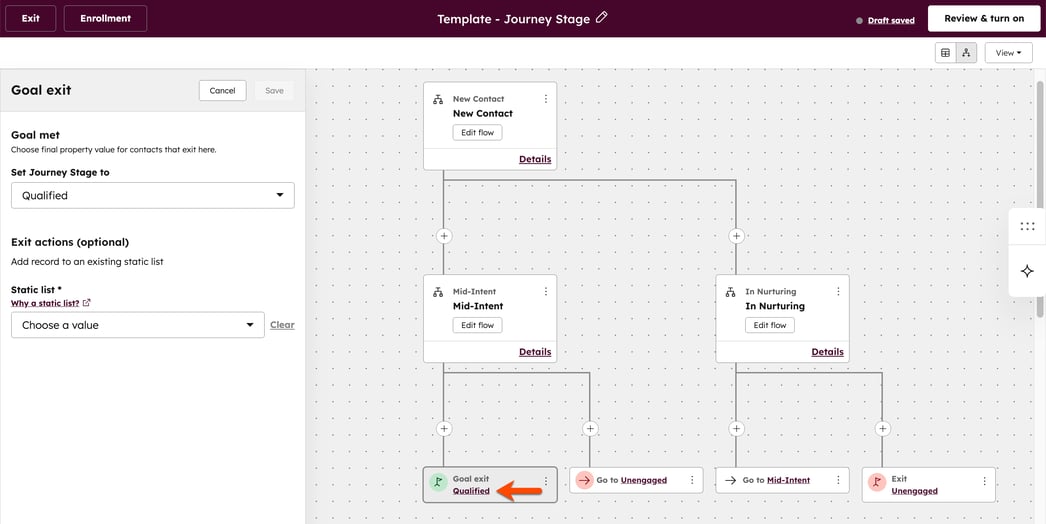
Select a property value to determine the success or failure of your journey. To set up your Goal exit or Exit:- In the Goal exit or Exit box, click Set up. If you're using a template or editing an existing journey, click the stage name.
- In the right panel, click the Set [property name] to dropdown menu and select a property value.
- For each end, you can also click the Add to static list dropdown menu and select a static list. This will add all contacts who have finished the journey to the selected static list. This is an optional step.
Please note: you can only select one Goal exit end per journey.
Turn on your journey
- After setting up your journey automation, in the top right, click Review and publish.
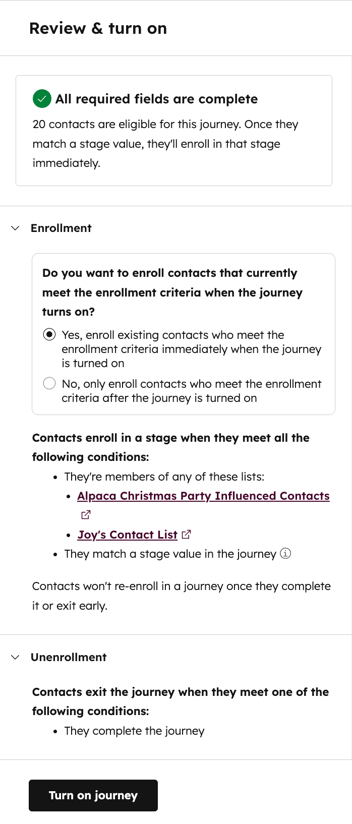
- In the right panel, you can review the number of contacts eligible for the journey. You can also configure the following:
- Do you want to enroll contacts that currently meet the enrollment criteria when the workflow turns on: choose to enroll records that currently meet the enrollment criteria or only enroll records that meet the criteria in the future.
- Yes, enroll existing contacts who meet the enrollment criteria immediately when the journey is turned on: enroll all existing records that meet the enrollment criteria.
- No, only enroll contacts who meet the enrollment criteria after the journey is turned on: only enroll records that meet the enrollment criteria after the workflow is turned on.
- Do you want to enroll contacts that currently meet the enrollment criteria when the workflow turns on: choose to enroll records that currently meet the enrollment criteria or only enroll records that meet the criteria in the future.
- At the bottom, click Turn on journey.
Manage your journeys
From the journey index page, you can edit, delete, and manage your journeys. When editing a journey, please note the following:
- You can edit both published journeys or journeys in a draft state. When editing a journey, updates will not be published automatically. You can make changes to the journey before manually publishing.
- If you delete a stage, any contacts in the deleted stage will be removed from the stage and will be inactive. These contacts will not enroll in another stage unless their tracking property is updated to a stage value.
- If you delete a single action or add an action within a flow:
- Contacts will automatically move to the next available action.
- For example, you have a send notification, create task, and set property action in sequence. If you delete the create task action, any contacts will move from directly from the send notification action to the set property action.
- If you delete multiple actions in sequence:
- Contacts in the previous action will become inactive and will not enroll in another stage or action unless their tracking property is updated to a stage value.
- For example, you have a send notification, send assets, create task, and set property action in sequence. If you delete both the send assets and the create task actions, then contacts currently in the send notification action will become inactive.
To manage your journey:
- In your HubSpot account, navigate to Marketing > Journeys.
- To see which assets were used in a journey, such as emails or SMS messages, click More and select See assets used. The assets will appear in the right panel.
- To review the performance of a journey, click More and select View details.
- To delete a journey, click More and select Delete.
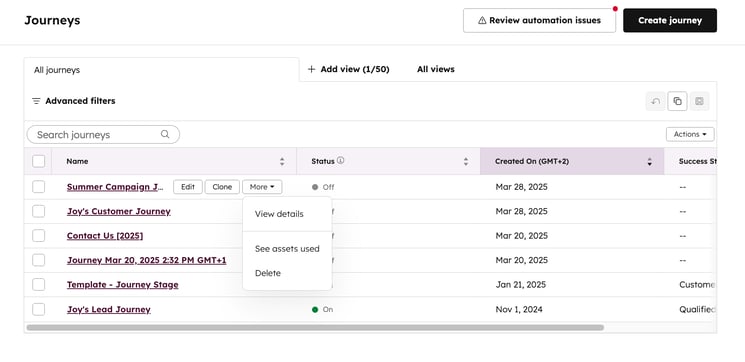
- To edit a journey:
- Hover over the journey and click Edit. You will be directed to the journey editor.
- Edit your journey.
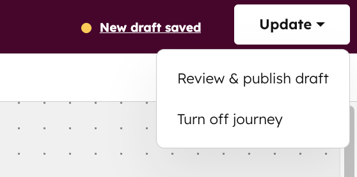
- After editing your journey, in the top right, click Update and select Review and publish draft.
 .
.
Review the version history of a journey
To review the version history of a journey:
- In your HubSpot account, navigate to Marketing > Journeys.
- Click the name of an existing journey.
- To view the version history of the overall journey, in the top right, click View and select Version history.
- To view the revision history of a specific journey stage, click Edit flow on the stage that you'd like to review. Then, click View and select Version history in the top right.
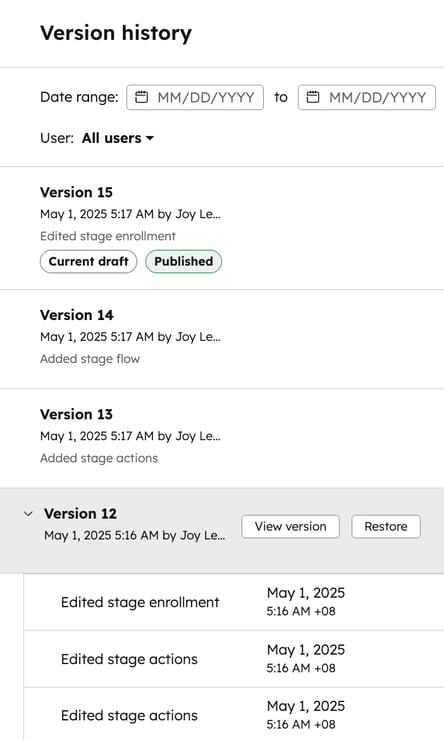
- In the right panel, you can review all previous versions of your journey or journey stage, sorted by date. At the top, you can filter your version history by the Date range for the version or the User that edited that version.
- To view more details about the changes made in each version, click the right dropdown icon to expand the section for the version.
- To view a specific version, hover over the version and click View version.
- To restore a specific version, hover over the version and click Restore. Then, click Restore version.
- This feature will only apply when reviewing overall journeys. It will not appear when reviewing individual journey stages.
- The restored version of the journey will be saved as the current draft and any previous changes in your draft will be erased.
- After restoring your journey, you'll still need to publish your journey to take the updates live.
Review your journey’s performance
After turning on your journey, you can analyze the enrollment history and individual performance of each journey. This includes the journey’s metrics, reporting, and details such as conversion metrics.
Review journey reports
You can review your journey reports while reviewing your overall performance in your journey details or from the journey report editor.
- To review your journey reports from your journey details:
- In your HubSpot account, navigate to Marketing > Journeys.
- Hover over a journey. Then, click More and select View details.
- At the top, click the Reports tab.
-
To review your journey reports from the journey report editor:
- In your HubSpot account, navigate to Marketing > Journeys.
- Click the name of an existing journey.
-
- In the top right of the journey editor, click View and select Report.
-
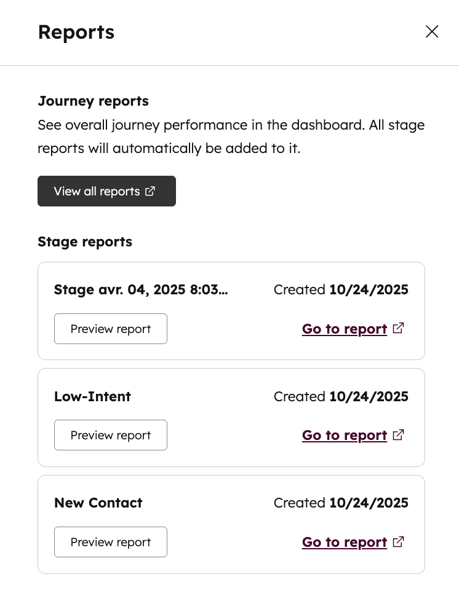
- To review the overall journey dashboard, click View all reports.
- In the Stage reports section, click Preview report for the stage you want to preview.
- To review the report in the reports editor, click Go to report.
Please note: you cannot edit journey reports.
Review a journey’s conversion metrics
From the journey editor, you can review your journey’s conversion metrics for each stage of the journey.
- In your HubSpot account, navigate to Marketing > Journeys.
- Click the name of an existing journey.
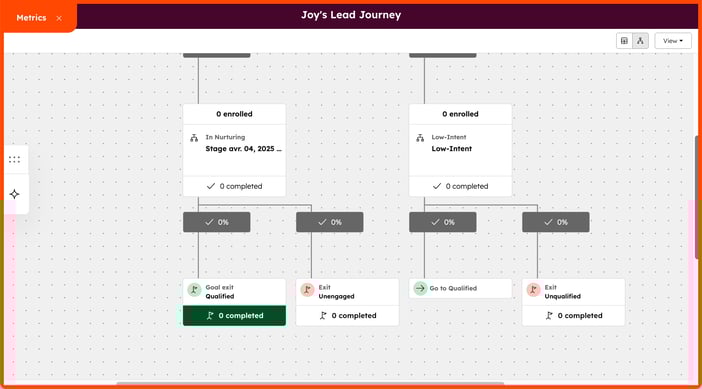
- To review your journey metrics, in the top right, click View and select Metrics. From the metrics page, you can review the following:
- The total enrollment count for the journey.
- The percentage and count of enrollments that reached each endpoint.
- For each stage, the percentage of enrollments that continued along each path.
Review a journey’s performance
To review a journey's overall performance metrics:- In your HubSpot account, navigate to Marketing > Journeys.
- Hover over the journey. Then, click More and select View details.
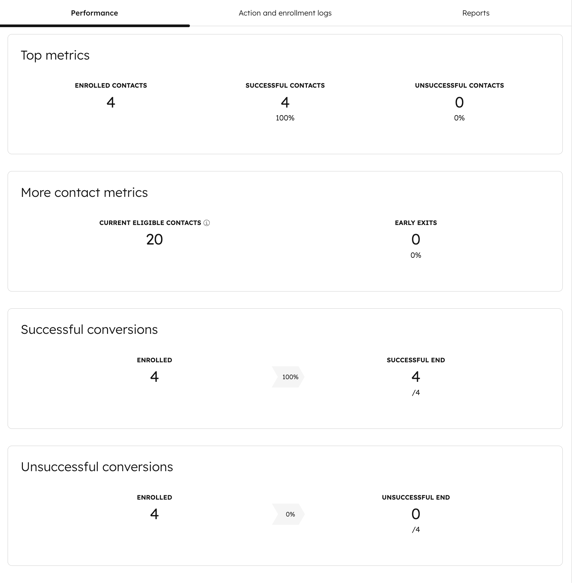
- From the Performance tab, you can review the following performance reports. The reports will only show data from when the journey was turned on.
- Top metrics: this report displays the total number of enrolled contacts out of all eligible contacts, the number of successful contacts, and unsuccessful contacts.
- More contact metrics: this report displays the number of eligible contacts and contacts that have exited early from the journey.
- Successful conversions: the percentage of successful conversions with the count of eligible contacts, enrolled contacts, and contacts that reached the journey with a successful end.
-
- Unsuccessful conversions: the percentage of successful conversions with the count of eligible contacts, enrolled contacts, and contacts that reached the journey with an unsuccessful end.
- Unsuccessful conversions: the percentage of successful conversions with the count of eligible contacts, enrolled contacts, and contacts that reached the journey with an unsuccessful end.
Review journey enrollments
To review a list of contacts that have enrolled in your journey:
- In your HubSpot account, navigate to Marketing > Journeys.
- Hover over a journey. Then, click More and select View details.
- At the top, click the Action and enrollment logs tab.
Please note: each contact can only enroll in a journey once. Contacts cannot re-enroll in a journey.
