Last updated: September 19, 2025
Available with any of the following subscriptions, except where noted:
Access your CRM contact information directly from your Outlook inbox with contact profiles. After you've installed the HubSpot Sales Office 365 add-in, contact information is available in your inbox's task pane. Use contact profiles to review contact information and recent sales activities. You can also create tasks and associate deals or tickets, all from within your Outlook inbox.
Please note: if you are using the Outlook desktop add-in, the add-in settings will look different in your mail client. Learn how to use contact profiles with the Outlook desktop add-in.
Access contact profiles
- In your Outlook inbox, compose a new email or open an existing email in Outlook. If composing a new email, add a recipient.
- Open the sales tools in your inbox. This process will differ slightly depending on the version of Outlook you're using. In the table below, hover over the icon to view the add-in for each Outlook version.
| Outlook version | Access the add-in |
|
Outlook for Windows or Mac (classic) 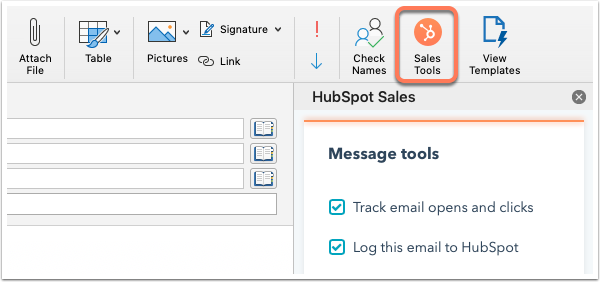
|
At the top of Outlook, in the main ribbon, click Sales Tools. |
|
Outlook for Windows or Mac (new) 
|
At the top of Outlook, in the simplified ribbon or toolbar, click the three horizontal dots. Then, select Customize Toolbar to access the add-in. You can also click and drag HubSpot Sales into the toolbar. |
|
Outlook on the web 
|
At the top of Outlook, in the main ribbon, click Apps, then select HubSpot Sales. |
- In the right task pane, under the Contact profile section, you can take the following actions:
-
- To add a new contact to your CRM, click Add to HubSpot.
- Enter the contact information in the contact create form.
- At the bottom, click Create.
- If the contact already exists in your CRM, click Open in CRM to view the contact in your HubSpot account. This will redirect you to the contact record.
- To view the contact profile in your Outlook inbox, click View contact.
- To add a new contact to your CRM, click Add to HubSpot.

Use contact profiles
In a contact's profile, you review contact details and recent sales activities. You can also edit contact properties, create tasks, and associate new or existing deals or tickets.
- In your Outlook inbox, compose a new email or open an existing email in Outlook. If composing a new email, add a recipient.
- Open the sales tools in your inbox. This process will differ slightly depending on the version of Outlook you're using. Learn how to access contact profiles for your Outlook version.
- In the right task pane, under the Contact profile section, click View contact.
- To view contact details, click to expand the About section.
- The properties available in the About section are customized in the contact preview cards that appear outside of the CRM. Learn how to update the properties in your preview cards.
- To edit a property, click a property to edit. Depending on the property type, edit the value:
- For a text or number property, enter your value in the text box.
- For an enumeration or user property, select a value.
- At the bottom, click Save. Learn more about editing property values.
- To view the contact’s recent sales activities, click to expand the Timeline section. This section will only display calls, emails, email tracking activity, page views, and lifecycle stage changes.

Create tasks
You can create a task that will be associated with the contact directly from the contact profile. The task will also appear on the record index page and on the contact's record in the CRM.
- In your Outlook inbox, compose a new email or open an existing email in Outlook. If composing a new email, add a recipient.
- Open the sales tools in your inbox. This process will differ slightly depending on the version of Outlook you're using. Learn how to access contact profiles for your Outlook version.
- In the right task pane, under the Contact profile section, click View contact.
- In the right panel, click to expand the Tasks section.
- In this section, you'll see any existing tasks that you have created or that are assigned to you. Click Add to create a new task for the contact.

- Enter the task name and select a due date for the task.
- At the bottom, click Save.
Associate new or existing deals or tickets
Associate new or existing deals or tickets to a contact, all from the contact profile. The newly created record will be displayed on the contact profile in Outlook, the contact record in your CRM, and on the object's index page.
- In your Outlook inbox, compose a new email or open an existing email in Outlook. If composing a new email, add a recipient.
- Open the sales tools in your inbox. This process will differ slightly depending on the version of Outlook you're using. Learn how to access contact profiles for your Outlook version.
- In the right task pane, under the Contact profile section, click View contact.
- To view records associated with the contact, scroll down to the Deals or Tickets section.
- Click to expand the section to view any existing records already associated with the contact.
- To create and associate a new record, click Add.
-
- On the Create new tab, enter the property values in the create form. To set up which fields appear in a create form, learn more about customizing the create form for each object.
- Enter property values for your new record. If you want to set an association label, you'll need to set the label after the record is created.
- Click Create, or to create and associate another record, click Create and add another.
- On the Create new tab, enter the property values in the create form. To set up which fields appear in a create form, learn more about customizing the create form for each object.
- To associate a record that already exists in your CRM, click Add.
- Click the Add existing tab.
- Search for the record you want to associate, then select the checkbox next to the record name.
- Click Next.
- To label the record association (Professional and Enterprise only), click +Add association label to set labels that describe the relationship between the records.
- Click Save.
- Click the Add existing tab.
