Last updated: October 24, 2025
Available with any of the following subscriptions, except where noted:
-
 Service Hub
Professional, Enterprise
Service Hub
Professional, Enterprise
-
 Seats required for certain features
After you've set up your customer success workspace, you can create a health score to identify trends or potential risks within your customer base. This helps your teams analyze contact and company data, allowing you to efficiently assess customer health based on criteria aligned with your business priorities.
If you have a Service Hub Professional subscription, you can create 1 health score and up to 5 draft scores. Users with a Service Hub Enterprise subscription, can create up to 10 unique health scores and 20 draft scores.
Create a health score
Permissions required Manage Customer Success Settings access permissions are required to create a health score.
- In your HubSpot account, navigate to Service > Customer Success.
- In the top right, click the settings icon.
- Navigate to the Health scores tab. Then, click Create a health score.
- To use pre-defined score groups, click Take me to setup in the top right. To set up your own score groups, click Start from scratch instead.
- On the Companies or Contacts tab, click the dropdown menu to select up to five company or contact segments to apply the score to. You can also click Create new segment to create a new segment and return to the health score setup process afterwards.
- If you make edits to the selected segments and exit the score builder without turning the score on, your changes will be saved as a draft.
Set up score criteria and points
To qualify your contacts, companies, or custom objects using a health score, set up criteria to add or subtract points for each record. The criteria options available depend on the type of score you've created.
- In your HubSpot account, navigate to Service > Customer Success.. Create or edit a score.
- Click the Calculations tab.
- If you've chosen to create score groups from scratch, click + Add event group or + Add property group and follow the steps to set up score groups.
- If you've chosen to use pre-defined score groups, several event groups and property groups will be pre-populated by default. These default groups include the following:
- 1:1 Engagement
- 1:1 Call Engagement
- Supported Tickets
- CSM Sentiment
- NPS
- Each of your event and property groups will have its Max points listed on the right side. You can enter a new max points for that group.
- To edit an event group or property group, click the pencil icon next to its name and enter a new name. To clone or delete a group, click the vertical menu icon then select the associated option.

Set up score groups
You can set up event groups or property groups. In an event group, you'll add event rules that will determine the score. You can combine related events in a group and set a limit to the points those events can add to the score. In a property group, you'll add property rules that will determine the score.
Set up criteria based on events
- In your HubSpot account, navigate to Service > Customer Success.. Create or edit a score.
- Click the Calculations tab.
- To add an event group:
- Click + Add event criteria.
- Select the event type (e.g., Meetings).
- Click Filter event, then select an event property (e.g., Meeting outcome change or Meeting booked).
- Click Add timeframe, then select the timeframe within which to include events.
- Click Add frequency, then specify the number of times an event should occur to be scored (e.g., viewing an email Between 1 and 3 times adds two points and 4 or more times adds five points). You can use the operators Exactly, Between, At least, or At most to set frequency ranges. If you select At most, select the checkbox to include records that haven't completed the event.
- Select an operator (e.g., is equal to any of).
- Select or enter event property values based on the selected operator.
- Select whether the rule will add or subtract points.
- Enter the number of points that'll be added to or subtracted from the score by the event.
- Click + Add event to add another new event of the same type (e.g., add another call event to the 1:1 Call Engagement event group).
- Click the clone icon or delete icon above a set of events to clone or delete the set.
- If you selected Associated [object], to customize how associated records will be aggregated into the score, click Association settings. In the dialog box:

- To select records based on their association label, click the Any [record] dropdown menu, then select the label.
- To select records based on other criteria, click + Add filter, then set your criteria.
- To select how the associated record's points will be aggregated into the original record's score, click the Aggregation dropdown menu. Select an option:
- Sum: includes the total points from each associated event that meets the criteria in the score.
- Average: includes the total points from each associated event that meets the criteria, divided by the number of events that meet the criteria in the score.
- Min: include the lowest value of the associated event that meets the criteria in the score.
- Max: includes the highest value of the associated event that meets the criteria in the score.
- If you've selected multiple event property values (e.g., Contact Us and Newsletter forms), you can choose to Score individually or Score together. Learn more about how these options affect the score for each type of criteria.
-
- To score each option separately, click Score individually. Enter the number of points that'll be added to or subtracted from the score by the event.

- Score together is the default behavior. If you were scoring individually, click Score together to revert back to the default. Enter a number of points that’ll be added to or subtracted from the score by the event for any of the options.

- To score each option separately, click Score individually. Enter the number of points that'll be added to or subtracted from the score by the event.
-
- To set up score decay, which automatically reduces a score based on how long ago a scored event occurred, toggle the Decay scores switch on. Select the percentage to reduce the score by, and the period of time that must pass to reduce the score. Learn more about how score decay works.
- To add another rule for the same event type (e.g., two rules for Meetings), click + Add event criteria, select the event, then set criteria and how the score will be impacted.
- By default, a contact or company will be scored every time a selected event type occurs. To limit how many points the score can reach for that event, click Score every time, then select Limit to, and enter a number of points. For example, a contact may submit a form worth one point five separate times, but if you've limited the rule to two points, only the first two times will be counted.
- To clone the rules for an event type (e.g.,. all rules for Meetings), click the clone icon. The cloned version will be automatically added to the bottom of the group.
- To delete all rules for an event type (e.g., all rules for Meetings), click the delete icon.
- To clone or delete an individual event rule (e.g., Meeting booked rule), click the three vertical dots icon next to the points, then select Clone or Delete.
- To add other events to the group, click + Add more events, then select the type, event, and how the score will be impacted.
Set up criteria based on property values
- In your HubSpot account, navigate to Service > Customer Success.. Create or edit a score.
- Click the Calculations tab.
- To add a property rule:
- Click + Add property criteria, then select [Contact/Company] to choose a contact or company property or Associated [object] to choose a property for an associated record. Learn how to customize settings when scoring based on associations.
- Select a property (e.g., State/Region).
- Select an operator (e.g., is equal to any of).
- Select values based on the selected operator. Learn how to score multiple values individually or together.
- Select whether the rule will add or subtract points.
- Enter the number of points that'll be added to or subtracted from the score by the event.
- If you selected Associated [object], to select which associated record to score and how the scores will be added, click Association settings. In the dialog box, customize the settings:
- To select associated records based on their association label, click the Any [object] dropdown menu, then select the label.
- To select records based on other criteria, click + Add filter, then set your criteria.
To choose how the associated record's points will be aggregated into the original record's score, click the Aggregation dropdown menu. Select an option:
- Sum: includes the total points from each associated record that meets the criteria in the score.
- Average: includes the total points from each associated record that meets the criteria, divided by the number of records that meet the criteria in the score.
- Min: include the lowest value of the associated record that meets the criteria in the score.
- Max: includes the highest value of the associated record that meets the criteria in the score.
- To apply the settings, click Confirm.
- If you've selected multiple values for a property, (e.g., Time to Close SLA Ticket Status), you can choose to Score individually or Score together. Learn more about how these options affect the score for each type of criteria.
-
- To score each option separately, click Score individually. Enter the number of points that'll be added to or subtracted from the score by each value.
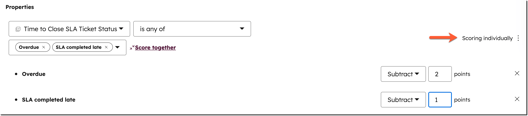
-
- Score together is the default behavior.Score together is the default behavior. If you were scoring individually, click Score together to revert back to the default. Enter the number of points that’ll be added to or subtracted from the score when any of the values are met.

- To add other criteria from the selected object, click + Add property criteria or + Add list membership criteria.
- To add properties from associated objects to the group, click + Add object, then select the object. These criteria will apply to the same group.
- To clone the rules for a property section, click the duplicate clone icon. The cloned version will be automatically added to the bottom of the group.
- To delete all rules for a property section, click the delete delete icon.
- To clone or delete an individual property rule, click the verticalMenu three vertical dots icon, then select Clone or Delete.
Choose which records are scored
To determine which records are included when scoring:
- In your HubSpot account, navigate to Marketing > Lead Scoring. Create or edit a score.
- Navigate to the [Companies/Contacts/Custom object] tab.
- To decide which companies, contacts, or custom objects receive scores, select an option:
- Score all [companies/contacts/custom object]: all of your companies/contacts/custom objects will receive scores. To exclude certain records, click the dropdown menu and select segments with the records you don't want scored.
- Score specific [companies/contacts/custom object]: score companies/contacts/custom objects only if they're members of certain segments. Click the dropdown menu and select the segments containing the records you want to be scored.
Set up score labels and thresholds
Configure how scoring thresholds will map to associated labels for your team to action.
- In your HubSpot account, navigate to Service > Customer Success.. Create or edit a score.
- Click the Settings tab.
- To set up score settings, navigate to the Settings tab.
- In the Health score threshold section, enter a threshold, color and score label.
- To set up the properties where scores will be stored, in the Score properties section, edit the properties' labels, internal names, descriptions, and property groups.
- Any edits you make to the score's settings will not be saved as a draft. If you're creating a new score, review your settings and turn on the score. Or, if you're editing an existing score, click Update in the top right.
Review and turn on the score
Once you're finished creating your score, to turn it on:
- In your HubSpot account, navigate to Service > Customer Success.. Create or edit a score.
- To test records before turning on the score, click Actions, then select Test a [contact/company/deal].
- To view score distribution insights for multiple records, click Actions, then select Preview distribution.
- Once you're done building the score, click Review and turn on.
- Review the score's details, what will happen when the score is turned on, then click Turn on. If you exit the score builder without turning the score on, it will be saved as a draft you can revisit.
- When you turn on the health score, the properties Health score and Health status will be automatically created in your account. If you've created multiple scores (Service Hub Enterprise only), each score will have its own associated properties. These properties will be updated based on your defined calculation criteria and scoring thresholds:
-
- Health score: the sum of points assigned to a contact or company based on your calculation criteria.
- Health status: the score label associated with the contact's or company's score, based on your scoring threshold. For example, Satisfied, Neutral, Unhappy.
Access the Health Score card
Subscription required Service Seat is required to access the Health Score card.
Permissions required Account Access permissions are required to add the Health Score card to the middle column and right sidebar of records.
Users can view the Health Score card on the record sidebar preview panel. This card will show the health score, health status, and the most recent score changes.
To access the Health Score card in the customer success workspace:
- In your HubSpot account, navigate to Service > Customer Success..
- Click the Customers tab. In the table view, click the name of the record to view the record sidebar preview panel.
- In the right sidebar, navigate to the Health Score card:
-
- You can view the health score, health status, and recent score changes.
- To view the health score history, click See score history. In the right panel, you'll find the Score trend graph, broken down by month, and the Score history chart, which shows the events that caused the score to change.
-
- To view score calculations, click Score calculations. You'll be redirected to the Calculations tab where you can customize and edit how the score is calculated.
