Last updated: March 2, 2026
Available with any of the following subscriptions, except where noted:
-
 Service Hub
Professional, Enterprise
Service Hub
Professional, Enterprise
-
 Additional subscriptions required for certain features
You can set service level agreement (SLA) goals to help your support team stay on track with customer expectations by defining goals for ticket response and resolution times. These goals can be applied to all tickets in the help desk or based on specific ticket properties, or a combination of properties. You can also customize whether your SLA goals apply at all times or only during specific hours.
Use cases
Standardize support: apply a universal SLA rule to all tickets to ensure every customer receives a consistent experience.
Handle critical issues: use one ticket property (e.g., Priority is Urgent) to trigger a specific goal, such as a 30-minute response requirement for emergency cases.
Prioritize high-value customers: use a combination of ticket properties to prioritize specific accounts. For example, set a 1-hour reply goal for Enterprise tickets while maintaining a 4-hour standard for other tiers. You could use an associated company property, such as Total Deal Value, Company Type, or Tier.
Managing multi-channel response times: use a combination of ticket properties to define distinct goals based on the ticket property Source. For example, set a 15-minute response for Chat tickets while allowing a 24-hour window for Email.
Permissions required Super Admin permissions are required to set SLAs for tickets in help desk.
Use Breeze Assistant
Use Breeze Assistant to learn more about SLAs and receive recommendations.
- In your HubSpot account, click the settings icon in the top navigation bar.
- Navigate to Inbox & Help Desk. Then, select Help Desk.
- In the Help desk automation section, click SLAs.
- Click Manage SLAs.
- To send a chat, enter your prompt, click a suggested prompt, or use a saved prompt, and then click the send icon in the bottom right.
Set up SLA goals in help desk
You can apply SLA goals to all tickets in help desk, based on one ticket property, or based on a combination of ticket properties.
When saving SLA goals, you can choose to apply them to newly created tickets or retroactively to existing open tickets.
- Please note: SLAs that have already been met on existing open tickets won’t be updated. If an SLA goal still has time remaining, it will be recalculated based on the new settings.
Set SLA goals for all tickets
To apply SLA goals to all tickets in help desk:
- In your HubSpot account, click the settings icon in the top navigation bar.
- Navigate to Inbox & Help Desk. Then, select Help Desk.
- In the Help desk automation section, click SLAs.
- In the Choose how to set SLA goals section, select the Apply to all tickets.
- In the Goals section, use the dropdown menus to set the SLA goals for Time to first reply, Time to next reply, Time to close.
- To set when a ticket's SLA status will change to Due soon, use the dropdown menus under Mark as due soon to remind your team and stay within your SLAs.
- To define specific time zones and scheduled hours for when SLAs should apply:
- In the Schedule section, click the dropdown menu and select During specific time.
- Click the Time Zone and Hours dropdown menus and select a time zone and schedule during which the SLA should apply.
- In the Pausing section, you can set conditions that temporarily pause the SLA timer. For example, you might pause the timer when a ticket is on hold or waiting for a customer response. The timer will automatically resume once the ticket no longer meets the selected criteria. To pause the SLA timer:
- Click Add condition. Then, click the dropdown menus and select a pipeline and ticket status.
- To delete a condition, click the trash icon.
- To add another condition, click Add condition.
- In the bottom left, click Save.
- In the pop-up box, select an option:
- Apply to new tickets only: the SLA goals you create or update will apply to newly tickets only.
- Apply to new tickets and existing open tickets: the SLA goals you create or update will apply to newly created goals and retroactively to existing tickets.
- Click Apply and save.
- To turn on the SLA, toggle the SLAs are inactive switch on.
Set SLA goals based on one ticket property
Set SLA goals based on priority, team, source, or pipeline. To set SLA goals based on custom properties, learn how to set SLA goals based on a combination of ticket properties.
To apply different SLA goals based on one ticket property:
- In your HubSpot account, click the settings icon in the top navigation bar.
- Navigate to Inbox & Help Desk. Then, select Help Desk.
- In the Help desk automation section, click SLAs.
- In the Choose how to set SLA goals section, select the Apply based on one ticket property.
- Click the Goals dropdown menu and select a ticket property.
- Use the dropdown menus to set the SLA goals for each property value, including Time to first reply, Time to next reply, and Time to close.
- If you don't want to set SLA goals for a specific value, toggle the Goal Active? switch off.
- To set when a ticket's SLA status will change to Due soon, use the dropdown menus under Mark as due soon.

- To define specific time zones and scheduled hours for when SLAs should apply:
- In the Schedule section, click the dropdown menu and select During specific time.
- Click the Time Zone and Hours dropdown menus and select a time zone and schedule during which the SLA should apply.
- In the Pausing section, you can set conditions that temporarily stop the SLA. For example, you might pause the timer when a ticket is on hold or waiting for a customer response. The timer will resume once the ticket no longer meets the selected criteria. To pause the SLA timer:
- Click Add condition. Then, click the dropdown menus and select a pipeline and ticket status.
- To delete a condition, click the trash icon.
- To add another condition, click Add condition.
- In the bottom left, click Save.
- In the pop-up box, select an option:
- Apply to new tickets only: the SLA goals you create or update will apply to newly tickets only.
- Apply to new tickets and existing open tickets: the SLA goals you create or update will apply to newly created goals and retroactively to existing tickets.
- To turn on the SLA, toggle the SLAs are inactive switch on.
Set SLA goals based on a combination of ticket properties
Subscription required A Service Hub Enterprise subscription is required to set SLA goals based on a combination of ticket properties.
Apply SLA goals based on multiple ticket properties, including custom properties.
- In your HubSpot account, click the settings icon in the top navigation bar.
- Navigate to Inbox & Help Desk. Then, select Help Desk.
- In the Help desk automation section, click SLAs.
- To apply SLA goals based on a combination of properties, select Apply based on a combination of ticket properties.
- Click Create rule.

- In the right panel, enter a rule name.
- To add conditions to the rule:
- Click Add condition.
- Click Add filter.
- Scroll or type to search, then select a filter type.
- Select an option for the ticket property or activity, then set your criteria.
- To add additional filters within the same group, click Add filter. A ticket must meet all criteria within the group in order to be included in the list.
- To add another filter group, click Add filter group. A ticket must meet the criteria of at least one of the filter groups in order to be included in the list.
- Click Save in the bottom left.
- Use the dropdown menus to set the SLA goals for Time to first reply, Time to next reply, Time to close.

- To define specific time zones and scheduled hours for each SLA rule:
- In the Schedule section, click the dropdown menu and select During specific time.
- Click the Time Zone and Hours dropdown menus and select a time zone and schedule during which the SLA should apply.
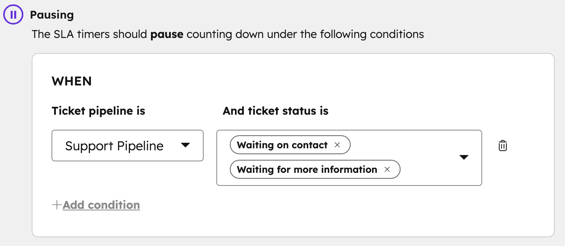
- To temporarily pause the SLA:
- Under The SLA timers should pause counting down under the following conditions, click add Add condition.
- Click the dropdown menus and select a pipeline and ticket status.
- To delete a condition, click the delete trash icon.
- To add another condition, click add Add condition.
- The timer will resume once the ticket no longer meets the selected criteria.

- Click Save.
- In the pop-up box, select an option:
- Apply to new tickets only: the SLA goals you create or update will apply to newly tickets only.
- Apply to new tickets and existing open tickets: the SLA goals you create or update will apply to newly created goals and retroactively to existing tickets.
- Click Apply and save.
- You’ll see each rule's order listed in the left column. If a ticket meets the conditions for more than one rule, its SLA goals will be based on the rule which is first on the list. To reorder the rules, click and drag a rule to move it to another location on the list.

-
If a ticket doesn’t match any of the rules applied, you can set up a fallback SLA:
-
- Toggle the Use fallback SLA rule switch on.
- Use the dropdown menus to set the SLA goals for each property, including Time to first reply, Time to next reply, and Time to close.
- To define specific time zones and scheduled hours for the fallback SLA rule, in the Schedule section, click the dropdown menu and select During specific time.
-
- Click the Time Zone and Hours dropdown menus and select a time zone and schedule during which the SLA should apply.
- In the bottom left, click Save.
- In the pop-up box, select an option:
- Apply to new tickets only: the SLA goals you create or update will apply to newly tickets only.
- Apply to new tickets and existing open tickets: the SLA goals you create or update will apply to newly created goals and retroactively to existing tickets.
- Click Apply and save.
Add and edit SLA rules
- In your HubSpot account, click the settings icon in the top navigation bar.
- Navigate to Inbox & Help Desk. Then, select Help Desk.
- In the Help desk automation section, click SLAs.
- To add a rule, click Create rule.
- To edit the rule, hover over the rule and click Edit.
- To clone the rule, hover over the rule and click Clone.
- To delete the rule, hover over the rule and click Delete.
- Click Save in the the bottom left.
View SLA goals in help desk
When SLA settings are turned on, any changes you make to SLA rules apply to all applicable open tickets. Which tickets the SLA goals apply to depend on whether you chose to apply the changes to new tickets only or retroactively to existing tickets.
If you chose to apply tickets retroactively, SLAs that have already been met on existing open tickets won’t be updated. If an SLA goal still has time remaining, it will be recalculated based on the new settings.
In help desk, an SLA label will appear next to the associated ticket number in the reply editor.

the warning labels will only appear to users with an assigned Service Seat.
Analyze SLA performance
Use the custom report builder to generate reports that provide valuable insights into SLA performance, improving efficiency and customer satisfaction.
You can use ticket properties such as Time to first response in SLA hours and Time to close in SLA hours to build reports based on your set SLA goals. These properties only apply to help desk tickets and include data starting from January 2025. Learn more about HubSpot's defaults tickets properties.
You can also use the ready-made service SLA reports that are included in the report collections.
- In your HubSpot account, navigate to Reporting > Reports.
- In the search bar in the top right, enter sla.
- View ready-made SLA reports. Click the report name to review its details, save it, or customize it. Learn more about adding reports from the report library to your dashboard.
