Last updated: October 17, 2025
Available with any of the following subscriptions, except where noted:
-
 Marketing Hub
Enterprise
Marketing Hub
Enterprise
-
 Sales Hub
Enterprise
Sales Hub
Enterprise
-
 Service Hub
Enterprise
Service Hub
Enterprise
Customer journey analytics help you understand how every interaction with your business affects customers. Use customer journey reports to see which touchpoints are most effective at attracting customers and to track a contact's or deal's progress through different stages. The conversion rate is calculated based on how many contacts or deals complete all stages.
You can create a journey report using three data sources:
- Contacts (Marketing Hub and Service Hub Enterprise)
- Deals (Sales Hub Enterprise)
- Tickets (Service Hub Enterprise)
Learn more about common steps and filters in customer journey reports.
Key Information & Limitations
Please note the following key information and limitations before creating a customer journey report:
- You can add up to 15 stages and up to 15 unique steps. For example, you could set 15 stages and include 5 different steps in the first stage, second stage, and third stage for a total of 15 unique steps.
- You can analyze up to 5 years of data and up to 20 million unique events. If the report is configured where there is more than 20,000,001+ events, the date range window will reduce to one month.
Create a customer journey report using a sample report
To create a customer journey report using a sample report:
- In your HubSpot account, navigate to Reporting > Reports.
- In the upper right, click Create report.
- In the left panel, click Customer journey report.
- Click Next.
- Click Start with a sample report.
- Click the report that aligns with your report goal.
- Click Next.
- Customize your report.
Create a customer journey report from scratch
To create a customer journey report from scratch:
- In your HubSpot account, navigate to Reporting > Reports.
- In the upper right, click Create report.
- In the left side panel, click Customer journey report.
- Click Next.
- In the left side panel, click Create journey on your own.
- Click the Primary data source dropdown menu and select a data source:
- Contacts (Marketing Hub and Service Hub only): select Contacts to measure how your content generates new contacts.
- Deals (Sales Hub only): select Deals to measure how your content generates new deals.
- Tickets (Service Hub only): select Tickets to measure how your tickets progress through your support pipeline.
- In the Add your first stage section, click the First stage event dropdown menu and select your first stage.
- Click Next.
- In the Timeline left side panel, click Add new stage +.
- In the Stage dialog box, you can do the following:

-
- Add events: under All events, hover over an event to view an estimate of the count of events in the set time period. Then, click the event to add it to the stage. Learn how to filter events.
- Find top events: click the Find top events checkbox to find the highest traffic events that happen in that stage of the customer journey.
- To customize the settings of top events:
- On the Events tab, click Edit to add or remove events. Then click Apply.
- On the Refinements tab, type a number or slide the scale to adjust the number of results to find.
- To customize the settings of top events:
- (BETA) Pathfinder: if you're building a customer journey report with Contacts as your data source, use Pathfinder to have HubSpot help you define stages in your customer journey instead of having to input them manually.
- Toggle the Pathfinder switch on.
- Select Find top paths before this stage to see how leads typically arrive at a key outcome.
- Select Find top paths after this stage to see what happens after a key milestone.
- On the Events tab, select the Event Name checkboxes to add or remove suggested events. On the Refinements tab, type a number or slide the scale to adjust the number of stages that Pathfinder should suggest. Then, click Save.
- To mark a stage as optional, click the Optional checkbox at the top right of the pop-up box. If a contact or deal makes it to the last stage, they will be included in the total conversion rate.
- Optional: a contact or deal doesn't have to go through that specific stage to continue along the journey. The first and last stages can't be made optional.
- Required: a contact or deal must go through that specific stage to continue along the journey. By default, all steps are required. If all stages are required, it'll be expected that records in the results will have experienced all of those stages at some point.
-
- Click Save.
- The stage will now appear in the Timeline left side panel. Continue adding stages as needed.
Create a customer journey report with pathfinder (BETA)
To create a report with pathfinder to help you define stages in your customer journey instead of having to input them manually:
- In your HubSpot account, navigate to Reporting > Reports.
- Click Create a report.
- In the left side panel, click Customer journey report.
- Click Next.
- In the left side panel, Start with a contact pathfinder will already be selected.
- In the center panel, under the Add your first stage section, click the First stage event dropdown menu and select your first stage event.
- Under Configure a pathfinder, select Find top paths before your selected stage or Find top paths after your selected stage.
- Click Next.
- The generated report automatically includes paths related to your selected stage. To customize the pathfinder customer journey:
- On the Timeline left side panel, click Find paths before [selected stage] or Find paths after [selected stage].
- In the Stage dialog box, to the right of the Pathfinder toggle, click Manage details.
- In the Settings pop-up window, under the Events tab, click Edit.
- In the pop-up window, select the events you'd like to include in the report. Then, click Apply.
- In the Settings pop-up window, under the Refinements tab, type a number or slide the scale to adjust the number of stages that Pathfinder should suggest. Then, click Apply.
- In the Stage dialog box, click Save.

- Continue adding stages as needed.
Customize customer journey report
After adding stages to your customer journey report, you can adjust and customize it before running or saving the report.
Filter
To filter your events:
- Add an event.
- Next to an event, click the filter icon.
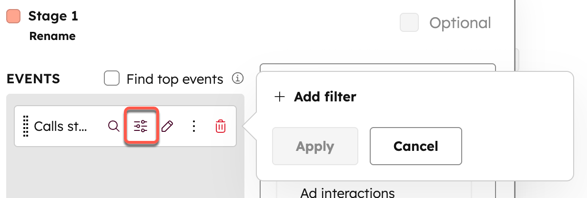
- Click + Add filter. Select your filters, then click Apply.
Please note: if contacts were ingested into HubSpot (e.g., during a migration), the Contact record created stage uses the date the record was ingested into HubSpot, not the contact's original creation date from the previous system. To ensure the report filters by the contact's true creation date, remove the Contact record created stage and use the Contacts filter with the Contact create date property instead.
Please note: the Campaign filter is only available for steps in the following categories:
- Ads
- Calls-to-action
- Forms
- Marketing email
- Marketing events
- Web pages
Learn more about common filters in customer journey reports.
Breakdown by property
- Add an event.
- Click the Break down by property icon. Journey reports can have up to 10 stages with property breakdowns.

- Click the Breakdown by property dropdown menu to select a property. When the reports has run, the most common pathways between the two stages will be displayed.
- Select the number of results to display in the report.
- Click Apply.
Please note: if you have multiple steps in a stage, the report will not show an aggregate number of contacts or deals in the stage. It will show the number that have completed each step.
Run and save your customer journey report
When you have finished configure your stages, you can run the report to display your data.
- Create and customize your customer journey report.
- Click Run report on the top right. The report will appear.
- Use the filters above the report to further refine your results.
- In the top right, click Save report. Set the access permissions for the report, then click Save.
- Contacts or deals will only appear in the following stage if their events follow the stages' order chronologically.
- Journey reports count the unique number of contacts or deals that completed an event in the journey’s pattern, not the total number of unique events.
- The Include anonymous visitors option can only be applied for certain steps. This means that, depending on the steps selected in your journey report, some steps will include anonymized visitors and some will not.
- All sales activities, including calls, meetings etc. from connected integrations are not counted in journey reports.
- When creating a static list from journey analytics, a maximum of 100,000 objects can be included in the list.
Example journey report
Below, find an example of how you can use journey reports to find what pages are driving new meetings and resulting in new deals being created for your business.
-
In your HubSpot account, navigate to Reporting > Reports.
- In the upper right, click Create report.
- Select Customer journey report.
- Click Next.
- Select Contacts as the data source. Then, click Next.
- At the top, click the Include anonymous visitors checkbox.
- In the left side panel, click Add new stage. A pop-up box will appear.

-
For the first stage, type Pages visited in the search bar. Then, select the Pages visited event.
- Click the Break down by property icon and select URL path. This will show where visitors are going on your website. Then, click Apply.

-
For the second stage, click Add new stage. In the pop-up box, type Form submission in the search bar. Then, select the Form submission event. This will let you know if and where visitors are submitting forms on your website.
- For the third stage, click Add new stage. In the pop-up box, type Meetings booked in the search bar. Then, select the Meetings booked event. This will show you how many meetings are booked from visiting your website or from submitting a form on your website.
- For the final stage, click Add new stage. In the pop-up box, type Deal record created in the search bar. Then, select the Deal record created event. This will show you how many of the meetings resulted in a deal being created.
- In the top right, click Run report. Then, click Save report or Export unsummarized data.
