Last updated: May 21, 2026
Available with any of the following subscriptions, except where noted:
Configure your default settings for the HubSpot Sales Office 365 add-in. This includes managing email log and track preferences for your inbox, accessing your email integration settings, and managing which HubSpot account your add-in is connected to.
Please note: if you are using the Outlook desktop add-in, learn how to customize your Outlook desktop add-in settings.
Access your add-in settings
- In Outlook, open the sales tools in your inbox. These steps may vary based on the Outlook version you're using. In the table below, hover over the icon to view the add-in for each Outlook version.
| Outlook version | Access the add-in |
|
Outlook for Windows or Mac (classic) 
|
At the top of Outlook, in the main ribbon, click Sales Tools. |
|
Outlook for Windows or Mac (new) 
|
At the top of Outlook, in the main ribbon, click the three horizontal dots. Then, select HubSpot Sales. You can also click Customize Toolbar to add HubSpot Sales into your toolbar. |
|
Outlook on the web 
|
At the top of Outlook, in the main ribbon, click Apps, then select HubSpot Sales. |
- In the right task pane, scroll down to the More section and click Add-in settings.
Configure email log and track preferences
Set your email preferences to automatically log and track emails in HubSpot whenever you compose a new email in Outlook. If your Super Admin configures log and track settings for all users, the account-wide settings override your inbox's log and track preferences.
- In Outlook, navigate to the HubSpot Sales add-in:
- Outlook for Windows or Mac (classic): in the main ribbon, click Sales Tools.
- Outlook for Windows or Mac (new): in the main ribbon, click the three horizontal dots and select HubSpot Sales.
- Outlook on the web: in the main ribbon, click Apps and select HubSpot Sales.
- In the task pane, scroll down to the More section and click Add-in settings.
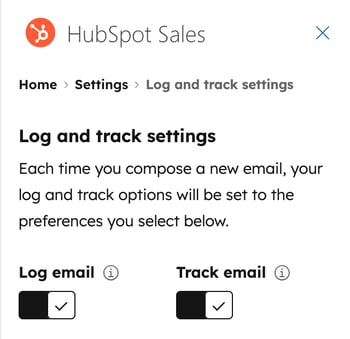
- Click Log and track settings.
- To log all emails by default, toggle the Log email switch on.
- To track all emails by default, toggle the Track email switch on.
Edit contact creation and associations for email logging
Super Admins customize your account's default association settings to determine which associated records an email automatically logs to (i.e., whether an email logs to the recipient's associated company or deal).
In Outlook, customize your inbox's email association settings to apply your preferences each time you compose a new email in your inbox. Use these settings to automatically create new contacts for new email addresses and hide suggested email logging associations to reflect your account-wide default association settings.
To customize your email association settings in your inbox:
- In Outlook, navigate to the HubSpot Sales add-in:
- Outlook for Windows or Mac (classic): in the main ribbon, click Sales Tools.
- Outlook for Windows or Mac (new): in the main ribbon, click the three horizontal dots and select HubSpot Sales.
- Outlook on the web: in the main ribbon, click Apps and select HubSpot Sales.
- In the task pane, scroll down to the More section and click Add-in settings.
- Click Log and track settings.
- In the Default Email Associations section, customize the following:
- Create new contacts: select the checkbox to create a new contact when logging an email using an email address that doesn’t already exist in your CRM.
- Hide suggested associations: select the checkbox to hide suggested record associations when you log an email. When this setting is turned on, only the record types configured in your account's default association settings display when logging an email.
- To review or customize the default association settings for your HubSpot account, click Manage Other Default Associations. You'll be directed to your activities settings in HubSpot where you can set default activity associations for records.

Pin the task pane open
For an email to log and track, the add-in task pane must be open when you send a logged or tracked email. You can pin this task pane in your inbox so it's always open.
- The read panel and compose panel need to be pinned separately. Closing the add-in pane will un-pin it.
- Pinning the task pane is available for Microsoft 365 subscribers. If you're accessing Outlook.com with an @outlook.com email address, it's not possible to pin the task pane open. Learn more about task pane support in Outlook.
To pin the task pane open:
- In Outlook, navigate to the HubSpot Sales add-in:
- Outlook for Windows or Mac (classic): in the main ribbon, click Sales Tools.
- Outlook for Windows or Mac (new): in the main ribbon, click the three horizontal dots and select HubSpot Sales.
- Outlook on the web: in the main ribbon, click Apps and select HubSpot Sales.
- At the top of the task pane, click the pin icon.

Block specific emails or domains from logging to the CRM
Emails sent to an email address or domain included in your never log list will never save to your CRM. Email tracking activity will also not appear on the contact's timeline.
- In Outlook, navigate to the HubSpot Sales add-in:
- Outlook for Windows or Mac (classic): in the main ribbon, click Sales Tools.
- Outlook for Windows or Mac (new): in the main ribbon, click the three horizontal dots and select HubSpot Sales.
- Outlook on the web: in the main ribbon, click Apps and select HubSpot Sales.
- In the task pane, scroll down to the More section and click Add-in settings.
- Click Log and track settings.
- In the Never log field, enter email addresses or domains you want to block.
- Click Add. If you have Account Access permissions, select an option:
- Block for all users: block the email or domain for all users in your account.
- Block only for me: block the email or domain for your user account only.

- To unblock an email address or domain, hover over it and click the delete icon.
You can also specify never log emails and domains from your HubSpot account settings and block specific IP addresses from email tracking in HubSpot.
Email integration settings
Manage the settings for your connected inbox.
- In Outlook, navigate to the HubSpot Sales add-in:
- Outlook for Windows or Mac (classic): in the main ribbon, click Sales Tools.
- Outlook for Windows or Mac (new): in the main ribbon, click the three horizontal dots and select HubSpot Sales.
- Outlook on the web: in the main ribbon, click Apps and select HubSpot Sales.
- In the task pane, scroll down to the More section and click Add-in settings.
- Click Email integration settings. This will open your HubSpot account's email settings where you can:
- Connect or disconnect your inbox.
- Manage additional BCC address.
- Manage blocked IP addresses.
- Manage lead revisit notifications.
Switch the connected HubSpot account
If you're using multiple HubSpot accounts, you can switch which account the add-in is linked to. Once you switch to another account:
- Your inbox will use the new account's CRM and email tools.
- Your logged emails and contacts will go to the new account's CRM.
- Any sequences or emails already scheduled will finish sending and logging to the original CRM.
To switch the connected HubSpot account:
- In Outlook, navigate to the HubSpot Sales add-in:
- Outlook for Windows or Mac (classic): in the main ribbon, click Sales Tools.
- Outlook for Windows or Mac (new): in the main ribbon, click the three horizontal dots and select HubSpot Sales.
- Outlook on the web: in the main ribbon, click Apps and select HubSpot Sales.
- In the task pane, scroll down to the More section and click Add-in settings.
- In the HubSpot account section, click Switch HubSpot account.

- Navigate to the HubSpot account that you want to switch to and click Select.
- Click Switch account.
Sign out of your HubSpot account
- In Outlook, navigate to the HubSpot Sales add-in:
- Outlook for Windows or Mac (classic): in the main ribbon, click Sales Tools.
- Outlook for Windows or Mac (new): in the main ribbon, click the three horizontal dots and select HubSpot Sales.
- Outlook on the web: in the main ribbon, click Apps and select HubSpot Sales.
- In the task pane, scroll down to the More section and click Add-in settings.
- In the HubSpot account section, click Sign out.
Additional settings
In addition to customizing your extension's settings, you can access the HubSpot Knowledge Base, take a tour of the add-in and its features, or review HubSpot's Customer Terms of Service from the add-in settings. You can also uninstall the HubSpot Sales Add-in or submit feedback on the add-in directly from the extension settings.
