
Last updated: May 27, 2026
Available with any of the following subscriptions, except where noted:

-
 HubSpot Credits required for certain features
-
Seats required for certain features
-
Additional subscriptions required for certain features
Access the HubSpot sales tools in your inbox when composing emails with the HubSpot Sales Office 365 add-in.
If you're using the Outlook desktop add-in, learn how to use sales tools with the HubSpot Sales Outlook desktop add-in.
Before you get started
- To access sales tools in Outlook, connect a personal email and install the HubSpot Sales Office 365 add-in.
- To use the meetings tool in Outlook, you must have a connected calendar.
Documents
To insert a document into an email using the Office 365 add-in:
- Compose a new email in Outlook and enter the email recipient.
- Navigate to the HubSpot Sales add-in:
- Classic Outlook for Windows or Mac: in the main ribbon, click Sales Tools.
- New Outlook for Mac: in the main ribbon, click the three horizontal dots and select HubSpot Sales.
- New Outlook for Windows or Outlook on the web: in the main ribbon, click Apps and select HubSpot Sales.
- In the task pane, click Documents.
- In the dialog box, search for a document by name. Or click the dropdown menu beside the search bar to filter your documents by All, Created by my team, Created by me, and Recent.
- The Last used at column is user specific, so it'll show the documents that were last used by the user viewing the modal. You can sort your documents by the Last used at or the Created at column.
- Select the Require an email address from all other viewers checkbox if you want to collect an email address from anyone else besides your recipient who views the document.
- Hover over the document you want to use and click Select.
- A link to the document will be inserted into your email.
Meetings
To insert a meeting link into an email using the Office 365 add-in so that your contacts can access your scheduling page:
- Compose a new email in Outlook.
- Navigate to the HubSpot Sales add-in:
- Classic Outlook for Windows or Mac: in the main ribbon, click Sales Tools.
- New Outlook for Mac: in the main ribbon, click the three horizontal dots and select HubSpot Sales.
- New Outlook for Windows or Outlook on the web: in the main ribbon, click Apps and select HubSpot Sales.
- In the task pane, click Meetings and select one of your scheduling pages. You can also insert proposed times directly into the email so your contacts can select an available time slot directly from the email.
The name of your meeting will appear in your email. It'll be hyperlinked, so when a prospect clicks it, they'll be brought to your scheduling page.
Payments
Subscription required A Starter, Professional, or Enterprise subscription is required to insert a payment link.
If you set up the payments tool to share payment links with your contacts, you can insert a payment link directly into an email using the extension.
- Compose a new email in Outlook.
- Navigate to the HubSpot Sales add-in:
- Classic Outlook for Windows or Mac: in the main ribbon, click Sales Tools.
- New Outlook for Mac: in the main ribbon, click the three horizontal dots and select HubSpot Sales.
- New Outlook for Windows or Outlook on the web: in the main ribbon, click Apps and select HubSpot Sales.
- In the task pane, click Payments.
- Select the payment link you want to share in the email.
- Click Send.
Prospecting agent
Subscription required A Sales Hub subscription is required to enroll contacts in the prospecting agent.
HubSpot Credits required HubSpot Credits are consumed when a contact is enrolled for prospecting. Review how Breeze Agents use HubSpot Credits.
Permissions required Prospecting agent assignment permissions are required to enroll contacts in the prospecting agent.
Enroll CRM contacts in the prospecting agent directly from your inbox to manage outreach and execute personalized communication without navigating away from Outlook. Learn more about setting up and using the prospecting agent.
Please note: you can manage AI feature access in your AI settings and configure what data is shared. Review HubSpot's AI Trust FAQs and AI Model Cards for detailed information on AI security controls, data use, and compliance.
To enroll a contact in the prospecting agent from Outlook:- In your Outlook inbox, compose a new email or navigate to an existing email thread.
- The email recipient must be an existing contact in your CRM.
- Navigate to the HubSpot Sales add-in:
- Classic Outlook for Windows or Mac: in the main ribbon, click Sales Tools.
- New Outlook for Mac: in the main ribbon, click the three horizontal dots and select HubSpot Sales.
- New Outlook for Windows or Outlook on the web: in the main ribbon, click Apps and select HubSpot Sales.
- In the task pane, in the Contact profile section, click Enroll to agent.
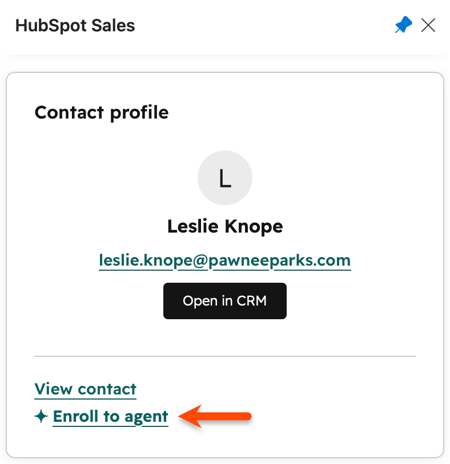
- Continue to confirm the prospecting agent guardrails to enroll the contact in the prospecting agent.
Sequences
Subscription required A Sales Hub or Service Hub Professional or Enterprise subscription is required to enroll contacts into a sequence.
Seats required An assigned Sales or Service Seat is required to enroll contacts into a sequence.
To enroll a contact in a sequence using the Office 365 add-in:
- Compose a new email in Outlook and enter the email recipient.
- Navigate to the HubSpot Sales add-in:
- Classic Outlook for Windows or Mac: in the main ribbon, click Sales Tools.
- New Outlook for Mac: in the main ribbon, click the three horizontal dots and select HubSpot Sales.
- New Outlook for Windows or Outlook on the web: in the main ribbon, click Apps and select HubSpot Sales.
- In the task pane, click Sequences.
- In the dialog box, use the search bar to search for a sequence by name. Or click the dropdown menu beside the search bar to filter your sequences by All, Created by my team, Created by me, and Recent.
- The Last used at column is user specific, so it'll show the sequences that were last sent by the user. You can sort your sequences by the Last used at or the Created at column.
- Hover over the sequence you want to enroll your contact in and click Select.
- In the next dialog box, customize your sequence's content and settings.
- If you're a Sales Hub Professional or Enterprise user, you can use sales email recommendations and surface insights about your contact to help tailor your email content. Click the Low personalization alert to review the suggestions.
- Specify the start email and send date/time.
- Click Start sequence to enroll the contact.
Snippets
To insert a snippet into an email using the Office 365 add-in:
- Compose a new email in Outlook and enter the email recipient.
- Navigate to the HubSpot Sales add-in:
- Classic Outlook for Windows or Mac: in the main ribbon, click Sales Tools.
- New Outlook for Mac: in the main ribbon, click the three horizontal dots and select HubSpot Sales.
- New Outlook for Windows or Outlook on the web: in the main ribbon, click Apps and select HubSpot Sales.
- In the task pane, click Snippets and select one of your snippets.
- The most recently used snippets will appear. Select a snippet to add to your email body, or use the search bar to look up a snippet name or shortcut.
- To navigate to your snippets dashboard in HubSpot, click Manage snippets.
Templates
To insert a template using the Office 365 add-in:
- Compose a new email in Outlook and enter the email recipient.
- Navigate to the HubSpot Sales add-in:
- Classic Outlook for Windows or Mac: in the main ribbon, click Sales Tools.
- New Outlook for Mac: in the main ribbon, click the three horizontal dots and select HubSpot Sales.
- New Outlook for Windows or Outlook on the web: in the main ribbon, click Apps and select HubSpot Sales.
- In the task pane, click Templates.
- At the top of the dialog box, use the search bar to search for a template by name. Or click the dropdown menu beside the search bar to filter your templates by All, Created by my team, Created by me, and Recent.
- The Last used at column is user specific, so it'll show the templates that were last sent by the user viewing the modal. You can sort your templates by the Last used at or the Created at column.
- Hover over the template you want to use and click Select.
