- Knowledge Base
- CRM
- Object Settings
- Create and use association labels
Create and use association labels
Last updated: September 3, 2025
Available with any of the following subscriptions, except where noted:
-
Marketing Hub Professional, Enterprise
-
Sales Hub Professional, Enterprise
-
Service Hub Professional, Enterprise
-
Data Hub Professional, Enterprise
-
Content Hub Professional, Enterprise
-
Smart CRM Professional, Enterprise
In your HubSpot account, you can associate records to establish a relationship between them (e.g., contact with a deal). You can also label associations to describe the relationship between associated records (e.g., a contact is labeled Buyer and is associated with a deal labeled New business).
All HubSpot accounts can use the Primary label for companies, but in accounts with a Professional or Enterprise subscription, you can create custom labels. Association labels can describe relationships between all CRM objects, including contacts, companies, deals, tickets, admin-activated (e.g., Appointments), and custom objects. For example:
- A contact can be Manager at one company, but also Former employee at another company.
- A deal can have multiple associated contacts, one who is the Decision maker and another who is the Billing contact.
- Two company locations are associated with each other, where one is the Headquarters and the other is the Regional Office.
- Multiple contacts from the same family are associated, with labels for Partner, Parent, and Child.
If you'd like to automate associations in your system, learn more about operations-related apps in the HubSpot App Marketplace.
Please note: your account may use personalized names for each object (e.g., account instead of company). This document refers to objects by their HubSpot default names.
Create association labels
Users with Super Admin permissions can create custom association labels. You can create up to 50 labels per object pair (e.g., Contact to Deal, Contact to Contact).
To create an association label:
- In your HubSpot account, click the settings settings icon in the top navigation bar.
- In the left sidebar menu, navigate to Objects, then select the object for which you’d like to create an association label.
- Click the Associations tab.
- Click Create and configure, then select Create and configure label limits.

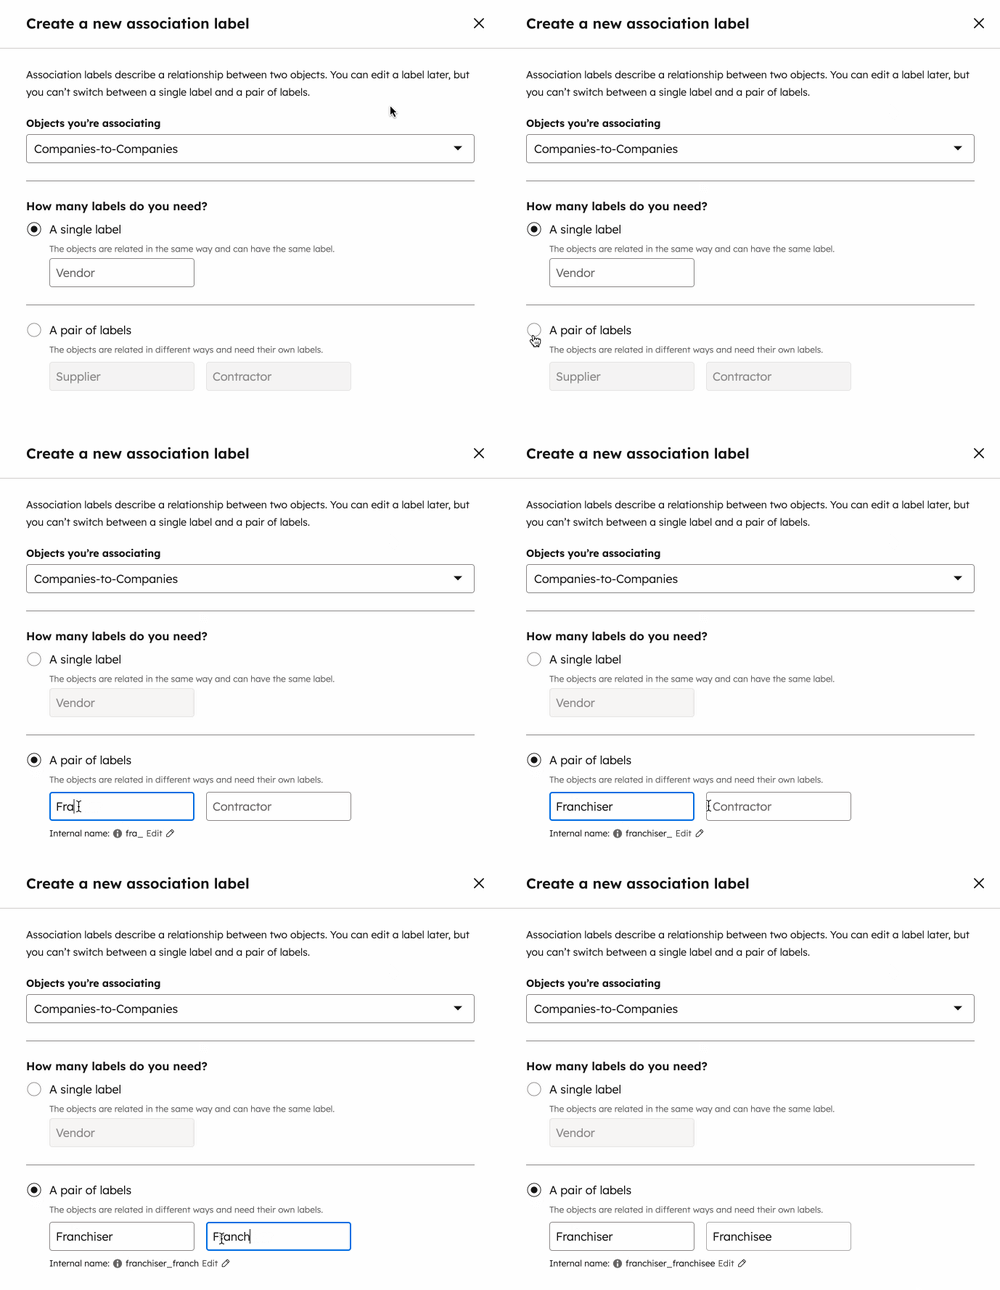
- In the right panel, click the Objects you're associating dropdown menu, then select the other object relationship for which you're creating the label (e.g., Deals-to-Contacts).
- Select the type of label you want to create:
-
- A single label: the associated records are described in the same way, so the label can apply to both records (e.g., Colleague or Partner).
- A pair of labels: different words are used to describe each side of the associated records' relationship, so two separate labels are required (e.g., Manager and Employee, Parent and Child, Headquarters and Regional Office). If you set a label for one of the records, the associated record will automatically be set to the other label in the pair. A paired label counts as one label toward your custom label limit.
-
- Enter a name for the label.
Please note: using non-alphanumeric characters in an association label name (e.g. semicolons) can result in errors during imports. Semi-colons are used as delimiters for multiple values in an import.

- To edit the label's internal name, click the edit pencil icon below the label. This is used for integrations and APIs. Once the label is created, the internal name cannot be edited.
- At the bottom, click Next.
- Set the label's limits for each direction of the association:
- Many [records] can have label: a record can be associated with many records of the other object using the label.
- Custom: a record can be associated with a specified number of records of the other object using the label. In the field, enter a number to set a custom limit.
- Click Save.
Once a label has been created, navigate to a record and refresh the page. The label will now appear for you to select.
You can also use your data model or Breeze Copilot to create association labels.
Manage association labels
You can edit or delete existing association labels, as well as view more information about a label's history and API details.
To manage existing association labels:
- In your HubSpot account, click the settings settings icon in the top navigation bar.
- In the left sidebar menu, navigate to Objects, then select the object you’d like to create an association label for.
- Click the Associations tab.
- Click the Select object associations dropdown menu and select the associations for which you want to view labels (e.g., Deals-to-Contacts).
- Hover over the label, then click More. You will see the following options:
- Edit label: in the right panel, edit the name of the label.

-
- Edit label limit: in the right panel, set limits for an association label.
- View API details: in the dialog box, view the label's name, inverse, internal name, limits, category (whether it's HubSpot-defined label or custom), and the association type ID. You can copy an individual value or copy all of them. Learn more about using these values in the associations API.

- View history: in the dialog box, view how the label was created, the object relationship it applies to, when it was created, which user created it, and a timeline of changes.
- Delete: in the dialog box, acknowledge that you can't restore a deleted label, then delete or cancel. If a label is used within records or other HubSpot tools, you'll first need to remove the labels from those assets before deleting.
Set or update association labels on records
On a record, you can add or remove labels for its associations. You can also set association labels in bulk via import. To add a new association with a label, or update a record's primary company, learn how to add or edit associations on a record.
To update the labels for an individual association:
- Navigate to the record with the association you want to update.
- To add or edit labels for an existing association, hover over the association card, click More, then select Edit association labels.

- In the dialog box:
- To add a label, click the dropdown menu and select the label.
- To remove a label, click x next to the label.
- When you're finished, click Update.

Use association labels in HubSpot tools
Once you've created association labels to describe relationships between records, you can add association labels to new or existing associations on a record or in bulk via import. You can then filter by these labels in HubSpot tools such as segments, workflows, and custom reports.
Association labels are not supported for sync via the HubSpot-Salesforce integration, however, prior to updating associations it's recommended to understand how records sync between HubSpot and Salesforce.
Filter by associations in segments
When creating a segment, you can filter your records based on their associations. For contact-based segments, you can filter based on contacts' primary company associations. Users in Professional and Enterprise accounts can also filter records in segments by association labels.
- Create or edit a segment.
- Click +Add filter.
- Click the Filtering on dropdown menu, then select the object from the Associated object section (e.g., in a contact-based segment, select Company to filter based on the contacts' company associations).
- Select a category and filter, then set your criteria.
- By default, the segment will include records when any associated records fit the criteria.
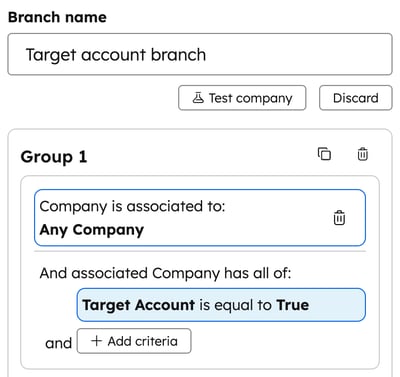
- To set your criteria based on the primary company association or a custom association label, click [Object] is associated to: Any [object], then select a label in the dropdown menu. This will filter the records based only on associations with that label, so the segment will include a record only an associated record has that label and that record meets the criteria.
- Once you're done setting segment criteria, in the top right, click Save segment.
Learn more about creating segment.
Use association labels in workflows
Once you've created association labels, you can use them to trigger enrollment and certain actions within workflows. For example, you can automatically send an email to contacts based on attributes of their associated primary company, or if a deal moves to a different deal stage, automatically update the stage of its associated deals.
The following functionality is supported:
- Enrollment triggers: enroll records in a workflow if associated records meet specified criteria.
- Workflow actions:
- Branches
- Set or clear a property value on associated records.
-
- Copy a property value from enrolled records to associated records, or to enrolled records from associated records.
-
- Send an email to associated contacts.
Enrollment triggers
You can use association labels in contact, company, deal, ticket, admin-activated (e.g., listings) or custom object-based workflows when setting enrollment triggers. To set triggers based on association labels:
- Create a workflow.
- Click Set up triggers.
- In the left panel, click When filter criteria is met.
- Click + Add filter.
- Click the Filtering on dropdown menu, then in the Associated object section, select the associated object.
- Select a property to filter by, then set your criteria.
- By default, the filter will be based on Any [object], which means a record would be enrolled when any of their associated records meet the criteria.
- To set your criteria based on an association label, click [Object] is associated to: Any [object], then select a label in the dropdown menu. This will enroll the records based only on associations with that label, which means the workflow would enroll a record only if they have an associated record with that label and that record meets the criteria.

- Once you're done setting your triggers, at the bottom, click Save.
Actions
To use association labels in a workflow action:
- Create a workflow.
- To add a workflow action, click the + plus icon.
- To set up a branch, click Branch.
- Create an if/then or value equals branch.
- If creating an if/then branch:
- Within a branch, click + Add filter.
- Click the Filtering on dropdown menu, then in the Associated object section, select the object.
- Select a property to filter by, then set your criteria.
- By default, the filter will be based on Any [object], which means the record would progress down the branch when any of their associated records meet the criteria. To set your criteria based on an association label, click [Object] is associated to: Any [object], then select a label in the dropdown menu. This will move records based only on associations with that label, which means the a record would progress down the branch only if they have an associated record with that label and that record meets the criteria.

-
- If creating a value equals branch:
- Click the Property or value to branch on field, then select a property in the [Associated Object]: [Refinement criteria] section. The refinement criteria will determine which associated record the value will be copied from (e.g., the most recently updated, a specific label). This will only appear if you've added the association type as an available data source.
- Click Next.
- Enter or select the value to branch on, and add additional branches as needed.
- Once you're done, click Save.
- If creating a value equals branch:
- To set or clear a property value for associated records, click Edit record.
- Click the Record type dropdown menu, then select the object.
- By default, the property update will be set based on All [object], which means all associated records' property values will be set or cleared. To set or clear the property value only for associations of a certain label, click the Association to object dropdown menu, then select a label.
- Click the Property to edit dropdown menu, then select the property to set or clear, then click Save. Learn more about editing records with workflows.

- To copy a value between associated records, click Edit record.
- Click the Record type dropdown menu, then select the object to copy from.
- Click the Property to edit dropdown menu, then select the property to copy from, then click Save. When copying a value to a different property, the properties must be compatible. Learn more about compatible property types.
- Click the Choose a value text box.
- Select an option in the Choose data variable panel:
- To copy from enrolled records to the associated records, select the enrolled object. The refinement criteria will determine which associated record the value will be copied from (e.g., the most recently updated, a specific label). This will only appear if you've added the association type as an available data source.
- To copy to enrolled records from the associated records, select the associated object.
-
- Once you're done, click Save.

- In a contact or company-based workflow, to send an email to associated contacts, click Send email. In a contact-based workflow, in the Send to section, select Associated contact.
- To edit which associations should receive the email, click the Association label dropdown menu, then select the labels that should receive the email, or click the x for a selected label if that association type should not receive the email.
- Choose the email to send to the associated contacts, then click Save.
Learn more about creating workflows.
Use association labels in custom reports
In custom reports, you can use association labels to specify which records to include in the report based on their labels. You can also use association labels as an axis, break down field, or filter in your custom report.
- In your HubSpot account, navigate to Reporting > Reports.
- In the upper right, click Create report.
- In the left panel, select Custom report builder.
- Select your data sources:
- Select the primary source by clicking the Primary data source dropdown menu and selecting a primary source. The primary source you select affects which labels are available. For example, a report with a primary data source of Contacts will only include labels you've created within your contact association settings.
-
- Select your secondary sources by choosing from the CRM, Marketing, Sales, Service, and Custom objects sections. To use labels for cross-object associations, you'll need to select at least one additional CRM object.
- At the top of the data source editor, click Choose association labels.
- In the dropdown menu, select the labels you want to include in the report.
- For cross-object associations, you can select the All [objects] checkbox to include all associated records of that object, regardless of their labels. This will be selected by default if there are no defined labels for an object relationship.
- For same object associations, you can only select one same object association label per report.
- For paired labels, the direction you select will impact the data included in the report (e.g., if you select Child Company to Parent Company, companies labeled Child Company will be the primary data source of the report, and companies labeled Parent company will be an additional source).
- You can click Back to data sources to continue editing your sources, or click Next to continue. You can update your data sources and associations at any time in the report builder by clicking Edit data sources in the left sidebar.
- Add fields to your report as an axis, break down field, or filter. By default, fields from the primary source label are shown in the left panel (e.g., Contacts (primary), Companies (Parent Company), etc.). To access the association's fields, you can search across the sources, or click the Browse dropdown menu, then select the object with the specified label (e.g., Contacts (Partner), Companies (Child Company), etc.).
- Finish creating your custom report.
Learn more about creating reports in the custom report builder.
Example reports
The following are sample uses cases for using association labels in custom reports.
- List all of a parent company's child companies and their annual revenue values.

- You manage apartment rentals and have activated the Listings object. You create two association labels for long-term and short-term leases.
- To split your report data by these labels:
- Select Contacts as your primary data source, then select Listings as secondary.
- Select your association labels.
- Click and drag the Association label data point to the X-axis channel.
- Click and drag the Count of contacts property to the Y-axis channel.
- Then, click and drag the Original Traffic Source property to the Break down by channel.
- The chart will show how many contacts have rented a short term and long term stay and what source they found the rental.
- To split your report data by these labels:

-
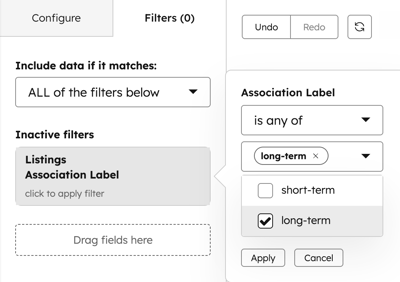
- To only report on contacts with a listings association label of Short-term:
- Click the Association label filter.
- Select is any of, and click Short-term.
- To only report on contacts with a listings association label of Short-term:
