- Knowledge Base
- Service
- Help Desk
- Organize teams and views in help desk
Organize teams and views in help desk
Last updated: November 10, 2025
Available with any of the following subscriptions, except where noted:
-
Service Hub Professional, Enterprise
Before you start managing your tickets in help desk, review the sections below to learn more about the default views provided by HubSpot, as well as how to structure your teams to allow them to efficiently collaborate with one another.
Permissions required Service Access or Sales Access is required to view, edit, and respond to tickets in help desk.
Seats required A Service Hub seat is required to access advanced help desk features, such as custom views, SLAs, and reply recommendations.
Group members into teams
To get the most out of help desk, it's recommended you organize team members into HubSpot teams based on expertise and how you plan to share tickets. For example, if your support organization has a general support team whose members share responsibilities, need visibility into each others' tickets, and often collaborate, it's recommended grouping those members into a single HubSpot team.
Understand views in help desk
Views allow you and your team to organize the help desk workspace to each member's specific needs. You can start managing tickets immediately using the default views, or create custom views to control what's visible for each team. You can also customize which views are shown and their order.
Please note:
- Users with Service or Sales Access who do not have an assigned Service seat will only be able to access the default views: My Mentions, Following, and All Open.
- Only tickets that do not have a close date will appear in Open views.
- Users can only see tickets in help desk that they have access to. Learn how to limit access to tickets for your users.
Help desk includes the following view types:
- Default views: built-in views that filter tickets based on their assignee and status:
- Unassigned: all Open tickets without a current assignee.
- Assigned to me: all tickets assigned to you.
- My Team's Unassigned: Open tickets will appear in this view if you set up automatic routing rules to assign tickets to your team but all users on the team were unavailable when the ticket was created.
- My Team's Open: all Open tickets assigned to you or another member of your team.
- All Open: all tickets with a status of Open.
- Customer agent: if you've set up a customer agent, all open tickets assigned to or escalated by the customer agent will appear in this view. Learn more about setting up a customer agent.
- Following: all tickets that you have manually followed. Learn more about following tickets.
-
- My Mentions: all Open tickets that you have been mentioned in. Learn more about mentioning users on records.
-
- All Closed: all tickets with a status of Closed. Tickets must have a close date to appear in this view.
- Sent: all Open tickets with an associated conversation that includes an email sent from a connected email or from a record in the CRM.
- Spam: all tickets that a user in your account marked as spam.
- Public custom views: views created by users in your account that are visible to all other teams.
- Team-shared custom views: views created by users that are only visible to their main team.
- Private custom views: views only visible to the user who created them.
To customize which views are shown and the order they appear in:
- To change the view order, click and drag a view to a new position.
- To hide a view, drag it below the More dropdown menu. You can expand this dropdown menu at any time to view hidden views.
- To show a view that was previously hidden, click the More dropdown menu, then click and drag the view above it.
Create custom views
You can filter tickets into public or private views to help your team prioritize and manage customer communications in help desk. For example, you could create a view of all high priority tickets so your team knows where to focus their efforts, or you could create a private view of all open tickets in your pipeline to better monitor ticket resolution without distracting your team.
If you've created spaces in help desk, you can also create custom views that dynamically organize tickets based on automatic or manual ticket assignment.
Permissions required Seats required A Service seat and Custom views permissions are required to create, edit, or delete custom views.
Create custom global views
- In your HubSpot account, navigate to Service > Help Desk.
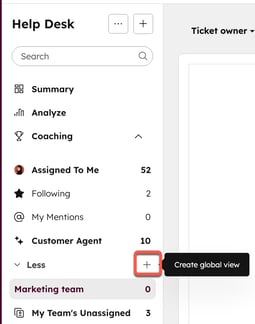
- In the left sidebar menu, next to the Less dropdown menu, click + Create global view.

- In the right panel, enter a name for your view.
- To add an emoji to your custom view name, click the emoji icon emoji next to the Name field. Browse or search for your emoji, then click on the emoji to add it to the custom view name.
- Select a sharing option:
-
- Private: the view will only be accessible to you.
- Team(s): users can create views that are visible to any HubSpot team with access to help desk.
- Everyone: all users in your HubSpot account will be able to access the view.
- To personalize the view so that users see only the tickets they own, select the Create a dynamic view filtered by ticket owner checkbox.
- Click Next.
- Select and configure any ticket properties you'd like to filter on.
- When you're done customizing your view, click Create view.
The newly created view will appear in the left sidebar menu under Shared views if you made the view accessible to everyone or a specific team. If you made the view private, it will appear under Private views.
The number of custom views you can create depends on your HubSpot subscription. You can review this limit in the Custom views in shared inbox section in HubSpot's Product & Services catalog.
Create space views
In help desk, you can create spaces to display tickets assigned to main team members within selected HubSpot teams. If you've set up help desk spaces, you can create space views:
- In your HubSpot account, navigate to Service > Help Desk.
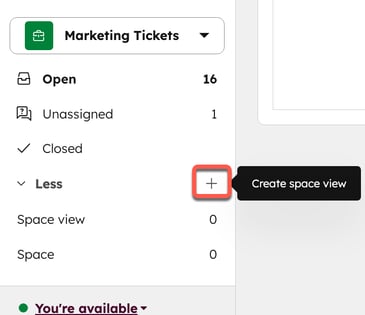
- At the bottom of the left sidebar menu, next to the Less dropdown menu, click + Create space view.

- Enter a name for your view.
- Select a type:
- Space: this view will only include tickets assigned to teams in the selected space. Use the dropdown menu and select a space, then select a sharing option:
- Private: the view will only be visible to you.
- Space: this view will only include tickets assigned to teams in the selected space. Use the dropdown menu and select a space, then select a sharing option:
-
-
- Everyone in the space: the view will be visible to all team members of the selected space.
- Global: this view will include all tickets assigned to any teams. Select a sharing option:
- Private: the view will only be visible to you.
- Team(s): the view will only be visible to selected team members.
- Everyone: the view will be visible to all members in the account.
-
- To show only the tickets belonging to the user viewing the view, select the Create a dynamic view filtered by ticket owner checkbox.
- Click Next.
- Select and configure any ticket properties you'd like to filter on.
- When you're done customizing your view, click Create view.
Learn more about using help desk spaces.
Edit columns in help desk
- In your HubSpot account, navigate to Service > Help Desk.
- In the top right of the table, click Edit columns.
- To add a property a property to your selected columns, select the checkbox.
- To reorder a column, click and drag a property. To move it to the top-most position, hover over the property and click Move to top.
- To remove a column, click the X to the right of the property.
- Click Apply.