- Knowledge Base
- Service
- Feedback Surveys
- Create and conduct customer support surveys
Create and conduct customer support surveys
Last updated: July 28, 2025
Available with any of the following subscriptions, except where noted:
-
Service Hub Professional, Enterprise
Customer Effort Score (CES) measures the ease of a user's customer support experience. CES is based on a seven-point scale ranging from Strongly agree to Strongly disagree. Send customer support surveys to your customers to let them score their experience with one of your support representatives.
Please note: you must have an assigned Service Hub seat to create feedback surveys. Learn more in HubSpot's Products & Services catalog.
To set up a customer support survey:
- In your HubSpot account, navigate to Service > Feedback Surveys.
- You can edit, or delete an existing survey.
- To edit, hover over the survey and click Edit.
- To delete, hover over the survey and click the Actions dropdown menu, then select Delete.
- To create a new survey, click Create survey in the upper right.
- In the next page, select Customer support, then click Next.
- Select Email as the delivery method, then click Create.
- Click the edit pencil icon at the top to enter a name for the survey.

Please note: to send an email survey, users must have Marketing access permissions, including Publish access to the Email tool.
Survey
On the Survey tab, you can customize the email settings, body, branding and appearance of your survey.
Email settings
- In the left panel, click the Survey language dropdown menu and choose which language you want the survey to be in.
- Enter your Company name.

- Set the From name and From address that your survey will be sent from. You can select the name and address of any user in your account.
- Enter a Subject line for your survey email. You can click contacts Contact token to include a personalization token.
- Click Advanced settings to expand the section:
- Click the Office location dropdown menu and select an option.
- This information will appear at the footer of your email. Learn more about managing your email footer.
Email body
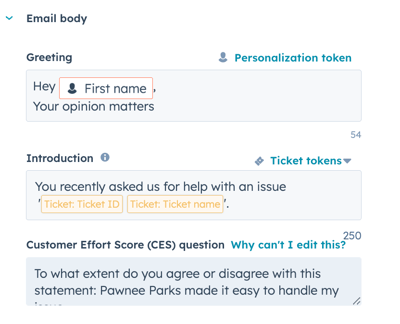
- In the left panel, click Email body to expand the section and edit the body of the survey email.
- Edit the text that appears at the top of your survey using the Greeting field. You can click contacts Contact token to include a personalization token.
- Edit the text that appears before your survey question using the Introduction field. You can click ticket Ticket tokens to include a personalization token.
- View the text that appears in your survey question in the Customer Effort Score (CES) question field. This text can not be edited.

Theme
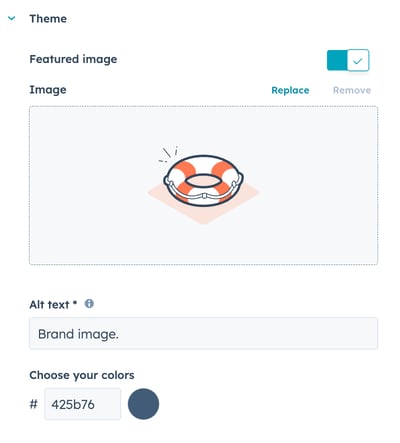
- In the left panel, click Theme to expand the section and edit the appearance of the survey email.
- Click to toggle the Featured image switch on to upload an image for the email survey. Click Replace to upload your own image or select an existing one from the file manager.
- In the Alt text field, enter a description of the image.
- Set a custom color by entering a hex color value, or select a default color by clicking the color picker to the right.

Feedback
- In the left panel, customize the follow-up questions based on the score they gave.
- Click the 1 - 3 Difficult tab to enter text for customers who gave a low score.
- Click the 4 - 5 Neutral tab to enter text for customers who gave a neutral score.
- Click the 6 - 7 Easy tab to enter text for customers who gave a high score.
- In the right panel, preview the follow-up question, and click the Thank you tab to continue.

Thank you
- In the left panel, customize the thank you message a customer will see after submitting their survey response:
- Click 1 - 3 Difficult, 4 - 5 Neutral, and 6 - 7 Easy to customize a different Image, Header text, and Body text for each category of survey responses.
- Toggle the Show image switch on or off to show or not show an image with your thank you message. Click Replace to upload your own image or select an existing one from the file manager.
- Enter a header for your thank you message in the Header text field for the selected category.
- Enter a thank you message in the Body text field for the selected category.
- In the right panel, preview the thank you messages, and click the Recipients tab to continue.

Recipients
On the Recipients tab, you can choose when the survey will be sent and who the survey will be sent to:
- In the Choose who gets the survey section, click the dropdown menu to select the pipeline and ticket status that'll trigger the survey to be sent.
- In the When section, choose when your survey will be sent:
- Immediately: the survey will be sent immediately after the ticket is closed.
- Add delay: the survey will be sent a custom amount of time after the ticket is closed. In the Send the survey field, enter a number and select the unit of time (minutes, hours, days) to send the survey email to your customers.
Please note: a customer support survey will be sent only once per ticket. For example, if a ticket is closed and then re-opened, an additional survey will not be sent once the ticket is closed again.

Automation
- In the Who gets notified about new survey responses? section, click the Add users or teams dropdown menu and select users or teams that'll receive email notifications when a customer submits a support survey.
- To view a preview of the notification email, click Preview example email notification.
- Select the Only send notifications for survey responses that contain comments checkbox to only receive notifications for responses with comments.

- In the Automate your follow-up actions, you can set up follow-up actions based on survey responses. Click Create workflow below the 1 - 3 Difficult, 4 - 5 Neutral, and/or 6 - 7 Easy sections. In the right panel, select the actions to automate or click See more to see other actions. Learn more about using workflows actions.

- Customer support survey workflows will not appear in the workflows tool. They can only be edited from this tab of the survey setup.
- Send survey reminder email options are not supported in Customer Support surveys.
Review and publish
- To see how the survey will appear on desktop, mobile, and tablet, in the upper right, click Actions and select Preview.
- To send yourself a version of the survey, in the upper right, click Actions and select Send test survey. You can preview the email as a specific contact by clicking the Choose a contact to test your survey personalization dropdown menu and then selecting a contact.
- When you're done, in the upper right, click Review and publish. In the right panel, click Publish to take your survey live.
Please note: if you choose a specific contact when sending a test survey, the test survey will display that contact's personalization token values, but will not display any ticket personalization tokens. Once you publish the survey, the ticket personalization token values will appear for the specific ticket associated with a survey.