Last updated: November 10, 2025
Available with any of the following subscriptions, except where noted:
-
 Marketing Hub
Starter, Professional, Enterprise
Marketing Hub
Starter, Professional, Enterprise
-
 Sales Hub
Starter, Professional, Enterprise
Sales Hub
Starter, Professional, Enterprise
-
 Service Hub
Starter, Professional, Enterprise
Service Hub
Starter, Professional, Enterprise
-
 Data Hub
Starter, Professional, Enterprise
Data Hub
Starter, Professional, Enterprise
-
 Content Hub
Starter, Professional, Enterprise
Content Hub
Starter, Professional, Enterprise
-
 Commerce Hub
Professional, Enterprise
Commerce Hub
Professional, Enterprise
-
 HubSpot Credits required for certain features
-
Seats required
-
Additional subscriptions required for certain features
Please note: buyer intent can be used with either purchased credits OR a seat plan that includes credits. It does not have to be both.
After configuring buyer intent, use buyer intent to gain insight into which companies are visiting your website and showing an interest in your brand, and from there, identify which companies to focus on.
In buyer intent, you can add and define specific target markets. You can also define a company's intent by count of visits, unique visitors, and review which pages are being visited.
For buyer intent, data collected through the HubSpot tracking code allows website visits to be matched to companies. This helps HubSpot build a commercial dataset that allows you to identify which companies are visiting your website. Learn more about the data that's collected by the HubSpot tracking code.
Before you get started
Before getting started with buyer intent, please note the following:
- Before using buyer intent, set up your target market, intent criteria, and confirm that your HubSpot tracking code has been installed and is successfully firing on your website. Learn how to configure buyer intent.
-
To access buyer intent features like filtering by segments and excluding companies, you need HubSpot Credits. However, these features do not consume credits. The only feature that costs credits is adding new companies from buyer intent to your CRM.
- To use buyer intent, you must install the HubSpot tracking code.
- It is recommended you add the site domains for the websites that you would like to track visitors on. These domains must be active to see enrichment data. It is also recommended to limit tracking to these specific domains when using buyer intent.
- To comply with data protection laws, you may need to install a cookie consent banner on your own website.
- To add and enrich companies from buyer intent, Super Admin must assign users with Data enrichment permissions. Learn more about enriching contact and company data.
- To configure buyer intent, or to create or edit saved views, Super Admin must assign users with Buyer Intent permissions.
Use buyer intent
HubSpot Credits required To view more than 20 companies per view, you must have HubSpot credits.
Subscription required To view more than 20 companies per view, you must have a Starter, Professional or Enterprise subscription.
After installing the HubSpot tracking code, company data will appear in buyer intent. Buyer intent connects anonymous web visitors to known companies' IP addresses. Companies currently in your account will appear with a HubSpot icon.
When adding a company to your CRM from buyer intent, the company will have a Record source property value of Buyer-Intent. Learn more about the Record source property.
Please note: custom intent properties are directly linked to their visitor intent criteria. For example, if you have SMB Intent as a criterion and a custom property called Showing SMB Intent, that property will automatically update to reflect whether an existing company meets or no longer meets the SMB Intent criteria.
However, these custom properties aren't designed to be updated by saved views in buyer intent or when you add a company from buyer intent into your HubSpot account.
- In your HubSpot account, navigate to Marketing > Buyer Intent.
- Click the Visitors tab at the top.
- In the left panel, you can filter your companies:
- Time frame: filter by the timeframe when the company last visited your website. For example, you can filter by companies that have visited your website in the last 14 days.
- This timeframe is based on midnight UTC, it will not be based on your local timezone or your account's timezone.
- You can only set timeframes within the last 90 days.
- Showing visitor intent: filter by companies that have met at least one intent criteria. Learn more about defining Intent.
- Traffic source: filter by what is detected at the URL level for tracked visits. HubSpot checks the full page URL using a specific order and rules. Learn more about traffic source order and rules.
- Visitor country: filter companies by the country identified from the IP address of website visitors.
- Time frame: filter by the timeframe when the company last visited your website. For example, you can filter by companies that have visited your website in the last 14 days.
-
- Specific page views: filter by companies that have visited specific pages. Click the dropdown menus to select:
-
-
- Path:
- Path is equal to
- Path is not equal to
- Path contains
- Path does not contain
- Path starts with
- Domain: select all or one of your domains.
- Path:
-
-
- In my target markets: filter by companies that meet your Target Markets criteria. Learn more about adding target markets.
-
- Filter by segment: if you have a Starter, Professional, or Enterprise subscription and your account has HubSpot Credits, you can choose to show or exclude specific company segments from your views within buyer intent. This does not consume HubSpot Credits.
- This filter will only work if you've chosen All companies or Companies in my CRM in the HubSpot CRM filter. If you've selected the Companies not in my CRM option, the Filter by segment option will not be available.
- To filter your buyer intent views by segment:
- Click to toggle the Filter by segment switch on.
- Click the first dropdown menu and select Exclude companies in or Only show companies in.
- Then, click the second dropdown menu and select the checkboxes next to the segments that you'd like to include or exclude from buyer intent.
- Filter by segment: if you have a Starter, Professional, or Enterprise subscription and your account has HubSpot Credits, you can choose to show or exclude specific company segments from your views within buyer intent. This does not consume HubSpot Credits.
-
- HubSpot CRM: choose to filter by All companies, Companies not in my CRM, or Companies in my CRM. If you've chosen All companies or Companies in my CRM, you can use the following additional filters:
- Lifecycle stage: filter by the lifecycle stage of the corresponding company record, such as Customer or Subscriber.
- Deal Stage: filter by pipeline-oriented deal stages through the Deal stage property of the company's associated deal records.
- Owner: filter by the company record's assigned owner.
- HubSpot CRM: choose to filter by All companies, Companies not in my CRM, or Companies in my CRM. If you've chosen All companies or Companies in my CRM, you can use the following additional filters:
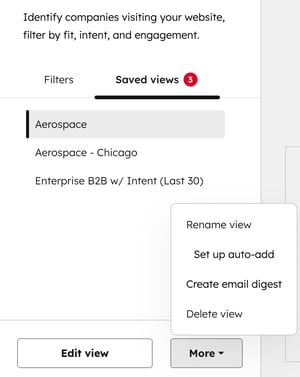
- To save your filters as a view:
- At the bottom, click Save view.
- In the dialog box, enter a view name.
- Click Save.
- To access previously saved filters:
- At the top left, click the Saved filters tab. Then, click the filter that you'd like to use.
- To edit the view, click Edit view. After editing the view, click Save view. To dismiss your edits, click Dismiss.
- To rename a view, click More and select Rename View.
- To delete a filter, at the bottom, click More. Then, select Delete View.
- To adjust the sort order, at the top right, click Page views and select from the following options. All options can be set to Ascending or Descending.
-
- Page views: sort companies by the total number of page views from each company. by default, companies in the buyer intent table are sorted by pageviews in descending order.
- Unique visitors: sort companies by the number of unique website visitors from each company.
- Last visit: sort companies by the most recent visit date from visitors associated with each company.

- To review more details on a specific company:
-
- Click the View company icon.
- To review the most viewed pages for that company, click the Top page views tab.
- If you're reviewing companies that have shown intent, the specific domain and page path that qualified the company will be tagged with Intent.
- To review the most recent page views from a company, including IP-derived country and date and time of the website visit, click the Recent page views tab.
- To review additional details about the company, such as a brief description of the company, the company's industry, count of employees, or country, click the About tab.
- To review any existing contacts associated with a company, click the Contacts tab. You can also review the contact's last touch, last engagement, and any recently scheduled interactions such as planned meetings.
- If the company has been added as a company record in your account, in the top right, click View record.
- If you have a Starter, Professional, or Enterprise subscription and your account has HubSpot Credits, you can add companies to your CRM records and segments:
- If the company does not currently exist as a record in your account, in the top right, click + Add to companies. to create a new company record.
- To add the company to an existing static segment:
- In the top right, click + Add to static segment. If the company does not currently exist as a record in your account, it will automatically be added as a new record.
- In the dialog box, click the dropdown menu and select a segment. Then, click Add.
- After reviewing the company details, click the X icon in the top right.
Add companies to your CRM records and segments
HubSpot Credits required To add companies to your CRM records and segments, you must have HubSpot credits. A specific number of HubSpot credits during a credit usage period are required to add net-new companies for buyer intent. Learn more about the specific number of credits used in the HubSpot Product & Services catalog.
Subscription required To add companies to your CRM records and segments, you must have a Starter, Professional or Enterprise subscription.
Permissions required To add companies to your CRM records and segments, you must have Data Enrichment permissions.
- In your HubSpot account, navigate to Marketing > Buyer Intent.
- To add an individual company to your HubSpot company records, click the + plus icon next to the company.
- To add multiple companies to your HubSpot company records in bulk, select the checkboxes next to the companies' names. At the top, click + Add to companies.
- To add multiple companies to an existing static segment:
- Select the checkboxes next to the companies' names.
- At the top, click + Add to static segment. If any of the selected companies do not currently exist as a record in your account, they will automatically be added as new records.
- In the dialog box, click the dropdown menu and select a segment. Then, click Add.
- In the dialog box, review the count of records to enrich, and the credits available in your account. At the bottom, click Add enriched records.
Please note:
- The credit balance reflects the number of credits in your account. Depending on your enrichment settings or if other users are in the account using credits, this number may have changed between actions.
- When a company is added, either manually or through auto-add, the owner will be left empty so you can assign it to your preferred user.
Enroll companies in a workflow
You can enroll companies directly from buyer intent into a workflow:
- In your HubSpot account, navigate to Marketing > Buyer Intent.
- On the Visitor tab, select the checkbox next to any company you want to enroll in a workflow.
- Click the + plus icon, then select Enroll in workflow.
- In the dialog box, click the dropdown menu and select an existing workflow.
- Click Enroll.

Exclude companies from buyer intent
HubSpot Credits required To exclude up to 100 companies from the buyer intent overview and companies tabs, saved views, auto-adds, and email digests, you must have HubSpot Credits.
To exclude an individual company:
- In your HubSpot account, navigate to Marketing > Buyer Intent.
- On the Companies tab, hover over a company and click the + plus icon. Then, select Add to exclusions.

To exclude companies by domain:
- In your HubSpot account, navigate to Marketing > Buyer Intent.
- Navigate to the Configuration tab.
- In the Exclusions section, click Add exclusions in the top right.
- In the right panel, type a domain.
- Click Save.
To add a company back in to your buyer intent tool:
- In your HubSpot account, navigate to Marketing > Buyer Intent.
- Navigate to the Configuration tab.
- In the Exclusions section, click Add exclusions in the top right.
- Delete the domain from the exclusion list, then click Save. Or to remove all domains, click Remove.
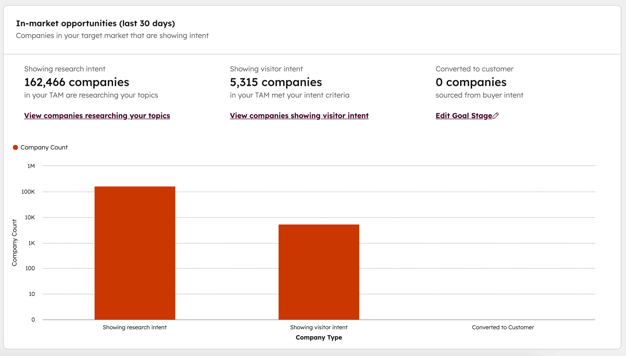
Analyze your buyer intent overview
From the Overview tab, you can analyze companies showing buying intent and your progress toward winning your market.
- In your HubSpot account, navigate to Marketing > Buyer Intent.
- Click the Overview tab to see companies showing buying intent and your progress toward winning your market.
- If you haven't set up buyer intent, review the following settings you must configure:
- Set up target markets: define the market segments you're targeting to focus on high-fit companies showing intent.
- Install HubSpot's tracking code: identify companies visiting your website by installing HubSpot’s tracking code.
- Set up research topics: find companies researching the topics that matter most to your business.
- Configure intent criteria: filter for companies that are showing intent based on visits to specific pages on your site.
- Under In-market opportunities, you can review the number of companies showing research intent, visitor intent, and companies that have been converted to customers.
- If you haven't set up buyer intent, review the following settings you must configure:
-
-
- Under Showing research intent, click View companies researching your topics to be taken to the Research tab.
- Under Showing visitor intent, click View companies showing visitor intent to be taken to the Visitors tab.
- Under Converted to [lifecycle stage], click Edit Goal Stage, then click the dropdown menu to change the lifecycle stage (e.g., lead, subscriber, etc.)
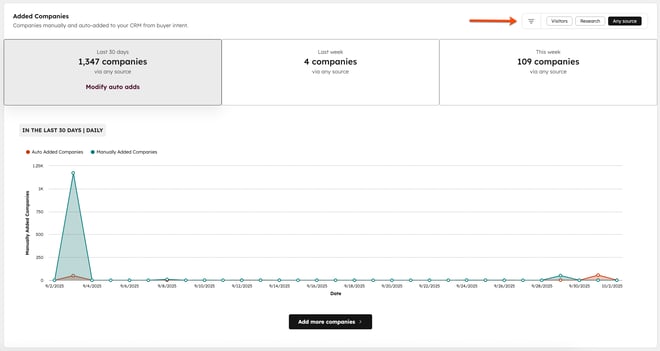
- Under Added Companies, you can review companies manually added or auto-added to your CRM from buyer intent. Switch between Visitors, Research, or Any source to see the numbers for each specific category.
-
-
-
- To modify your auto add settings, click Modify auto adds.
- To add more companies, click Add more companies.
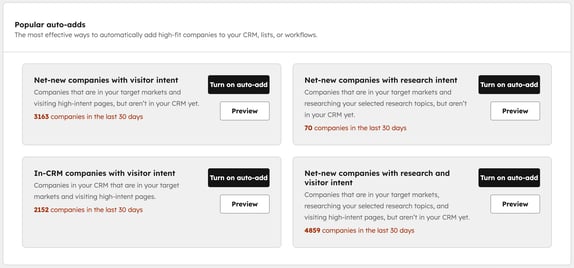
- Under Popular auto-adds, review the most effective ways to automatically add high-fit companies to your CRM, lists, or workflows.
-
-
-
- Click Turn on auto-add for any of the following:
- Net-new companies with visitor intent: companies that are in your target markets and visiting high-intent pages, but aren’t in your CRM yet.
- Net-new companies with research intent: companies that are in your target markets and researching your selected research topics, but aren’t in your CRM yet.
- In-CRM companies with visitor intent: companies in your CRM that are in your target markets and visiting high-intent pages.
- Net-new companies with research and visitor intent: companies that are in your target markets, researching your selected research topics, and visiting high-intent pages, but aren’t in your CRM yet.
- Click Preview to see the companies included in each category. Click the + plus icon to add a company to your CRM, a static segment, or to enroll the company in a workflow.
- Click Turn on auto-add for any of the following:
-

Use buyer intent in your company records
Add the Buyer Intent card to your company records to review buyer intent data directly from your company records.
Add the buyer intent card to your company records
Permissions required To add the Buyer Intent card to your company records, users must have Customize record page layout or Super Admin permissions.
- In your HubSpot account, click the settings icon in the top navigation bar.
-
In the left sidebar menu, navigate to Objects, then select Companies.
-
At the top, click the Record Customization tab.
- To edit the default view, click Default view or click the name of an existing team view (Professional and Enterprise only).
- In the left or right column, click Add cards.
- After adding your card, in the top right, click Save and exit. Learn more about customizing cards on your CRM records.

Review the buyer intent card in your company records
After adding the Buyer intent card, you can review buyer intent data directly from your company records. If a company does not have buyer intent data, the card will still appear but display empty values.- In your HubSpot account, navigate to CRM > Companies.
- In your left or right sidebars, review your Buyer Intent card.
- Website visits: the count sessions of website visits from this company.
- Unique visitors: the count of unique visitors that have visited your website from this company.
- Last seen: the date and time of the last visit from a visitor from this company.
- Top page views: the pages with the most visits from visitors from this company.
- To view all buyer intent activity, click View full visit activity. You will be redirected to the company profile on the Buyer intent page.

