Last updated: April 22, 2026
Available with any of the following subscriptions, except where noted:
-
 Marketing Hub
Professional, Enterprise
Marketing Hub
Professional, Enterprise
Create social feeds to monitor specific keywords used in X posts or competitor activity from Facebook, Instagram, X, and YouTube. Use this data to monitor keywords relevant to your brand and understand how your competitors perform on social media.
To review social mentions, learn how to review and reply to social interactions.
Permissions required All accessible accounts, Their connected accounts, or Draft only social permissions are required to create social feeds.
Before you get started
Before you create social feeds, review the requirements and limitations.
Requirements
- To create a keyword feed, connect your X account to HubSpot. When you choose which posts you want to view in reports, select Report on posts published from all sources.
Limitations & considerations
- Keyword feeds are avaialble for X accounts only. When creating a keyword feed:
- Only social media posts from after the feed was created will be included. Social media posts published before the feed was created will not be included in the feed.
-
- You cannot create a feed based on a private X list.
- Your X feed will only display posts from the past seven days.
- It can take up to five minutes for social feeds to update. Keyword feeds may take up to four hours to update with new activity.
Create keyword feeds for X
Set up keyword feeds to track specific terms used in posts on X. You can monitor keywords across the entire platform or narrow the feed to specific X lists or HubSpot segments.
- In your HubSpot account, navigate to Marketing > Social.
- At the top, click the Listen tab.
- If the Listen tab isn't available, click More tools and select Listen.
- In the left sidebar menu, under Keywords, click Add feed.
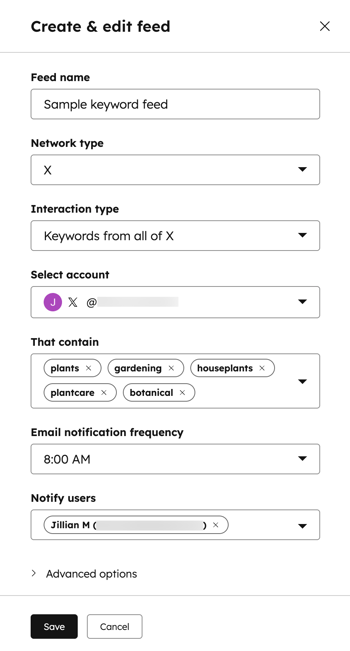
- In the right panel, enter the following feed details:
- Feed name: the name for your feed.
- Network type: the social network that the feed is associated with. Keyword feeds support X accounts only. This field can't be edited.
- Interaction type: select where to listen for a keyword. You can listen to Keywords from all of X, Keywords from an X list, or Keywords from a HubSpot contact list.
- Select account: your connected X account that'll be used to interact with posts in your feed. Click the dropdown menu to select the account that you can use to like, reply, repost, or quote posts within your keyword feed.
- That contain: enter one or more keywords. When a keyword is used in an X post, the post will be displayed in your keyword feed.
- Email notification frequency: the daily email notification frequency for the feed activity.
- Click the Email notification frequency dropdown menu. Then, select None, 8:00 AM, or 8:00 AM & 4:00 PM.
- Click the Notify users dropdown menu. Then, select a user from your HubSpot account.
- Click to expand Advanced options to specify the posts that'll populate your feed based on the following details:
- Required keywords: enter one or more keywords that a post must contain in order to populate your feed.
- Excluded keywords: enter one or more keywords that, if used, would exclude the post from your feed.
- Hide posts from these accounts: select X accounts that you'd like to exclude from your feed.
- Written in: select the language of the posts to include in your feed.
- Ignore Reposts: select the checkbox if you'd like to exclude reposts from populating your feed.
- At the bottom, click Save. X posts that contain your selected keywords will begin to populate your feed automatically.
Edit or delete keyword feeds
- In your HubSpot account, navigate to Marketing > Social.
- At the top, click the Listen tab.
- If the Listen tab isn't available, click More tools and select Listen.
- In the left sidebar menu, under Keywords, click your feed.
- To refresh a keyword feed, in the top right, click Refresh.
- To edit a keyword feed, in the top right, click Edit.
- In the right panel, edit your feed options.
- After editing your feed, in the bottom left, click Save.
- To delete a keyword feed, in the top right, click Edit.
-
- In the bottom right, click Delete feed.
- In the dialog box, click Delete. Deleting a keyword feed cannot be undone.
Review and interact with your keyword feeds
After creating your feed, you can keep track of posts that include the specified keywords.
- In your HubSpot account, navigate to Marketing > Social.
- At the top, click the Listen tab.
- If the Listen tab isn't available, click More tools and select Listen.
- In the left sidebar menu, under Keywords, click your feed.
- Review your feed in the table below:
- Account: the user that has used a keyword in a post or comment.
- Post: the post or comment containing the used a keyword.
- Likes: the number of likes that the post or comment has.
- Date: the date the post that used a keyword was published.
- To search for a specific post or comment, in the Search field, enter your search keyword. Then, press Enter.
- To like a post, navigate to a post in your feed and click the like icon. This will like the comment in the post on X.
- To reply to a post, click the reply icon.
- In the right panel, enter your reply or insert a reply recommendation. Then, click Reply.
- To view a post directly on the social network, click the reply icon. In the right panel, click View post on [social network].
- To repost a post to send it to your follower base, at the bottom of a post, click the repost icon.
- To quote a post, click the quote icon.
- In the social composer, continue creating your post.
Create competitor feeds
Subscription required A Marketing Hub Enterprise subscription is required to create competitor feeds.
Create social feeds to listen to your competitor’s social media posts on Facebook, Instagram, X, and YouTube. You can monitor up to three competitors at one time.
- In your HubSpot account, navigate to Marketing > Social.
- At the top, click the Listen tab.
- If the Listen tab isn't available, click More tools and select Listen.
- In the left sidebar menu, click Add competitor.
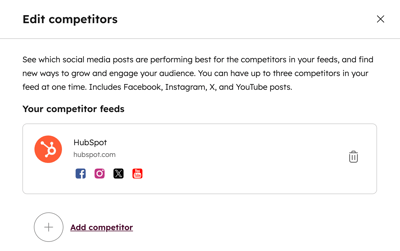
- In the right panel, click Add competitor.
- Enter the website of the competitor that you want to monitor under Enter a competitor’s website.
- Click Save. If the competitor has Facebook, Instagram, X, or YouTube social accounts, these accounts will begin to populate your feed automatically.
- If you have already added three competitors and would like to remove or replace a competitor, in the left sidebar menu, click Manage competitors.
- To remove a competitor, in the right panel, click the delete icon next to the competitor you’d like to remove.
- To replace that competitor, in the right panel, click Add competitor to enter another competitor website.
Please note: any existing competitor feed that has not been viewed for more than 60 days will be automatically removed. To add the competitor back to your feed, create a new competitor feed.
Review competitor feeds
- In your HubSpot account, navigate to Marketing > Social.
- At the top, click the Listen tab.
- If the Listen tab isn't available, click More tools and select Listen.
- In the left sidebar menu, under Competitors, click a feed.
- Review your feed in the table:
- Time published: the date and time the post was published.
- Engagement Total: the total number of interactions for the post.
- Engagement Rate: the number of post interactions divided by the number of followers for this account. This is shown as a percentage.
- To search for a specific post, in the Search field in the top right, enter your search keyword. Then, press Enter.
- To filter the posts by social media network, click the dropdown menu in the upper left and select from All networks, Facebook, Instagram, X, or YouTube.
- To filter the posts by publishing date, click the date range dropdown menu and select a date range.
- To view the post in the corresponding social network, navigate to the post and click View on [social network].
