Last updated: May 11, 2026
Available with any of the following subscriptions, except where noted:
-
 Marketing Hub
Starter, Professional, Enterprise
Marketing Hub
Starter, Professional, Enterprise
-
 Sales Hub
Starter, Professional, Enterprise
Sales Hub
Starter, Professional, Enterprise
-
 Service Hub
Starter, Professional, Enterprise
Service Hub
Starter, Professional, Enterprise
-
 Data Hub
Starter, Professional, Enterprise
Data Hub
Starter, Professional, Enterprise
-
 Content Hub
Starter, Professional, Enterprise
Content Hub
Starter, Professional, Enterprise
-
 Smart CRM
Professional, Enterprise
Smart CRM
Professional, Enterprise
-
 Commerce Hub
Professional, Enterprise
Commerce Hub
Professional, Enterprise
-
 HubSpot Credits required for certain features
With Breeze, HubSpot's collection of AI tools, create smart properties for contact, company, deal, ticket or custom objects. Smart properties surface insights using user-defined data sources. You can use smart properties to generate organized insights for usage in pre sales call research, ideal company profile enrichment, or lead qualification.
For example, configure the smart property to use activity transcript data to surface a summary for contact or company research.
Before you get started
Smart properties are separate from standard contact and company enrichment. Running a smart property consumes HubSpot Credits, even when a value isn't filled for the property. Learn more about how many HubSpot Credits smart properties use.
Please note: review the Product & Services Catalog for information about credit tiers and possible upgrades associated with your use of the enrichment products.
Understand requirements and recommendations
In order to create and use smart properties, you must turn on the following AI settings:
- Give users access to generative AI tools and features: allow users to generate content throughout the HubSpot account, including in text editors (e.g., marketing emails, blog posts), the Conversations Inbox, sales emails, templates, Breeze Assistant, and more.
- CRM data: your account's CRM data, including contacts, companies, deals, tickets, notes, and feedback.
In order to produce the best results and use all data source options (e.g., Activities and transcripts), you must turn on the following AI settings:
- Customer conversation data: data from interactions with customers, including call transcripts, call recordings, emails, and chats.
- Files data: public files and documents stored in the files and documents tools.
Create smart properties
Permissions required Edit property settings or Super Admin permissions are required to create smart properties.
Create a smart property from scratch
Each smart property pulls from a defined data source, such as publicly available company domain data, call transcripts, or another property on the record. This makes summarized or derived information available directly on the record.
- Navigate to your records:
- In your HubSpot account, navigate to CRM > Companies.
- In your HubSpot account, navigate to CRM > Contacts.
- In your HubSpot account, navigate to CRM > Deals.
- In your HubSpot account, navigate to CRM > Tickets.
- In your HubSpot account, navigate to CRM, then select the custom object.
- Navigate to a view tab.
- Click the three vertical dots icon, then select Add column.
- Click Create new property.
- In the right panel in the Property label field, enter a name for your property.
- In the Field type dropdown menu select one of the following:
- Single-line text
- Multi-line text
- Number
- Single checkbox
- Multiple checkboxes
- Radio select
- Dropdown select
- Select the Data Agent prompt checkbox. Breeze automatically generates a prompt based on your property name and field type.
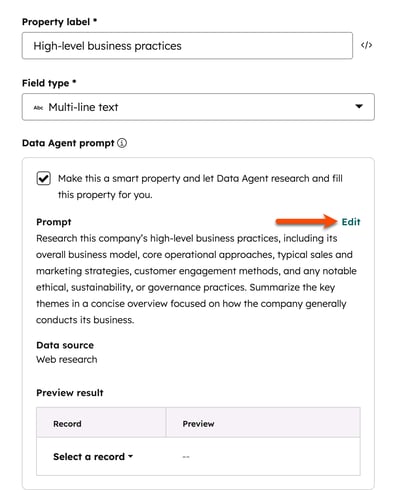
- In the Prompt section, click Edit to manage the following:
- Prompt: in the What do you want to know text field, enter descriptive text.
- Dynamic property token: click Insert property token to use specific existing properties in the prompt (e.g., Does this company have a presence in
company.city?) - Data source: click the Where should this data come from dropdown menu and select and option. Depending on the object you'll see different options:
- Web research: data from searching the internet. This data is pulled using the Company Domain Name property value for companies and First name, Last name, Email, and associated company domain name for contacts. Contacts without an associated company pull from the name and the email.
- Company website: data from the company's primary domain (e.g., hubspot.com). This data is pulled used the company domain name property value for the company record.
- Property data: data from another property on the same record. Only one property can be selected. If you select a file property, it will use the first uploaded PDF file.
- Activities and transcripts: data from logged calls, emails, meeting transcripts, and notes associated with the record. Learn more about using call transcripts.
- Activity type: if you selected the Activities and transcripts data source, select the types of activity you want the smart property to pull from.
- Preview record: select a record to preview your configuration with existing records.
- Click Apply changes.
- Click Create and view fill options.
- Select a fill option.
- Click Fill smart properties.
- In the upper right of the index page table, click Save.

Create a smart property using an AI prompt
Use Breeze to configure standard property details (e.g., name, field type) and a smart property prompt. This allows you to fine-tune a baseline configuration rather than start from scratch.
- Navigate to your records.
- Navigate to a view.
- Click the three vertical dots icon, then select Add column.
- Click Create new property.
- Click the Create with Breeze tab.
- In the What kind of property do you need? text field, enter a prompt (e.g., Does the company have any locations in Europe?).
- Click Generate property. Breeze uses the prompt to set the property name, field type, prompt, and data source.
- In the right panel:
- Review the generated property label, field type, prompt, and data source.
- Click Edit on a section to make changes.
- Select the Data Agent prompt checkbox.
- In the Preview result section, click the Select a record dropdown menu and select a record to test the property value.
- Click Create and view fill options.
- Select a fill option.
- Click Fill smart properties.
- In the upper right of the index page table, click Save.
Please note: you cannot apply validation rules (e.g., require unique values) or Sensitive Data to smart properties. Also, prompts that use LinkedIn (e.g., search LinkedIn company profile for sales roles) will be filtered out and may not return values when enriched.
Create a smart property from an existing property
Add a smart property prompt onto an existing custom property to generate insights on properties you already use in other HubSpot tools (e.g., reports, segments, workflows).
To convert an eligible custom property into a smart property:
- Navigate to your records.
- On a custom property column, click the three vertical dots icon, then select Set up smart property.
- Configure the smart property details.
- Click Save and view fill options.
- Select a fill option.
- Click Fill smart properties.
Configure automatic fill
HubSpot Credits required HubSpot Credits are required to fill smart properties.
Set up automatic smart property fill based on a schedule or record creation. For schedules, select the frequency, time of day, and add segment restrictions.
To configure smart property auto-fill:
- In your HubSpot account, navigate to Data Management > Data Agent.
- Click the Manage tab.
- In the table, click the Manage dropdown menu and select Auto-fill smart property.
- In the right panel, click Edit and configure options:
- Auto-fill event: select an event (e.g., On a schedule, Record creation).
- If you selected On a schedule, select from the following:
- Segment: select a segment of records to auto-fill. You must select a segment that matches the object of the smart property (e.g., a company-based segment to auto-fill a company smart property).
- Frequency: select an option such as daily, weekly, or monthly.
- Days: select days of the month or week to trigger auto-fill. You can select multiple options.
- Time: select a preset time of day (e.g., During business hours) or a custom time.

- When you're finished, click Save.
- Select a fill option.
- Click Set up auto-fill.
To edit an existing smart property auto-fill:
- In your HubSpot account, navigate to Data Management > Data Agent.
- Click the Manage tab.
- In the table, click the Manage dropdown menu and select Auto-fill smart property.
- In the right panel, click Edit or Delete.
- When you're finished, click Save auto-fill.
Use smart properties
HubSpot Credits required HubSpot Credits are required to fill smart properties.
Permissions required Data enrichment access or Super Admin permissions are required to enrich smart properties.
Fill smart properties to review the generated insights prior to a sales call or build lead qualification segments.
Fill smart properties in bulk
To bulk enrich one smart property from an index page:
- Navigate to your records.
- Click the three vertical dots icon within a smart property column, then select Smart fill.
- In the dialog box, review the count of records to enrich and the credits available in your account. In the Fill options section, select a fill option, then select Smart fill properties.
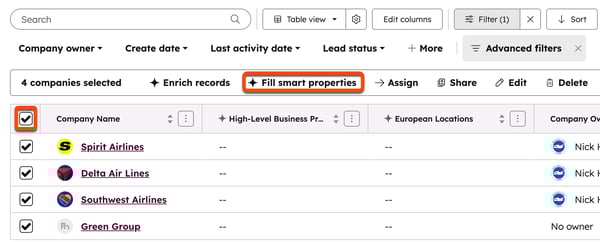
To bulk enrich multiple smart properties from an index page:
- Navigate to your records.
- In the upper left of the table, select the checkbox. If you want to select all records, click Select all [number] [records] (e.g., Select all 26 companies).
- Click Smart fill properties.
- In the right panel, select the properties you want to enrich.
- Select a fill option.
- Click Smart fill properties.
To bulk enrich multiple smart properties from a segment:
- In your HubSpot account, navigate to CRM > Segments.
- Click the name of a segment. Learn more about creating a segment.
- In the upper right, click Actions, then select Fill smart properties.
To bulk enrich smart properties from a workflow:
- In your HubSpot account, navigate to Automation > Workflows.
- Create a workflow.
- Add the Data Agent: Fill Smart Property action.
Fill smart properties on an individual record
To run smart properties from an individual record:
- Navigate to your records.
- Click the name of the record.
- In the left panel, in the About this record section (e.g., About this contact), click Actions. Then, select Fill smart properties.
- In the right panel, select the properties you want to enrich, then click Smart fill properties.

Learn more about viewing a property value's history.
View filled value source data
To view the smart property source data:
- Navigate to your records.
- Click the name of a view with a smart property column. If your view doesn't contain a smart property, learn how to add columns to a view.
- Hover on a row in the smart property column, then click the AI button.
- In the pop-up box, click the View all details button.
- In the right panel, click the Sources tab.
- Review the listed source material. Depending on the smart property's configuration, you may see website links or a link to the company record.
- Click an option to view more details in a new tab.
Manage smart properties
After you've created a smart property, review usage metrics, edit the prompt, or remove the enrichment configuration from the property.
To manage a smart property:
- In your HubSpot account, navigate to Data Management > Data Agent.
- Click the Manage tab.
- Review metrics such as: fill usage data, successful runs, and number of errors.
- To edit or remove a smart property prompt:
- In the table under the Manage Property column, click the Manage dropdown menu and select an option (e.g., edit, auto-fill smart property, remove prompt).

You can also manage your smart properties from property settings.
