- Knowledge Base
- AI
- AI
- Manage Breeze context with knowledge vaults
BetaManage Breeze context with knowledge vaults
Last updated: December 11, 2025
Available with any of the following subscriptions, except where noted:
-
Marketing Hub Starter, Professional, Enterprise
-
Sales Hub Starter, Professional, Enterprise
-
Service Hub Starter, Professional, Enterprise
-
Data Hub Starter, Professional, Enterprise
-
Content Hub Starter, Professional, Enterprise
-
Smart CRM Professional, Enterprise
In Breeze Studio, you can set up knowledge vaults that provide agents and assistants with additional context about your business. For example, you can upload PDFs with descriptions of your products or link to all contacts created from a specific campaign.
Understand limitations and considerations
- You can have up to 50 separate knowledge vaults at the same time.
- Agents and assistants will use the most recent version of any records added to knowledge vaults.
- Knowledge vaults can't be saved without at least one file or CRM object attached.
Create knowledge vaults
A default knowledge vault will be created using the data sources set in AI settings for context about your business. To create custom knowledge vaults for additional context:
- In your HubSpot account, navigate to Breeze > Knowledge.
- In the top right, click Create vault.
- In the right panel, enter a name for the vault in the Name field.
- In the Description field, enter a description of the context you'll be adding to this vault.
- In the Files section, click Add and select the relevant files from your device.
- Upload files in the following formats: .pdf, .md, .html, .pptx, .txt (UTF-8 encoding only), and .docx.
- Upload image files in the following formats: .jpeg, .png, or .webp (up to 10 MB per file).
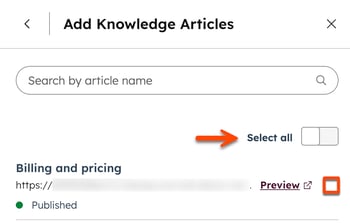
- In the Content section, click the Add dropdown menu and select a content type (e.g., Knowledge base articles).
- To choose specific content, select the checkbox next to each asset.
- To select all content, toggle the Select all switch on.
- Click Add [assets] in the bottom right.

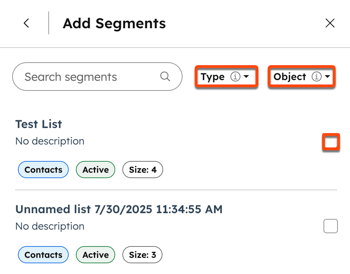
- In the Segments (Lists) section, click Add.
- In the search field, enter the name of a segment.
- To filter the available segments, click the Status (e.g., Active or Static) or Object (e.g., Contacts, Companies, Deals, or Tickets) dropdown menus, and select an option.
- To choose a segment, select the checkbox next to the segment.
- Click Add segments in the bottom right.

- To add additional files, content, or segments, click Add, then repeat the relevant sections.
- When finished, click Create.
Edit knowledge vaults
- In your HubSpot account, navigate to Breeze > Knowledge.
- Click a knowledge vault's card.
- In the right panel, click the ellipsesIcon menu icon and select Edit to customize the name and description. Then click Save.
- To add a new file, click Add in the Files section, then upload a file.
- To add content or segments, click Add in the Content or Segments (List) sections and select an option.
- For knowledge base articles, landing pages, blog posts, and calls, select the checkbox next to each asset you want to add, then click Add [asset].
- For segments, click Add, clear or select the checkbox next to the segment. Then click Add segments.
- To remove a file, asset or segment, click the remove remove icon next to its name.
- When finished, click Save.
Delete knowledge vaults
When you remove a knowledge vault from an agent or assistant, that knowledge vault stays in your account. To permanently delete a knowledge vault:
- In your HubSpot account, navigate to Breeze > Knowledge.
- Click the knowledge vault's card.
- In the right panel, click the ellipsesIcon menu icon and select Delete.
- In the dialog box, click Delete vault.
Manage an agent or assistant's knowledge vaults
Once you've created knowledge vaults, you can add them to any agent or assistant in Breeze Studio.
- In your HubSpot account, navigate to Breeze > Breeze Studio.
- Hover over the agent or assistant and click theverticalMenumenu icon, then select Configure.
- In the What this agent knows section of the editor, click Add knowledge.
- In the right panel, hover over a knowledge vault and click Add. Repeat for each knowledge vault you want to use.
- To review the contents of a knowledge vault, hover over the knowledge vault and click View details or View in settings.

- To remove a knowledge vault from this agent or assistant, hover over the knowledge vault and click Remove.
- When finished, click X to close the right side panel. Then click Publish in the top right.
Understand default properties included in knowledge vaults
Knowledge vaults include HubSpot default properties. Learn more about default contact, company, deal, and ticket properties. To view the properties for each object, click to expand the applicable section:
- Contact owner
- Country / Region
- Create date
- Customers
- Days to close
- First name
- Industry
- Job title
- Last activity date
- Last NPS survey date
- Last page seen
- Last name
- Lifecycle stage
- Number of associated deals
- Original traffic source
- Phone number
- Record source
- State / Region
- Website URL
Learn more about HubSpot's default contact properties.
- Annual revenue
- Business units
- City
- Company Domain Name
- Company name
- Company owner
- Country / Region
- Country / Region code
- CSM Sentiment
- Description
- Ideal Customer Profile Tier
- Industry
- Industry group
- Last activity date
- Last contacted
- Lead status
- Lifecycle stage
- Next activity date
- Number of associated contacts
- Number of associated deals
- Number of employees
- Number of open deals
- Parent company
- Phone number
- Recent deal amount
- Recent deal close date
- Revenue range
- Target account
- Time first seen
- Time last seen
- Website URL
Learn more about HubSpot's default company properties.
- All owner IDs
- All teams
- Amount
- Business units
- Close date
- Create date
- Deal description
- Deal name
- Deal stage
- Last activity date
- Next activity date
Learn more about HubSpot's default deal properties.
- Assigned teams
- Business units
- Close date
- Create date
- HubSpot team
- Last CES survey comment
- Last customer reply date
- Last message sentiment
- Last message sentiment score
- Number of associated companies
- Numbers of times contacts
- Original channel type
- Pipeline
- Priority
- Resolution
- Ticket description
- Ticket name
- Ticket owner
- Tickets status
- Time to close
Learn more about HubSpot's default ticket properties.