Set up calling
Last updated: July 18, 2024
Available with any of the following subscriptions, except where noted:
|
|
|
|
When configuring a phone number in HubSpot, users with assigned Sales Hub or Service Hub paid seats can set up a HubSpot provided phone number that allows them to place and receive calls, or register an outbound phone number to place outgoing calls. You can also integrate with a third-party calling provider.
Please note: you can't configure a phone number if you are on a HubSpot free trial account.
Review the table below to learn more about the differences between HubSpot provided phone numbers and outbound phone numbers.
| HubSpot provided phone number | Outbound phone number |
|
| Call from CRM | Yes | Yes |
| Call from conversations inbox | Yes | Yes |
| Route to forwarding number, voicemail, etc. | Yes | No |
| Log outbound calls to CRM | Yes | Yes |
| Log inbound calls, missed calls, and voicemails to CRM | Yes | No |
You can also set up call recording for your account so your team's calls are recorded and accessible in the calls index page for review. If you're a user in a Sales Hub or Service Hub Professional or Enterprise account, you can turn on Conversation Intelligence (CI) to automatically record, transcribe, and review calls made in HubSpot.
Please note: depending on your HubSpot subscription, there is a limit to the number of HubSpot provided phone numbers that you can acquire. Each HubSpot account also has a pooled limit of available calling minutes that are shared between users based on your subscription. Super admins in a Sales Hub or Service Hub Professional or Enterprise account can purchase additional calling minutes and HubSpot provided phone numbers from the Add-ons section on HubSpot's pricing page or by contacting their Customer Success Manager.
Set up phone numbers
To make calls in HubSpot, you can either use a HubSpot provided phone number, register an outbound phone number, or integrate with a third-party calling provider.
Configure a HubSpot provided phone number
A HubSpot provided phone number allows you to make outbound calls and receive incoming calls forwarded to your personal device. If you're a user with super admin permissions, you can acquire a HubSpot provided phone number then assign it to a team member. You can also acquire the number and reassign it later. After acquiring a HubSpot provided phone number, make sure to configure a forwarding number to send the incoming calls to.
HubSpot provided phone numbers are generated by the third-party service Twilio and must meet country specific regulations. To gain access, you must submit information about your business to Twilio who will then review and confirm the information with the local telecom provider in that country. If requirements are satisfied, you can register the HubSpot provided phone number. This only needs to completed once.
Due to legalities and demand fluctuations, we're unable to offer phone numbers in every country. Phone number acquisition is based on availability. If a number is not available, then you can try a different region, area code, or prefix. You can also wait and try to acquire a number again in a few minutes.
Please note:
- HubSpot numbers are available in more than ten international countries. Based on the phone number you select, you may need to validate your business through address validation or by submitting regulatory documents providing proof of business in the selected country.
- Calls forwarded to your phone are subject to your provider's inbound calling costs. Most telecom providers in the United States offer unlimited calls at no additional cost, but it's important to verify this with your telecom provider before setting up call forwarding in HubSpot.
- Call recording laws apply to inbound calls if you turn on call recording in HubSpot. When a contact calls a number where recording is turned on, a voice message will play informing them that the call is being recorded. If you don't want to record these calls, you can turn off call recording. When a super admin enables call recording for a user on a HubSpot provided phone number, calls will begin recording automatically.
- Toll-free numbers are not supported as HubSpot provided phone numbers.
- From May 27, 2024, any new United Kingdom long code purchase for messaging or voice will require an approved UK RC bundle. From September 30, 2024, all United Kingdom long codes will require an approved UK RC bundle to send messages or make voice calls.
- In your HubSpot account, click the settings settings icon in the top navigation bar.
- In the left sidebar menu, navigate to Calling.
- On the Phone numbers tab, click Get a HubSpot number.

- In the right panel, review the information then click Next.
- Use the dropdown menus to select a country and area code, then click Generate a number.
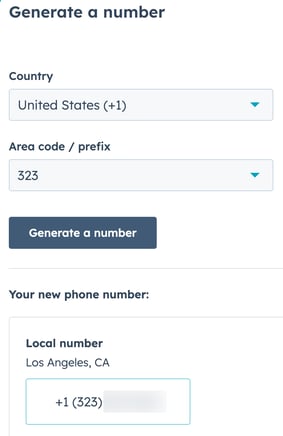
- Based on the country you selected, you may need to validate your business through address validation or by submitting regulatory documents providing proof of business in the selected country. Click Get started to complete the verification process.

- Review the phone number that appears. If you're satisfied with the generated phone number, click Get this number.
Please note: when you click Get this number, you will use one of your allotted HubSpot provided phone numbers.
Please note: this name only displays internally on your HubSpot account, not on the external caller ID. You might consider choosing a name that indicates the purpose of the line. Examples include Support line, Refunds line, Spanish line, etc.
- Click the Assignment dropdown menu and select a user with an assigned Sales Hub or Service Hub seat.
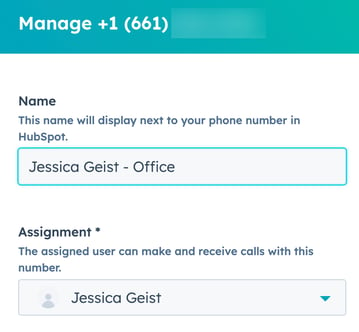
- Learn how to set up working hours or customize your voicemail.
- Click Save.
- To edit an existing phone number:
- Next to the existing phone number, click the Actions dropdown menu.
- You can edit the name or assignment. Then, click Save.
- To delete an existing phone number:
- Next to the existing phone number, click the Actions dropdown menu.
- Click Delete. In the dialog box, click Delete.
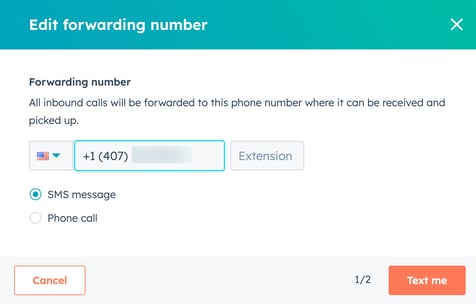
- To forward inbound calls from your HubSpot provided phone number to your cellular device or landline:
Please note:
- If a phone number is connected to your inbox or help desk, your Device ringing must be set to Ring in HubSpot browser.
-
You can't forward calls to numbers that are connected as channels in the inbox.
-
- In your HubSpot account, click the settings settings icon in the top navigation bar.
- In the left sidebar menu, navigate to General. Then, click the Calling tab.
- Under Device ringing, click the dropdown menu, and select Forward to phone number. Then, click Add next to Missing forwarding number.

-
-
- In the dialog box, type your forwarding number, then select the circleFilled radio button next to SMS message or Phone call to choose your verification method. Depending on your selection, click Text me or Call me.
-
-
-
- Type the verification code sent to your forwarding number. Then, click Verify.
- Your forwarding number is now set up.
-
- To receive inbound calls in the HubSpot browser:
- In your HubSpot account, click the settings settings icon in the top navigation bar.
- In the left sidebar menu, navigate to General. Then, click the Calling tab.
- Under Device ringing, click the dropdown menu, and select Ring in HubSpot browser.
You can now use this phone number to make outbound calls or to receive incoming calls to the forwarding number that you configured. Inbound calls will appear on the call index page and you can review them using the call review tool. However, they are not automatically associated with a record in the CRM. You can still manually associate the call to a corresponding CRM record.

If you miss an inbound call or the caller leaves a voicemail, the call record will appear in HubSpot and the voicemail will also be included as part of the call recording as long as you turn on recording in your account. Learn more about managing HubSpot provided phone numbers.
Register an outbound phone number
You can register an outbound phone number in your calling settings. This allows you to make outgoing calls to your contacts, and your caller ID will appear on the contact's device when they receive a call from you. However, HubSpot does not take ownership of registered outbound phone numbers, and you can only make outgoing calls when using an outbound phone number in HubSpot.
The process for registering a phone number is user-specific. Multiple users can use the same number in your account if it isn't a HubSpot provided outbound number, but each user must register the phone number individually. Before you register a phone number, make sure your country is supported for calling.
Please note:
- HubSpot provided outbound numbers can only be used by one user.
- You cannot register a toll-free number to use as an outbound phone number.
- Calls to Singapore, Norway, and Australia using non-Twilio phone numbers may face connection issues due to regulatory measures, with Singapore having uncertain connectivity, Norway enforcing restrictions on calls from outside the country, and HubSpot users experiencing caller ID blocking when calling Australia.
- In your HubSpot account, click the settings settings icon in the top navigation bar.
- In the left sidebar menu, navigate to General.
- Click the Calling tab.
- If calling hasn't been turned on in your account, click Connect calling.
- To register your phone number, click Add phone number.

- In the dialog box, enter your phone number and an extension (if applicable).
- You will then be prompted to verify your phone number. You can choose how the verification code is delivered to you. Select the SMS message or Phone call radio button.
- Click Text me or Call me.
You'll receive an SMS message or phone call to verify that you have access to the phone number. When prompted, enter the verification code that appears on your screen.
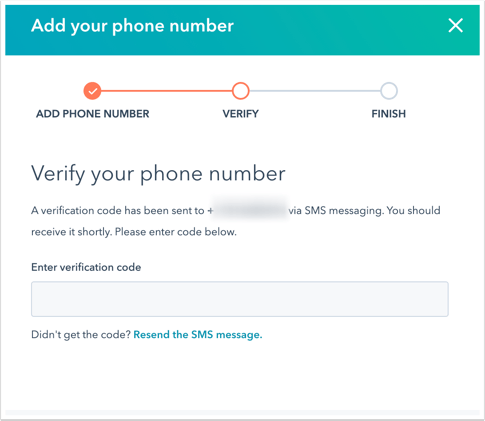
Your phone number will then be listed in your user's calling settings and you can use it to make outbound calls in HubSpot. Learn how to manage your registered outbound phone numbers.
Set up your working hours
The working hours setting allows users to set specific times and dates that they're available to take calls.
Once you've set your working hours, any inbound calls that come in outside of these hours will automatically ring to your voicemail or to another available team member. Learn more about inbound calling in HubSpot.
To set your working hours:
- In your HubSpot account, click the settings settings icon in the top navigation bar.
- In the left sidebar, click General > Calling.
- In the Call working hours section, select the day, starting time, end time, and timezone dropdown menus to set your working hours. Click + Add hours to further customize your working hours, and click the delete Delete icon to remove working hours.
![]()
- Click Save.
Customize your voicemail and recording consent message
You can create a text-to-speech or uploaded audio voicemail to play during and outside of working hours. You can also customize the language and voice used when the recording consent message plays. Voicemails are only available for inbound browser calls, not inbound forwarded calls.
- In your HubSpot account, click the settings settings icon in the top navigation bar.
- In the left sidebar, click General > Calling.
- Next to a HubSpot number, click the Actions dropdown menu, then select Edit.
- Below the name text box, click the Recording consent language and Recording consent voice dropdown menus to select the language and voice used when the recording consent message plays. You can also select this during the text-to-speech voicemail setup.
- In the right side panel, under During working hours or Outside of working hours, click Setup Voicemail.
- You can set up either a text-to-speech or audio file voicemail:
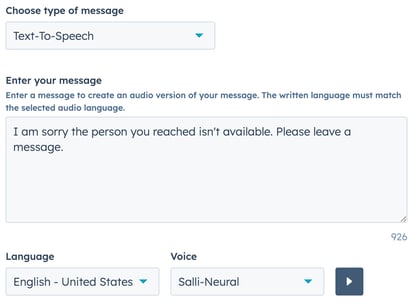
- To set up a text-to-speech voicemail:
- Click the Choose type of message dropdown menu, and select Text-To-Speech.
- In the text box, type the message you want to playback when a call goes to voicemail.
- To set up a text-to-speech voicemail:
-
-
- Click the Language and Voice dropdown menus to select the language and voice for your voicemail. This will also determine the language and voice used for the recording consent message. Click the playerPlay Play button to hear a preview of your message.
- Click Save.
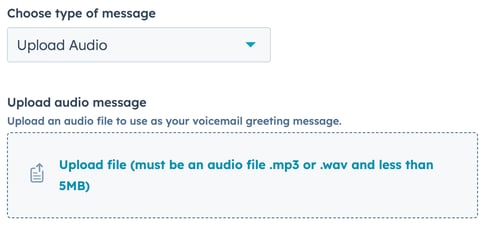
- To set up an audio file voicemail:
- Click the Choose type of message dropdown menu, and select Upload Audio.
- Click Upload file to upload a .mp3 or .wav audio file that is less than 5 megabytes.
-
-
-
- Click Save.
-
Use a third-party calling provider
If you have an assigned Sales Hub or Service Hub Professional or Enterprise seat, you can set up a Twilio Connect account to make calls in HubSpot, purchase additional calling minutes, and make calls to countries that are not included on the supported country list.
Or, you can connect a third-party calling provider to HubSpot to make calls. You can integrate with a provider listed on the App Marketplace that supports third-party calling and related functionality, or work with a developer to connect your own calling app using the Calling Extension SDK.
Require call outcome logs
You can require custom call outcome logs to organize how your team logs call activities and report on these patterns. This setting is currently for outbound calls placed from the HubSpot browser or logged calls. This functionality does not require call outcome logging for inbound calls, mobile calls, or imported calls.
- In your HubSpot account, click the settings settings icon in the top navigation bar.
- In the left sidebar menu, navigate to Calling.
- Click the Call Configurations tab.
- Select the Make call outcome required checkbox.
Turn on call recording
You can turn on call recording to capture the call's audio. The ability to record calls is an account-wide setting, affecting all users who are making calls in the account. It can be turned on or off by a user with Account access permissions. Before turning on call recording, learn about call recording laws to ensure that you are compliant with these laws as they vary across jurisdictions.
- In your HubSpot account, click the settings settings icon in the top navigation bar.
- In the left sidebar menu, navigate to Calling.
- Click the Call Configurations tab.
- Select the Allow call recording checkbox. If this setting is turned off, the Record button will not appear when making a call. If you are not seeing the option to record, check with the other admins in your account to see if they have turned this setting off. Allow call recording will be enabled by default on newly created HubSpot accounts.

Please note: the Allow call recording setting is turned on by default in all HubSpot accounts.
Turn on Conversation Intelligence (Sales Hub or Service Hub Professional or Enterprise only)
If you're a user with super admin permissions in a Sales Hub or Service Hub Professional or Enterprise account, you can also turn on Conversation Intelligence (CI) to automatically transcribe and analyze calls. This includes calls made through HubSpot's built-in calling tool, via HubSpot's integration with Zoom, or using a connected third-party calling provider that supports CI. Using CI in HubSpot, you can:
- Review recordings using speaker tracks, sharing options, transcripts, and search capabilities.
- Access a full list of your team's calls in your calls index page. These calls are filterable by call properties such as user, team, call outcome, and duration.
- Search across all recordings for key terms within global search.
- Preview recording details on associated records for added context.
- Review tracked terms and build reports on call content (Enterprise only).
Please note:
- Only calls made by users with an assigned Sales Hub or Service Hub Professional or Enterprise paid seat will be automatically transcribed. Any user in a Sales Hub or Service Hub Professional or Enterprise account can access the recording and transcript for coaching.
- If you're using HubSpot's integration with Zoom to make calls, make sure cloud recording is turned on in your Zoom account.
To turn on CI in HubSpot:
- In your HubSpot account, click the settings settings icon in the top navigation bar.
- In the left sidebar menu, navigate to Calling.
- Click the Transcription and Analysis tab.
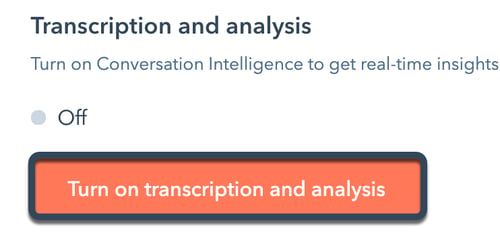
- In the Transcription and analysis section, click Turn on transcription and analysis.
- When turning on CI, you can also opt-in to use your account's data to improve the quality of your transcripts. In the dialog box, select the Help improve your transcriptions checkbox. If you don't turn this on when setting up CI, you can navigate back to your calling settings at any time to turn it on later. Learn more about how HubSpot uses data to improve the quality of your transcripts.
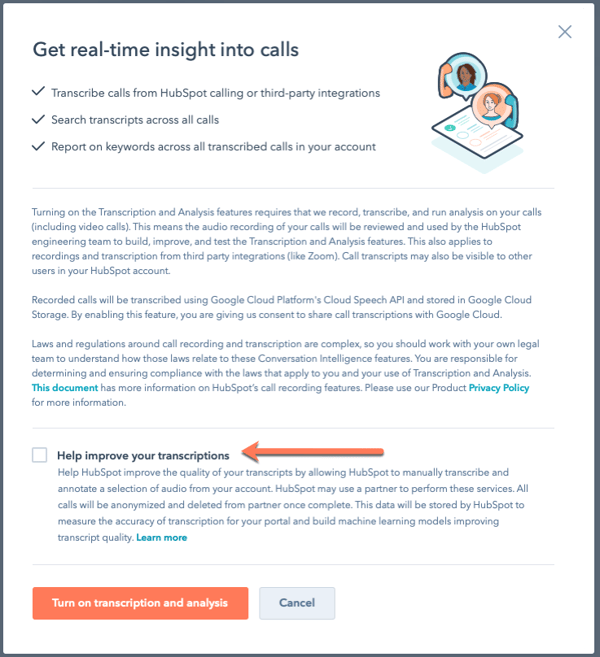
- Click Turn on transcription and analysis.
To set the language for call transcriptions:
- In the left sidebar menu, navigate to General. Then, click the Calling tab.
- Under Transcription and Analysis, click the Transcription language dropdown menu, and select your preferred language.
Automatic associations (Sales Hub or Service Hub Professional or Enterprise only)
With Conversation Intelligence, you will get access to Automatic Associations, a tool that automatically associates calls to relevant CRM records such as contacts, companies, deals, and tickets. Detailed descriptions of the logic used to make each type of automatic association are provided below:
- Call to Contact: for each meeting associated with the call, up to 5 contacts associated with that meeting will be associated with the call.
- Call to Company: for each contact associated with the call, up to 5 companies associated with that contact will be associated with the call.
- Call to Deal: an AI model looks for connections and similarities between the call and deals in the portal. For instance, the model may look at whether the deal and call are both associated to the same company, or whether the deal name is in the call name.
- Call to Ticket: an AI model looks for connections and similarities between the call and tickets in the portal. For instance, the model may look at whether the ticket and call are both associated to the same contact, or whether the ticket subject is in the call name.
By default, HubSpot AI will automatically associate recordings to the primary company associated with the call’s participants. To turn this off, clear the Link associated objects to recorded calls with HubSpot AI checkbox.

Reconnect HubSpot calling
If you enabled calling a month ago and have not registered any new numbers or made any calls in the past seven days, the calling tool will be automatically turned off in your account. Before your calling tool is turned off, you'll be notified by email and will have seven days from when you were first notified to opt out of having your calling tool turned off.
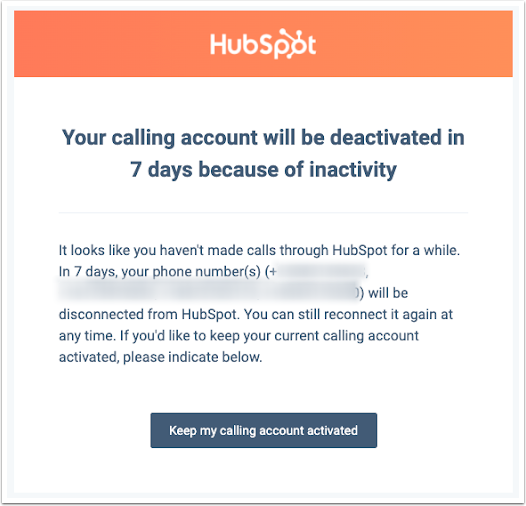
To keep your calling tool active, click Keep my calling account activated in the notification email. You will then be redirected to your account's calling settings and will see a notification banner indicating if your calling account is still active.
Turn off calling for all users
Super admins can turn off calling for all users in the account. This is useful if your team switches to a different calling tool and you want to make sure every user stops using the built-in calling tool.
- In your HubSpot account, click the settings settings icon in the top navigation bar.
- In the left sidebar menu, navigate to Calling.
- On the Call Configurations tab, click to toggle the Place calls using HubSpot calling switch off.

- In the dialog box, type turn off in the text field, then click Turn off.
Users will no longer have access to HubSpot's calling tool and all registered numbers will be disconnected. Any existing call engagements will still be available on your records' timelines. You will still be able to use Twilio Connect or another third-party calling provider to make calls.
