- Knowledge Base
- CRM
- Records
- Create and manage records in the HubSpot mobile app
Create and manage records in the HubSpot mobile app
Last updated: November 21, 2025
Available with any of the following subscriptions, except where noted:
-
Additional subscriptions required for certain features
If you’re on a mobile device, you can interact with your contact, company, deal, ticket, and custom object records in the HubSpot mobile app. This allows you to access and manage your data on the go. For example, you can add contacts from an in-person sales meeting or log a call you made at a café. You can navigate to your records using the navigation shown below, or by clicking a direct link to a record from another app on your phone.
If you’re using HubSpot on your computer, learn how to work with records on the desktop app.
Please note: records cannot be created, edited, or viewed in the mobile app without an internet or data connection.
Filter records in the mobile app
-
Open the HubSpot app on your mobile device.
-
Navigate to your records:
- Contacts: tap the Menu icon in the top left, then tap Contacts in the left sidebar.
- Companies: tap the Menu icon in the top left, then tap Companies in the left sidebar.
- Deals: tap the Menu icon in the top left, then tap Deals in the left sidebar.
- Tickets: tap the Menu icon in the top left, then tap Tickets in the left sidebar.
- Custom objects: tap the Menu icon in the top left, then tap the custom object in the left sidebar.
- Tap Add views, then select the views you want to display. You can display up to five saved views.
- Tap a tab to navigate to an existing saved view.
- Tap the Sorted by dropdown menu and select a property to organize your records based on a specific property.
- Tap the property again to change the direction of the sort from ascending to descending.
- Tap View all [object] properties to select other properties to sort by. Tap Apply.
- To filter records based on certain property values:
- Tap a property dropdown menu to filter records based on that property's values (e.g., Deal owner, Create date, Last activity date, or Close date for deals). Select your criteria, then tap Apply.
- To remove a specific filter, tap the property dropdown menu, then tap Clear. To clear all filters, tap Reset.

- Tap Pipeline, then select the pipeline you want to view for deal, ticket, and custom object records.
- In the upper right, tap the bulletListIcon list icon to use the list view type, or tap the gridIcon grid icon to use the board view type.
- In list view, you can view a list of all records in the pipeline.
- In board view, you can swipe to view the records in each stage/status.
Create records in the mobile app
Subscription required A Starter, Professional or Enterprise subscription is required to use required associations when creating a record.
You can manually create new records in the mobile app. For contacts, you can also import contacts from your device, scan a business card, or scan a QR code.
- Open the HubSpot app on your mobile device.
- Tap + Create in the bottom right, then select the object for which you want to create a record.
- In the slide-up panel:
- Enter the required properties and associations such as Email, conditional logic enumeration properties. Learn more about required associations when creating records.
- Tap Save in the top right when you're finished.
Please note: if you're on an object's index page, you can tap + [Object] to create a record.

Edit or delete records in the mobile app
You can edit or delete existing records in the mobile app.
-
Open the HubSpot app on your mobile device.
-
Navigate to your records.
- Tap the record's name to view or edit an individual record.
- Tap [Stage/Status] under the deal or ticket record's name, then tap the [stage/status] you want to move the deal or ticket to.
- To edit a property value:
- In the top right, tap the verticalMenu menu icon, then tap Edit [object] properties (e.g., Edit deal properties).
- Tap a property shown.
- Scroll to the bottom and tap View all properties to edit other properties not shown.
- Enter a value or select an option depending on the field type.
- Tap the X to clear the value.
- Tap Save in the top right once you’re finished.
- To delete a record:
- In the top right, tap the verticalMenu menu icon, then tap Delete [record] (e.g., Delete deal).
- In the dialog box, tap Delete.
Configure individual records in the mobile app
You can view and manage properties, activities, and associations (e.g., deals, quotes, line items) in the mobile app.
View properties on records in the mobile app
- Tap the name of the record.
- Tap the About tab.
- If a desired property is not visible, scroll to the bottom and tap View all properties.
Associate records in the mobile app
You can view and edit a record's existing associations, as well as associate new records in the mobile app. You can also manage association labels after configuring them on the desktop app (Professional and Enterprise only).
Subscription required A Professional or Enterprise subscription is required to use custom association labels.
Please note: the mobile app can display up to 99 associations on a record. If a record has more than 99 associations, additional associated records won't be shown and will not appear in search results.
To associate records or remove existing associations:
-
Navigate to your records.
- Tap the name of the record you want to add or edit associations for.
- Tap the Associations tab.
- Tap the name of an associated record to view its record.

- Tap Add [objects] to associate a new record.
- At the top, tap Create new [record] to create a new record to associate.
- Search or scroll and tap the checkboxes next to existing records you want to associate your record with. Once you're done, tap Done in the top right.
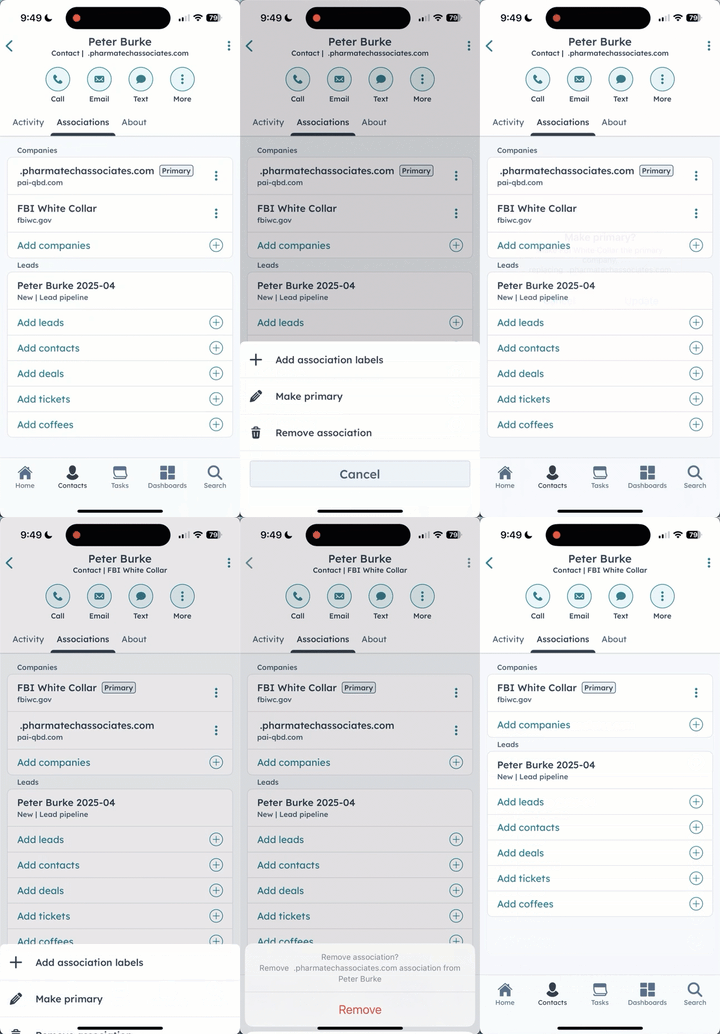
- Tap the verticalMenu menu icon to edit an existing association.
- Add association labels: select to add or remove association labels. Labels must be set up on desktop before they can be added or removed on mobile.
- Make primary (Companies only): select to make this company association primary. In the pop-up box, tap Update.
- Change primary (Companies only): select to set a different company association as primary. On the Change Primary screen, tap the name of the new primary company. The previous company will still be associated to the record, but will no longer be primary.
- Remove association: select to remove the association from the record. Tap Remove again to confirm. If the association you’re removing is a primary company, choose a new primary company.

Manage quote and line items on deals in the mobile app
You can manage existing quotes and line item associations on deal records. For line items, you can add new ones.
To view, share, recall, or delete quotes on deals:- Navigate to the deal and tap the Quotes tab.
- Tap a quote to see a preview. If tapping a draft quote, you'll be prompted to edit the quote from your desktop.
- Tap the verticalMenu menu icon to download PDF, copy link, share, recall, view line items or delete. If tapping a draft quote, you can delete or view line items.
- Tap the Line items tab.
- Tap + Add line item to add a new line item. Select the products, then tap Next. Enter a quantity, then tap Save.
- Tap the line item to view more details about it.
-
- Tap the verticalMenu menu icon, then tap Edit quantity. Edit the quantity, then tap Save.
- Tap the verticalMenu menu icon, then tap Delete. In the dialog box, tap Delete to confirm.
Manage activities on records in the mobile app
You can also add, view, edit, or delete activities within each record's activity timeline.
To add an activity:
-
Navigate to your records.
- Tap the name of the record.
- At the top of contact, company, and deal records, tap on an icon to add an activity:
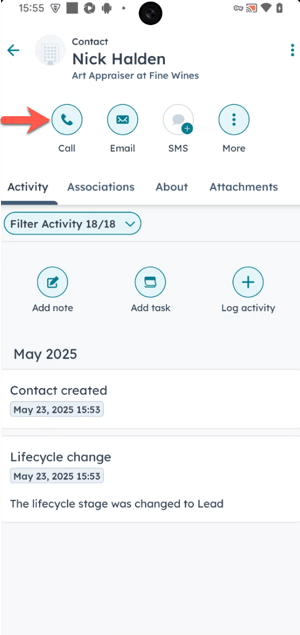
- On contact and company records, tap Call to call the contact or company.
- On contact records, tap Email or Text to send an email or text message.
- On deal and ticket records in the Android app, tap Call to call a contact associated with the deal or ticket.

- At the top of the activity timeline, tap the icons to add a note, task, or other activity to a record:
- Tap Add note to add a note to the record.
- Tap Add task to add a task to the record.
- Tap Log activity to log other activities such as meetings, SMS, or postal mail.

To filter which activities appear in the timeline:
- Tap the name of the record.
- Tap the Filter activity dropdown menu, then tap to select or clear a specific activity type. A certain activity type will be included in the timeline if there is a success checkmark on the left.
- When you're finished, tap Done in the top right. The activities you select to appear on a record timeline will apply to all records of that object.
To edit or view an activity's details:
- Tap the name of the record.
- Tap on an activity to edit it or view its details, associations, and comments.
-
- To edit the activity, tap Edit in the top right. Make your changes, then tap Save.
- To comment on a note, call, email, or meeting, tap Add a comment at the bottom of the screen. In the comment, you can also mention a user by typing @ and searching their name. You cannot edit or delete existing comments on iOS.
Please note: you cannot edit activity attachments in the mobile app.

To delete or share an activity:
- Tap the name of the record.
- In the activity timeline, tap the verticalMenu menu icon in the top right of the activity.
- To delete, tap Delete, then in the dialog box, tap Delete.
- To share, tap Share, then in the pop-up box, select an option (e.g., message, email, etc.).

Manage attachments on activities in the mobile app
You can take photos or add existing ones to activities.
To add photos to an activity in the iOS mobile app:
- Tap the name of a record.
- Add an activity.
- Tap the photo icon, then select:
- Choose photo: select a photo from your device.
- Take photo: take a photo then upload it to the activity.
To view attachments included in record activities:
- Tap the name of a record.
- In the activity timeline, tap on an activity.

You can add attachments, files, and snippets to activities.
To add attachments in the Android mobile app:
- Tap the name of a record.
- Add an activity.
- Tap the attach attach icon, then select a file from your device.
- Tap the photo icon then select:
- Choose existing: select an existing photo.
- Take photo: take a new photo.
- Tap the snippet icon to insert a snippet.

To view attachments included in record activities:
- Tap the name of a record.
- In the activity timeline, tap on an activity.
