Last updated: September 3, 2025
Available with any of the following subscriptions, except where noted:
Non-HubSpot forms are HTML forms on your external site that were not created in HubSpot. Use the non-HubSpot forms tool to start collecting submissions on your website as soon as submissions occur. The tool is able to identify your website's external forms based on the <form> tag in the HTML code.
To use the non-HubSpot forms tool, you must install the HubSpot tracking code on your external page or use the HubSpot WordPress plugin. Once the tracking code is added and the tool is turned on, submissions to non-HubSpot forms will be collected in HubSpot.
If your form isn't capturing submissions, learn more about common issues with non-HubSpot forms.
Before you get started
When using non-HubSpot forms, do take note of the following:
- Only 10,000 non-HubSpot forms can be created in an account. When there are more than 10,000 non-Hubspot forms, Hubspot will reject the submissions.
- Non-HubSpot form submissions are collected whenever a visitor clicks the submit button. If there is validation on the external form, this can lead to multiple partial submissions. For example, if a visitor attempts submits the form without filling a required field, they would need to enter the required information and submit again. In HubSpot, both submissions would be collected, one partial and one complete.
- The non-HubSpot forms tool is dependent on the tracking code. HubSpot can only collect form submissions if the tracking code loads successfully. For example, if there are JavaScript conflicts on the page or a visitor's browser security extension blocking scripts, the form submission will not be collected.
- When using non-HubSpot forms, all submissions associated with the same cookie will be added to the same contact record. For example, if a visitor submits a specific form multiple times with the same device and browser, all submissions will be attributed to a single contact, even if each submission uses a different email address.
Because these behaviors are due to external factors, HubSpot cannot prevent them. Alternatively, you can consider working with a developer to connect your non-HubSpot forms directly using HubSpot's Submit data to a form API or an existing form integration.
Requirements to capture non-HubSpot form submissions
For form submissions to be collected in HubSpot, your form must meet the following requirements:
- The form must be a static HTML form.
- The form must be wrapped in HTML <form> tags.
- The form must have an email input field. This email field must be an email type input, such as: <input type="email">.
- The form must use a standard <input type="submit"> button for its form submissions.
- The form must not be in an <iframe>.
- The form must not have JavaScript bound to the form submit event or submit button click event.
- The form must not be introduced after the page completed loading. Only submissions from forms that were present during the initial page loading will be collected.
- The form must not be on a single-page app. In most single-page apps, the HTML is not loaded when navigating to another page. As a result, HubSpot cannot capture these form submissions.
- The form must not contain a sensitive field, such as a credit card number.
- The form must not contain hidden fields. The tool does not collect information from any hidden fields.
Manage your non-HubSpot forms settings
When using the non-HubSpot forms tool, the form submission data is stored in localStorage and then pushed back into HubSpot to either create a new contact or update
Please note: each time the submit button is clicked on your non-HubSpot form it will trigger a form submission in HubSpot. This includes instances where a user has not filled out all required fields and clicks the submit button, HubSpot will record this action as a form submission.
To enable or disable the collection of information from non-HubSpot forms on your pages:
- In your HubSpot account, click the settings icon in the top navigation bar.
- In the left sidebar menu, navigate to Marketing > Forms.
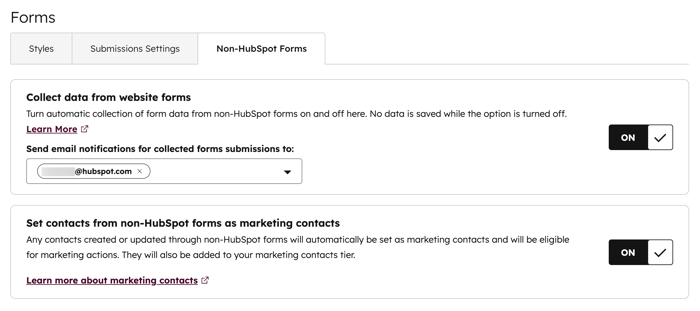
- Click the Non-HubSpot Forms tab.
- Click to toggle the Collect data from website forms switch on/off to enable/disable non-HubSpot forms.
- To send email notifications on non-HubSpot form submissions, enter the email addresses of existing HubSpot users in the Send email notifications for collected forms submissions to field.
- If you have access to marketing contacts, click to toggle the Set new contacts created through non-HubSpot forms as marketing contacts switch on/off to set the default marketing status of these created contacts as marketing/non-marketing.
Mapping non-HubSpot form fields and HubSpot properties
All data submitted to non-HubSpot form fields will only match to single-line text field type properties in HubSpot. Non-HubSpot form fields cannot match with other field types.
If a corresponding single-line text field type property cannot be detected, the data submitted won't be stored on the contact record. The details submitted for that form field will still be available in the form submission data.
You can create form fields or labels to match HubSpot default properties or create a custom contact property to match the name or label of your form field. However, non-HubSpot form fields cannot be manually mapped. HubSpot will automatically try to map form fields to existing contact properties in HubSpot using logic in the following order:
- field name with contact property internal name
- field label with contact property name
- field label with contact property internal name
- field name with contact property name
Please note: as property internal names can only be alphabetical, contact property internal name mapping for non-alphabetical languages such as Japanese or Chinese will not work. These fields will only be mapped with the contact property name.

Manage date inputs in non-HubSpot form text fields
If you're using text fields to collect dates on your external forms, you can use a data attribute to interpret the submitted date values. When collecting the form submission, the data will be standardized in the ISO standard YYYY-MM-DD.
For example, you can use a data attribute to identify that the value submitted is in DD/MM/YYYY, or any other specified date format. When the form submission is collected and the value 12/03/2013 is submitted to HubSpot, it'll be mapped to the corresponding property in HubSpot in the ISO standard as 2013-03-12.
Please note: using data attributes requires some knowledge of HTML and access to your non-HubSpot form's HTML.
To add a data attribute to your non-HubSpot form field:- From your non-HubSpot form, access your form's HTML.
- In the form's date field, update the form field's <input> html to include the data attribute
data-hs-cf-date-formatand the corresponding date format. This should only be used with text inputs collecting date values.- For example, if you're collecting a date property in
MM-DD-YYYYformat, the input would follow this format:<input type="text" data-hs-cf-date-format="MM-DD-YYYY"/> - When setting up your data attribute, you can use the following supported date formats:
- For example, if you're collecting a date property in
DDMMYYYY |
DD/MM/YYYY |
DD-MM-YYYY |
DD.MM.YYYY |
DD MM YYYY |
MMDDYYYY |
MM/DD/YYYY |
MM-DD-YYYY |
MM.DD.YYYY |
MM DD YYYY |
YYYYMMDD |
YYYY/MM/DD |
YYYY-MM-DD |
YYYY.MM.DD |
YYYY MM DD |
YYYYDDMM |
YYYY/DD/MM |
YYYY-DD-MM |
YYYY.DD.MM |
YYYY DD MM |
Manage your non-HubSpot forms
To further manage your non-HubSpot forms:- In your HubSpot account, navigate to Marketing > Forms.
- In the upper left, click the Form type
dropdown menu and select Non-HubSpot. -
Hover over a non-HubSpot form and click the Actions dropdown menu to:
-
Rename: rename the form.
-
View Information: view the URL of the most recent page where a submission was collected for this form and the date of the first submission. Click Advanced information to show the selector for this form .
- View submissions: review the details page of your form and an overview of the form's submissions.
- Export submissions: export all submissions on the form in a CSV, XLS, or XLSX file.
-
Edit MailChimp lists : edit the MailChimp lists that you want to send submissions to.
-
Edit email notifications: edit the form submission notification addresses.
-
Move to folder: move the form into a folder.
- Manage access (Content Hub and Marketing Hub Enterprise only): select which users and teams have access to this non-HubSpot form. Learn more about partitioning your HubSpot assets.
-
Copy to HubSpot : convert the form into a HubSpot form.
-
Delete: remove the form from the forms index page. As non-HubSpot forms are not hosted on HubSpot, this will not delete the actual, live form on your external site.
-
