- Knowledge Base
- CRM
- Records
- Create tickets
Create tickets
Last updated: October 21, 2025
Available with any of the following subscriptions, except where noted:
-
Additional subscriptions required for certain features
With tickets, you can organize all of your customer inquiries in one place and track trends over time. You can create individual tickets from your tickets index page, a record, or help desk. Otherwise, you can create tickets in bulk via workflows or a support form.
After creating tickets, learn how to view and save reports about your tickets.
Please note: accounts that have the Brands Add-on can create contact records for a specific brand by selecting it in the main navigation, then, continuing one of the following processes. Also, your account may use personalized names for each object (e.g., account instead of company). This document refers to objects by their HubSpot default names.
Create a ticket from the index page
- In your HubSpot account, navigate to CRM > Tickets.
- In the upper right, click Create ticket.
- In the right panel, enter your ticket details. If you want to customize the property and association options that appear here, click Edit this form at the top. The following fields are required by default:
- Ticket name: provide a name for this ticket.
- Pipeline: assign this ticket to a specific ticket pipeline you've created.
- Ticket status: select a specific ticket stage within the pipeline you've selected.
- In the Associate ticket with section, you can manage the following:
- Click the Associate records dropdown menu to associate records such as contacts or companies with the ticket.
- Click the checkbox to add timeline activity from contact or company records to the ticket, then select a date range. Learn more about the date range options.
Create a ticket from a record
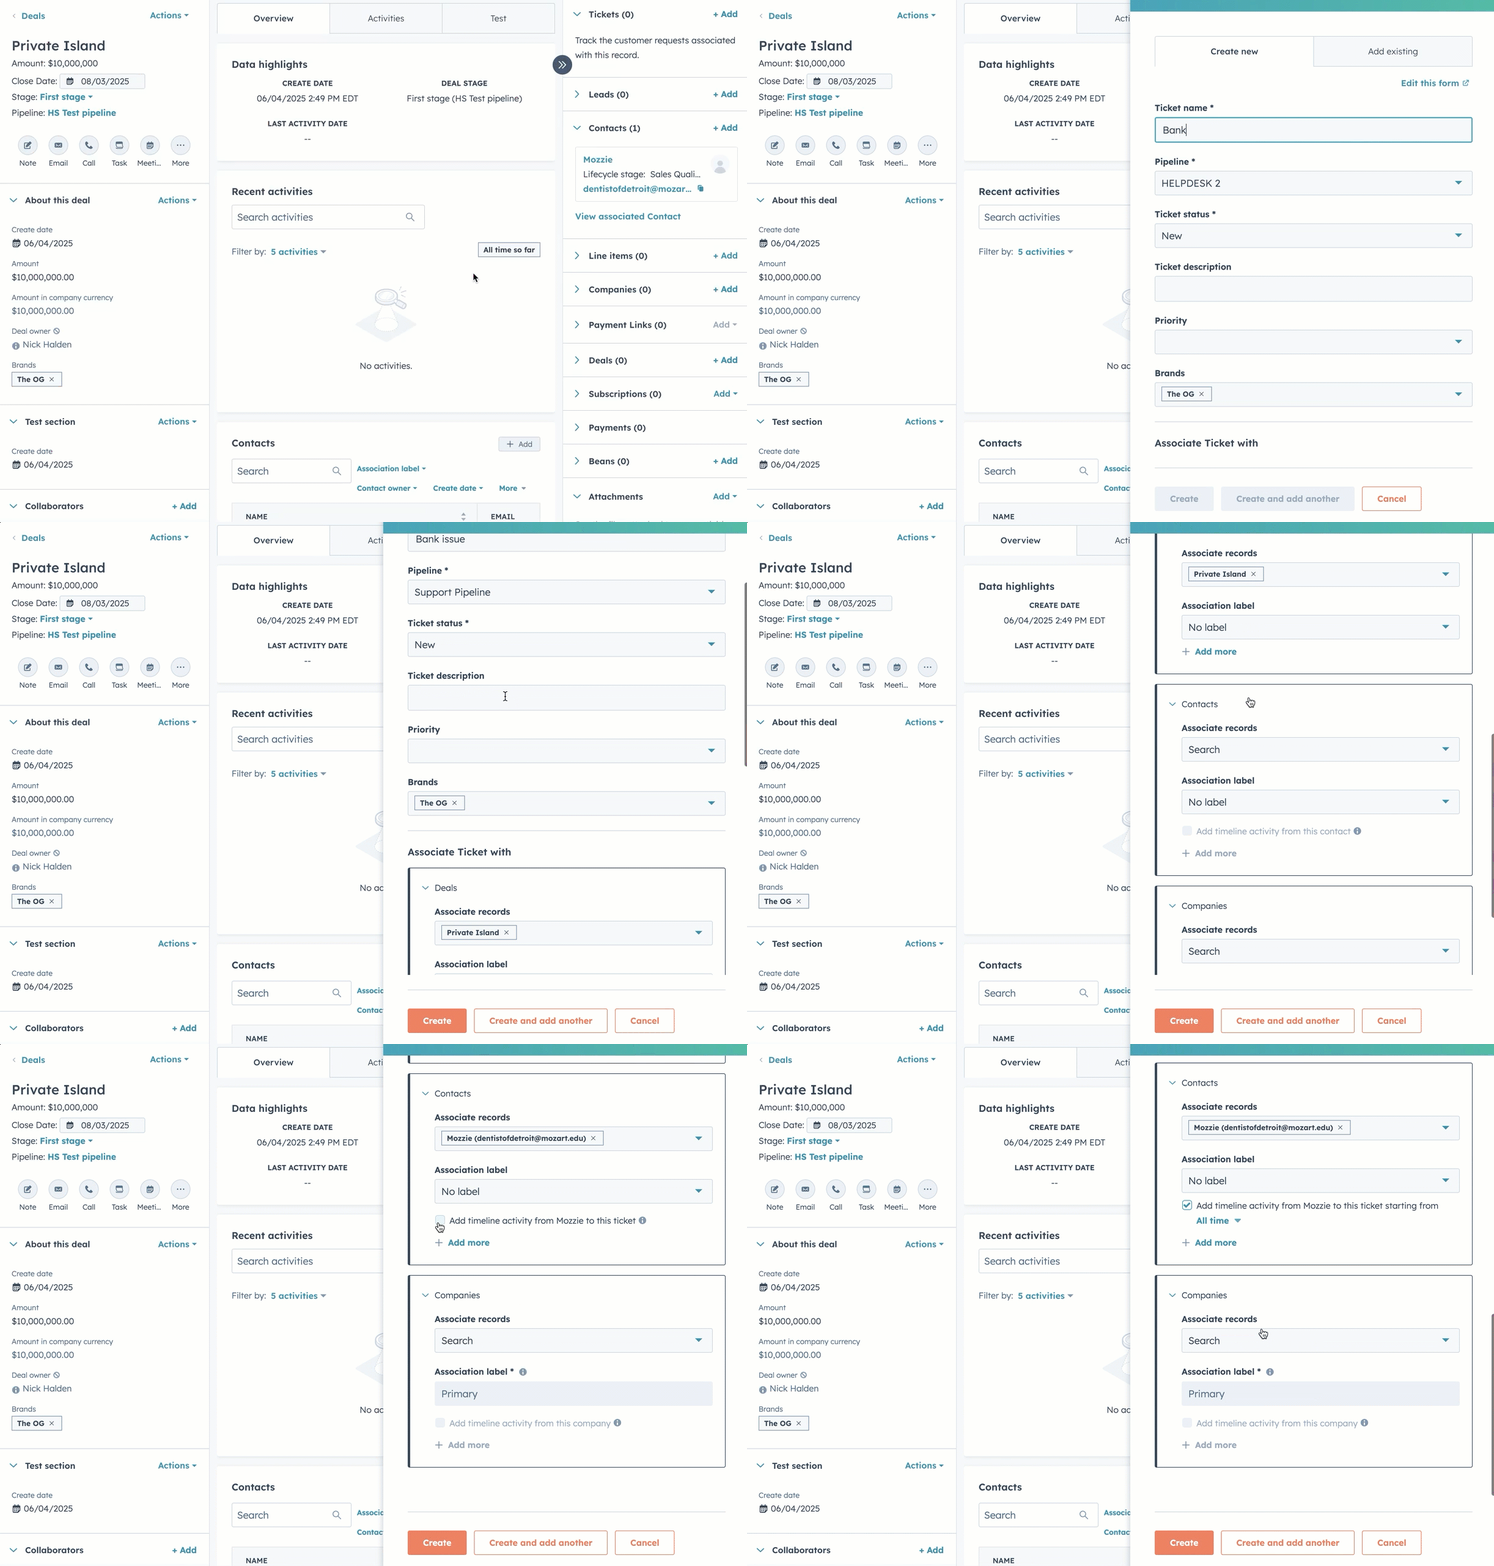
You can create a ticket from a record using the Tickets associated object card in the right sidebar. If you don't see the card, learn how to customize the cards shown.
To create a ticket from a record you want associated with the ticket:
- Navigate to your records (e.g., CRM > Companies).
- In the right sidebar of the record, on the Tickets card, click + Add.
- In the right panel, enter the following:
- In the Create new tab, enter the properties for your new ticket.
- In the Associate ticket with section, select any additional records you want to associate with the ticket. The record you use to create the ticket is selected by default.
-
- Click the checkbox to add timeline activity from contact or company records to the ticket, then select a date range. Learn more about the date range options.
- Once you're finished, click Create.
The new ticket will be associated with the record. Learn more about managing automatic activity association and rules.

Create tickets in help desk
Subscription required A Service Hub Professional or Enterprise subscription is required to create tickets in help desk.
You can configure help desk so that tickets are automatically created through channels such as forms, email, and chatflows. Learn more about configuring help desk channels and settings.
Create tickets with a workflow
Subscription required A Service Hub Professional or Enterprise subscription is required to create tickets with a workflow.
Set up a workflow to create tickets automatically based on specific enrollment triggers. Learn how to add actions in your workflow and use the Create record action.
Next steps
Review channels that automatically create tickets
You can view which connected conversations inbox or help desk channels automatically create tickets from incoming messages. You can also turn off the automatic ticket creation.
To view or remove channels that create tickets:
- In your HubSpot account, click the settings settings icon in the top navigation bar.
- In the left sidebar menu, navigate to Objects > Tickets.
- Click the Pipelines tab.
- Click the Select a pipeline dropdown menu, then select the ticket pipeline you want to adjust.
- Click the Automate tab. If collapsed, click Templated automations to expand the section.
- In the Connected channels section, view the channels in which a ticket will automatically be created for all new incoming messages.
- If you don't want a ticket created for messages sent to a channel, click the channel name to turn ticket automation off in the channel's settings.

Learn more about setting up channels or help desk.