- Knowledge Base
- Account & Setup
- Integrations
- Use HubSpot's integration with GoToWebinar
Use HubSpot's integration with GoToWebinar
Last updated: February 21, 2025
Available with any of the following subscriptions, except where noted:
The GoToWebinar integration is designed to help you reduce the time it takes for you to create, promote, and deliver quality webinars.
Before you get started
Before installing the GoToWebinar integration, please note the following:- To connect GoToWebinar to HubSpot, you must be either a super admin or have App Marketplace Access permissions.
- The GoToWebinar integration can only be connected to one GoToWebinar account. You can use the Zapier integration to set up a simple integration with a second GoToWebinar account.
Install the GoToWebinar integration
To install the GoToWebinar integration:- In your HubSpot account, click the settings settings icon in the top navigation bar. In the left sidebar menu, navigate to Integrations > Connected Apps.
- In the upper right, click Visit App Marketplace.
- Search for the GoToWebinar integration, and select GoToWebinar in the results. In the top right, click Connect app.
- Enter your GoToWebinar credentials and click Sign in. After logging in to GoToWebinar, your accounts will automatically be connected and you will be redirected back to the Connected apps page.
To disconnect your HubSpot and GoToWebinar accounts:
- In your HubSpot account, click the settings settings icon in the top navigation bar. In the left sidebar menu, navigate to Integrations > Connected Apps.
- To the right of GoToWebinar, click More, then select Uninstall.
Turn on your webinar
From your GoToWebinar integration page, you can manually sync past webinars and enable auto-syncing for all new webinars. Please note the following:
- The connecting user needs to be the co-organizer of any webinar in order for the webinar to be available for syncing.
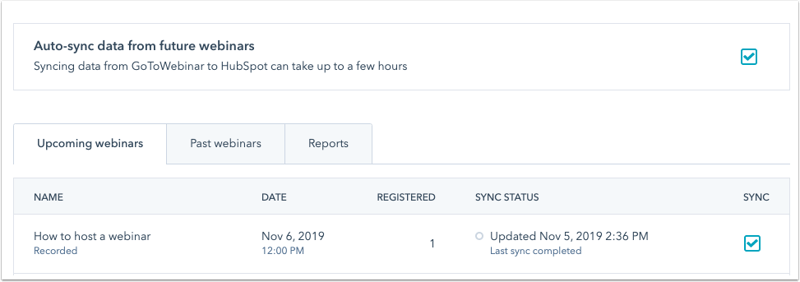
- After turning on a sync, it can take between 1 minute and 2 hours or more, depending on the amount of information queued to sync. The Sync status column will display the current status of the sync for each webinar.
To turn on a webinar:
- In your HubSpot account, click the settings settings icon in the top navigation bar. In the left sidebar menu, navigate to Integrations > Connected Apps.
- Search for and click on the GoToWebinar app. The dashboard will show all upcoming and past webinars from the connected accounts.
- To manually sync a webinar, select the checkbox in the Sync column. HubSpot will then start importing data from GoToWebinar.
- By default, syncing will be turned off for all webinars created before the integration was set up. To enable auto-syncing for new webinars, select the Auto-sync data from future webinars checkbox.

Set up a form for your webinar
When you're ready to begin collecting registrations for your upcoming webinar, you can do so using the following methods:
- Register contacts using a GoToWebinar registration page.
- Register contacts using a HubSpot form embedded using a default form module, on a HubSpot page.
- Register contacts through a HubSpot form embedded on an external page.
- Register contacts using a HubSpot form embedded using a custom module linked to a webinar, on a HubSpot page.
If you are using a HubSpot form, please note the following:
- The GoToWebinar registration page and your HubSpot landing page are not linked. Using a HubSpot landing page with a HubSpot form means that you do not need to use the GoToWebinar registration page.
- When linking a form on a HubSpot page or a form embed code to GoToWebinar, the integration will not automatically pull in any fields from the GoToWebinar registration page. To collect similar information, it is recommended to recreate the questions on your GoToWebinar registration page in the HubSpot form.
- When setting up your form, take note of which form fields can be used to pass information between HubSpot and GoToWebinar.
-
In order for the GoToWebinar integration with HubSpot to successfully register a contact for a webinar in your GoToWebinar account, the following must be set as required fields, and must be the only required fields in the form:
- First name
- Last name
Use a form on a HubSpot landing page
You can create forms in HubSpot that automatically register contacts for a webinar created in GoToWebinar upon submission. When visitors submit the form, they will be sent to GoToWebinar and appear as a registrant in your registrant list.
- Registrant data will be added to HubSpot in real time.
- Attendee data will be added to HubSpot 15 minutes after your webinar is over.
To register contacts, you will need to create a landing page, then associate your form with a webinar:
- In the landing page editor, click the form module.
- In the left panel, click to expand the Form automation section.
- Click the GoToWebinar registration dropdown menu and select a webinar.
- Only upcoming webinars will be listed as an option in the dropdown menu.
- Webinars that have already taken place will not be listed.
- After setting up your page, click Publish. Learn more about setting up forms in HubSpot pages.

Embed a HubSpot form on an external page
You can also embed a HubSpot form on an external page to register visitors for a webinar by modifying the form's embed code to include the GoToWebinar webinar key:
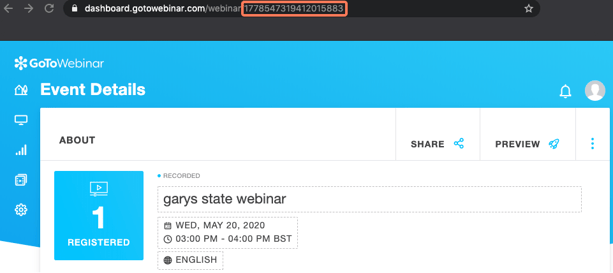
- Retrieve your GoToWebinar webinar key:
- From your GoToWebinar account, navigate to your webinar event details page.
- In the URL, copy the webinar key.

- In your HubSpot account, navigate to Marketing > Forms.
- Hover over an existing form and click Actions, then select Share. Or, create a new form.
- Click Copy to copy the embed code from your form.
- When adding the embed code to your external site, manually edit the form code to include a goToWebinarWebinarKey:
- Add a comma after formID.
- Add a goToWebinarWebinarKey identifier with the webinar key for your webinar.

Create a form module in custom module
Segment and follow up with registrants and attendees
As contacts begin registering for your webinars, you can segment them based on their webinar activity in the lists tool using the GoToWebinar integration filter.

Please note: the above segmentation options are not available in Marketing Hub Starter accounts.
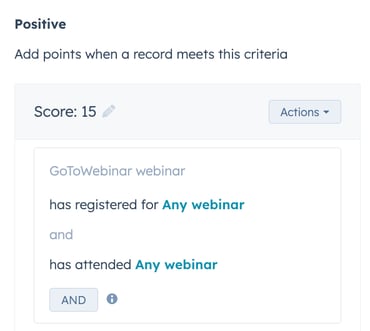
You can also incorporate webinar data into your HubSpot score criteria to make sure that your HubSpot score is accurate and up to date.

Once you've segmented your contacts, send emails to your contacts based on their engagement with your webinar. In addition to any promotional email you create to encourage registration, here are a few suggestions:
- Reminder emails in advance of the webinar
- Thank you emails for those who attended
- Sorry we missed you emails for those who registered but didn't attend
- Request to schedule a demo emails for those who attended and have a high lead score
The integration does not have an automated mechanism for inserting personalized links from GoToWebinar within HubSpot emails.
Sync webinar data to Salesforce
If you have the HubSpot-Salesforce integration installed, webinar activity will automatically pass to Salesforce in the HubSpot Visualforce window.
To send more specialized messaging to your sales reps, you can pass data to Salesforce in the form of tasks in a workflow. For example, if you want to alert a sales rep every time one of their leads attends a webinar, you can create a workflow that sends a task to Salesforce. The task will appear on the Salesforce lead/contact record in the Activity History section.
If you're using the Salesforce integration, it's important to change the field mapping between the email field in HubSpot and Salesforce to Use most recent value. This is relevant because data is pulled from GoToWebinar into HubSpot based on email address, so if the email address in HubSpot has changed between the time a contact registers and when they attend the webinar, HubSpot will not be able to match the attendance data with the new email address.
Add contacts to a GoToWebinar using workflows (Professional and Enterprise only)
You can enroll and register contacts automatically for your GoToWebinar using workflows.
Please note: to enroll contacts in your GoToWebinar event, the sync for the event must be switched on in your integration settings.
- In your HubSpot account, navigate to Automation > Workflows.
- Select an existing Contact-based workflow or create a new Contact-based workflow.
- Edit your enrollment triggers.
- Click the plus icon + to add a workflow action.
- In the left panel, in the Connected apps section, click to expand the GoToWebinar section.
- Click the Add contact to webinar action.
- Click the Webinar dropdown menu to select your GoToWebinar event. Then, click Save.
- Turn on your workflow.
When a contact is enrolled in the workflow, a confirmation email, that includes the webinar link, will be sent to their primary email address.
Use marketing events with GoToWebinar (BETA)
HubSpot can aggregate marketing events from the GoToWebinar integration to provide you with a consistent overview of your marketing events.