Last updated: July 25, 2024
Available with any of the following subscriptions, except where noted:
|
|
You can create payment links to share with customers so that they can easily complete a purchase. To create, edit, or delete payment links, you must be a user with a Super Admin permissions or have Manage payment links access.
For example, your business can use payment links to:
- Accept payments for professional services such as meetings, trainings, consultations, and more.
- Sell, collect, and manage recurring fees for memberships, software subscriptions, and retainers.
- Offer one-time and ongoing project packages, such as construction work, website redesigns, and SEO audits.
- Drive fundraising efforts by collecting one-time and recurring donations of any amount.
You can view real-world examples from other customers in the Payments Hall of Fame.
How payment links work
- Create a payment link: create a payment link to sell a one-time product or service or start a recurring subscription. Payment links can be created from the payment links index page or from a CRM record.
- Share the link: share the link with a customer either directly or by embedding it in your website, one-to-one emails, meeting scheduling pages, or using the link in your CTAs. You can also collect payments through HubSpot forms. To share payment links, you'll need to connect your Stripe account for payment processing (available for all subscriptions), or sign up for HubSpot payments (Starter, Professional, or Enterprise only).
- Earn and track: receive payouts and track payments through notifications, the payments dashboard, and reports. Learn more about managing payments.
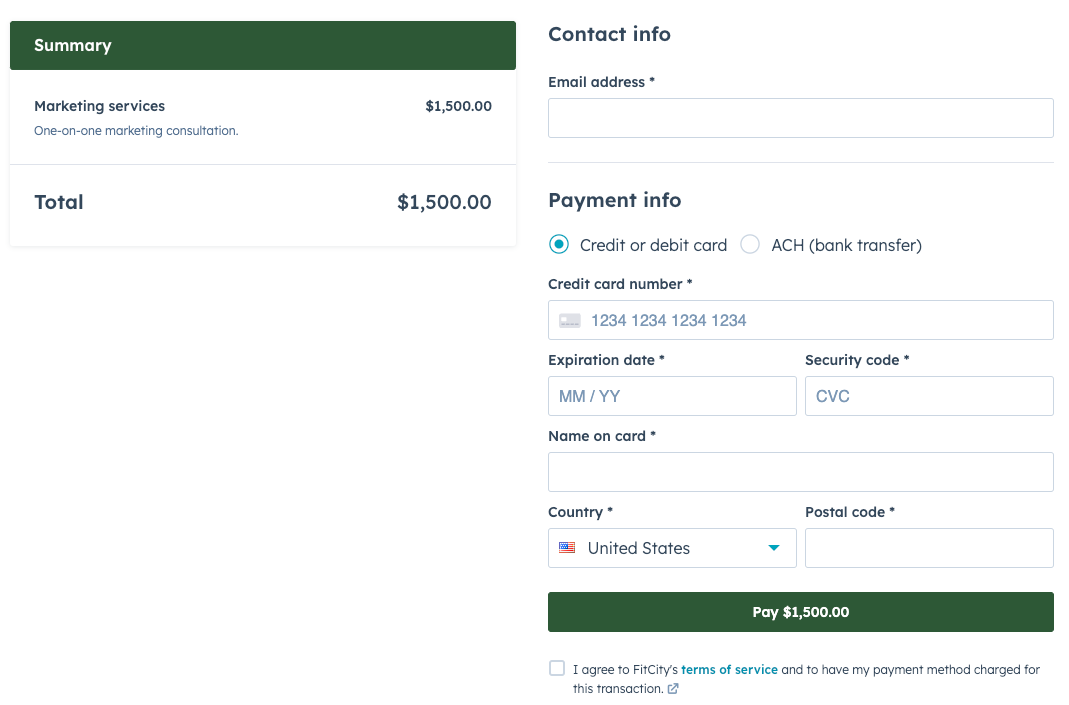
When a customer uses your payment link, they'll be brought to a checkout page where they can review their purchase and entering their payment information. After making their purchase, both you and the buyer will receive notifications confirming their payment. Learn more about the buyer checkout experience.
To collect payments through payment links, you'll also need to set up one of the following payment processors:
- HubSpot payments: set up HubSpot payments, HubSpot's built-in payment processor available to companies based in the United States with Starter, Professional, and Enterprise accounts.
- Stripe payment processing: connect your existing Stripe account to use Stripe for payment processing, available internationally with some exceptions. Stripe payment processing is available for all subscriptions.
After you start collecting payments in HubSpot, learn more about managing your payments and subscriptions. You can also analyze payments revenue with a dashboard.
Please note: you can test payment links without adding a payment processor. Learn more about testing payment links.
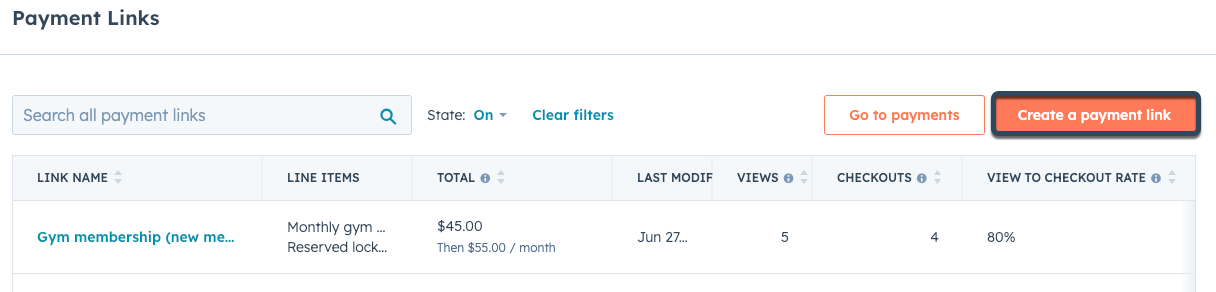
Create a payment link from the index page
By default, payment links created from the index page are enabled for multiple uses. Payments and subscriptions will automatically associate with the contact based on the email address included at checkout.To create a payment link from the index page:
- In your HubSpot account, navigate to Commerce > Payment Links.
- In the upper right, click Create payment link.
- At the top of the editor, enter a name for the payment link. This name is for internal use only and will not be visible to your customers.
- By default, payment links created from the index page will remain active until turned off. To automatically turn the payment link off after the customer makes a purchase, click to toggle the One-time use switch on. You can also turn existing payment links on and off from the index page.

- Then, continue setting up the payment link by adding line items.
Add line items
Review and edit the line items that will appear on your payment link, along with adding discounts, taxes, and fees, and payment schedules to schedule payment installments. Learn how to use line items with payment links.
Configure payment link settings
On the Settings tab, you can set up deal creation and checkout behavior. Payment links will inherit the default payment link settings, but these can be updated per link.
- By default, purchases made with the link will not create a new deal in HubSpot. To create a new deal for each purchase, click to toggle the Create a new deal for each payment switch on. Then, select a Deal pipeline and Deal stage for the new deal using the dropdown menus.
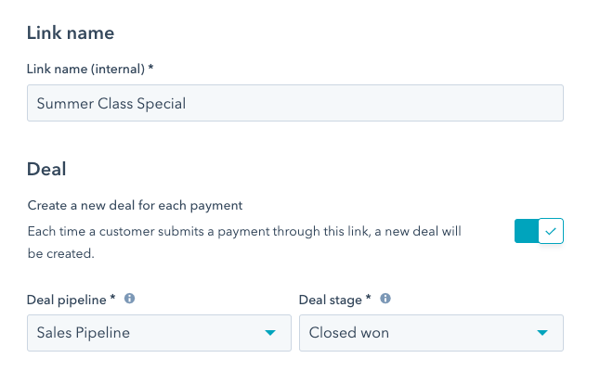
Please note:
If a buyer makes several purchases using the same payment link:
- If this toggle is turned off, HubSpot will associate each payment with an existing deal, as long as the deal is associated to the Payment Link, is not set to a Closed won stage, and the paying contact is associated with that deal. The association between contact and deal is matched using the email address of the contact.
- If this toggle is turned on, HubSpot will create a new deal for each payment. However, if there’s an existing open deal (not in a Closed won stage) that is associated with the payment link, a new deal will not be created for each payment. Instead, payments will be associated with the open deal.
- When a buyer uses a payment link to purchase a line item with a regular billing frequency, HubSpot creates a subscription to automatically charge the buyer at the specified frequency. This means that a new deal will not be created for each subscription payment, even if this toggle is turned on. Payments will be tracked on the subscription record, which is associated to the original deal.
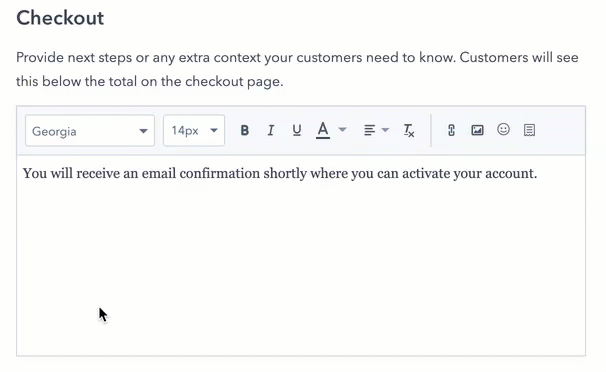
- In the Checkout section, use the text box to include any next steps or additional context that will appear below the total on the checkout page. Use the dropdown menus to edit the font and font size, and the icons in the rich text editor to format the text, insert a link, image, emoji, or snippet.
- To enable the payment link to use discount codes, click to toggle the Discount codes switch on.

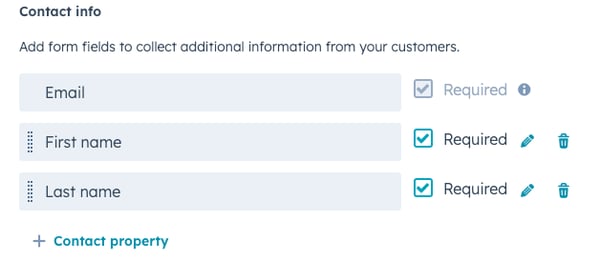
- When your buyer checks out, you can collect additional information from them by adding form fields for contact and company properties.
- To collect information into a contact property at checkout, click Contact property. Then click the Add contact property dropdown menu and select a property.
Please note: only contact properties in the Contact information property group can be added as fields. In addition, you cannot include the following field types: calculation, file, HubSpot user, and score.
- To collect information into a company property at checkout, click + Company property. Then click the Add contact property dropdown menu and select a property. On payment submission, HubSpot will update the property of the contact's primary associated company. If the contact is not associated with a company, HubSpot will create one or associate them with an existing one based on the domain in their email address.
- To collect information into a contact property at checkout, click Contact property. Then click the Add contact property dropdown menu and select a property.
-
- To edit the form field's label and help text, click the pencil icon next to the field, update the label and help text details, then click Save.
- To make the field required, next to the field select the Required checkbox.
- To reorder the form fields, next to the property name, click to drag and drop it to a different position.
- Select the checkboxes next to the type of payment you'll accept. If using HubSpot Payments, selecting Credit or debit card will automatically enable Apple Pay and Google Pay options.
Please note:
- Apple Pay and Google Pay are only available when using HubSpot Payments as your payment processor (payment processing via Stripe does not yet support these methods). Learn more about supported payment methods.
- If using the payments module or an embedded checkout on your website, Apple Pay will not be available.
- If a buyer reports issues using either Apple Pay or Google Pay, ensure that they’ve set up their cards correctly as specified by Apple and Google.
- To collect a billing address to reduce the likelihood of fraud, select the Collect billing address for credit card purchases checkbox (recommended). When selected, the billing address will be added to the payment record.
- To add the customer's shipping address to the payment record, select the Collect shipping address checkbox. To use this feature, you must first enable shipping in your payment settings.
- In the Checkout confirmation section, select the radio button next to the checkout confirmation option. You can redirect the buyer to the default successful payment page or redirect them to a custom branded thank you page.
After setting up your payment link settings, click the Preview tab at the top to preview the checkout page.
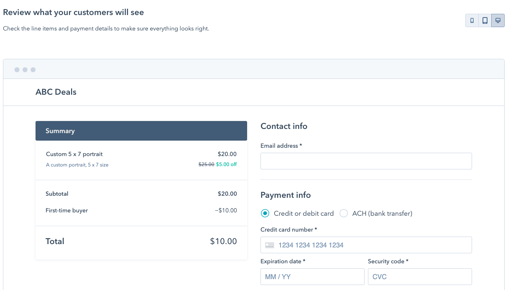
Preview the checkout page
On the Preview screen, you review what your buyers will see when they open the payment link, including any discounts and scheduled subscriptions.
- Use the device icons in the upper right to preview what the link will look like on different screen sizes.
- To finish setting up your payment link, click Create in the top right.
- In the dialog box, click Copy to copy the payment link's shareable URL. Learn more about how to share payment links, or learn how to embed payment links on your website. Before sharing, you can also test the link to review what the customer will see during checkout.
Create a payment link from a CRM record
In addition to creating payment links from the index page, users with permission to manage payment links can create and send payment links directly from contact, company, and deal records. Payment links created this way are intended for one-time use and will turn off by default after the first purchase is made. Payments and subscriptions will automatically associate with the CRM record that you create the link from regardless of the email address included at checkout.
To create a payment link from a contact, company, or deal record:
- In your HubSpot account, navigate to a contact, company, or deal record:
- In your HubSpot account, navigate to CRM > Contacts.
- In your HubSpot account, navigate to CRM > Companies.
- In your HubSpot account, navigate to CRM > Deals.
- Click the name of the contact, company, deal, or record.
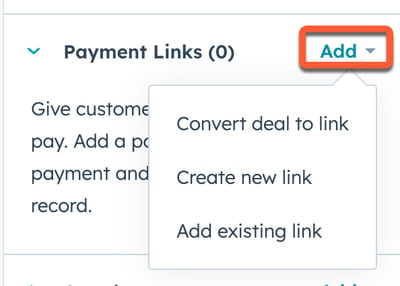
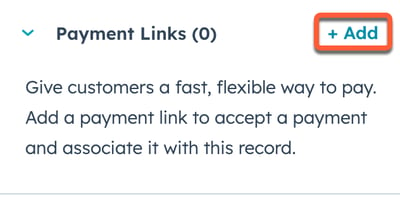
- In the right sidebar, navigate to the Payment Links card, then click Add. Then, select how you'd like to create the payment link:
- Convert deal to link (deal records only): if there are line items associated with the deal, you can create a new payment link using those line items.
- Create new link: create a new, blank payment link.
- Add existing link: instead of creating a new link, you can associate an existing payment link with the deal.
Please note: if you're not seeing the Payment Links card, an account admin may have customized the right sidebar of that CRM record type.
- By default, payment links created from CRM records will be turned off after the customer makes a purchase. It's recommended to retain this setting, as a purchase made through the link will automatically associate with the CRM record that you created it from. To keep the payment link active after its first use, click to toggle the One-time use switch off.

- Continue setting up the payment link by adding line items.
Troubleshooting
Payment not appearing on the contact record
When you create a one-time use payment link from a CRM record, HubSpot will automatically associate the purchase with the contact, company, or deal that it was created from. For all other payment links, HubSpot will associate payments with a contact based on the email address provided at checkout. You can manually associate the payment with another contact from their record by clicking + Add in the Payments card. 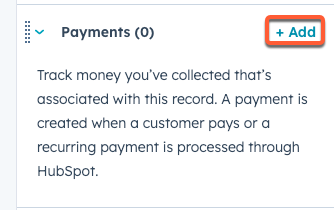
Payment Links card not appearing on the contact record
Account admins can customize the right sidebar of CRM records to display only specific cards. If you don't see a Payment Links card in the right sidebar of a contact, company, or deal record, ensure that the card has been added to any right sidebar customization.
Share payment links
You can copy and share payment links directly to your customers via email, chat, or quote, or through a QR code. Depending on your HubSpot subscription, you can also embed the payment link on one of your pages, share it in a marketing email, send a payment link using the HubSpot Sales Chrome extension, or include it on a scheduling page.
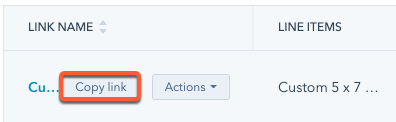
- In your HubSpot account, navigate to Commerce > Payment Links.
- To share a payment link through a URL:
- Hover over the link and click the Copy link.
-
Please note: when you open a payment link, the URL will change to reflect that new checkout session. Each checkout session is unique and can only be used once. For this reason, you should not copy/paste the checkout session URL when sending the link to multiple buyers, but instead use the URL provided when clicking Copy link.
- To share a payment link through a QR code:
- Hover over the link, then click Actions and select View QR code.
- In the dialog box, click Download to a .png file of the QR code, or click Copy to clipboard to copy the QR code for pasting into your preferred sharing platform.
Please note: the option to view the QR code won't appear if you haven't set up the payments tool for collecting payments.
When a buyer checks out using the payment link, a contact will be created for them if one doesn't already exist. Learn more about the buyer checkout experience.
Manage payment links
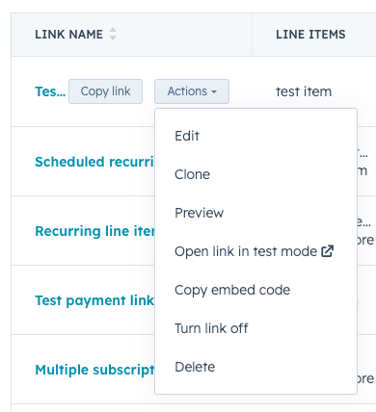
You can clone, edit, and delete payment links from the Payment link tab.
- In your HubSpot account, navigate to Commerce > Payments.
- In the upper right, click Manage payment links.
- Use the search bar in the top left to look up a payment link by name.
- Hover over the link and click the Actions dropdown menu, then select an option:
- Edit: edit the payment link.
- Clone: create a copy of the payment link.
- Preview: view the buyer checkout page for the payment link.
- Open link in test mode: test the payment link. This option is not available for payment links with recurring line items.
- Copy embed code: copy the link's embed code to add it to your content.
- Turn link on/off: set whether the payment link is active and can collect payments. A link that's turned off will not allow payments, but can be turned back on at any time.
- Delete: delete the payment link.