- Knowledge Base
- Commerce
- Subscriptions
- Create subscriptions
Create subscriptions
Last updated: November 25, 2025
Available with any of the following subscriptions, except where noted:
Use subscriptions to automate recurring payments or send recurring invoices to your customers. This article covers how subscriptions work and how to create them.
Before creating and managing subscriptions, set up subscriptions in your account.
How subscriptions work
Subscriptions can be set up to automatically collect payments from customers, or to automate billing with invoices. Invoices can be due on receipt or have net payment terms.
Subscriptions can be created from the subscriptions index page, from other CRM records, or automatically created when a buyer purchases a recurring line item via a payment link or quote.
To collect online subscription payments, or automate the collection of payments, set up one of the following payment processing options:
- HubSpot payments: HubSpot's built-in payment processing option, available with Starter, Professional, and Enterprise subscriptions.
- Stripe payment processing: connect your existing Stripe account to use Stripe for payment processing, available for all subscriptions. If you use Stripe as a payment processing option, when creating subscriptions in HubSpot, subscriptions won't be created in Stripe.
The subscription process
When a buyer purchases a recurring line item, the following occurs:
- The buyer and Super Admins in your account will receive a payment notification for the first subscription payment. Learn how to adjust your notifications.
Buyer receipt Merchant receipt 

- A subscription record is created in HubSpot to track recurring billing and payments:
- Automatic payment subscriptions from payment links and quotes: the subscription record will automatically be associated to the contact who paid and any deals that are associated to the payment links or quotes that were paid.
- Subscriptions with manual payment collection that are converted from quotes or deals: the subscription record will automatically be associated with the contact, company, associated billing contact (if the billing contact association setting is turned on), and the deal or quote it was converted from.
- Subscriptions created from scratch: select which contact, company, and billing contact are associated when creating the subscription.
Please note: a new deal will not be created for recurring payments, even if you have turned on the Allow payment links to create new deals setting in payment link settings. Recurring payments will be recorded on the subscription record, which is associated to any deals that the subscription is associated to.
-
- Line items with the same billing frequency, billing terms, billing start date, and number of payments are tracked on the same subscription record, as they can be billed together.
- Line items with different billing frequencies, billing terms, billing start dates, and number of payments are tracked on separate subscription records. For example, two subscription records will be created for a payment link that includes two recurring line items, one monthly and one yearly. Similarly, if a payment link has two recurring line items with different billing terms (e.g., one has a fixed number of payments, the other is set to automatically renew until canceled), two subscription records will be created.
- If you've selected Automatically renew until canceled in the Billing terms dropdown menu of your line item, there will not be an end date associated with the subscription. You can set an end date when adding your line items.
-
- If a recurring payment is made via a bank debit method (e.g., ACH), a subscription record will be created once the payment is authorized and submitted, even if the payment is still processing.
- When the next payment due date arrives, HubSpot automatically charges the buyer using the payment method they originally purchased with, or with the stored payment method if this option was selected during the creation of the subscription. If the customer needs to update their payment method, you can send a link to update it.
- For each charge, HubSpot will email the buyer a receipt, and the properties on the subscription record in HubSpot will be updated. You can also turn on reminder emails to notify the buyer 14 days before their next subscription payment.
- HubSpot will send email notifications to account admins when a subscription payment is made, or if it fails. You can turn these notifications off within your notification settings. If a transaction fails, retries to take the payment will be automatically attempted based on a set schedule. Learn how a customer can update their payment method for failed payments.
Create subscriptions
Aside from being created automatically when a buyer purchases a recurring line item on a payment link or quote, subscriptions can be created from the subscriptions index page or from other records.
Create subscriptions from the index page
- In your HubSpot account, navigate to Commerce > Subscriptions.
- In the upper right, click Create subscription.
- To add a billing contact:
- Click Add contact.
- In the right panel, search for and select a contact to add it to the subscription. Or, click the Create new tab to create a new contact record to use on the subscription. Enter the contact details and click Create.
- To edit the contact details, hover over the contact and click the edit edit icon. Update the contact details in the right panel and click Save. Editing the contact details will update the contact record in the CRM.
- To replace the contact, click the replace replace icon. Select a new contact in the right panel.
- To add a billing company:
- Click Add company.
- In the right panel, search for and click a company to add it to the subscription. Or, click the Create new tab to create a new company record to use on the subscription. Enter the company details and click Create.
- To edit the company details, hover over the company and click the edit edit icon. Update the company information in the right panel and click Save. Editing the company will update the company record in the CRM.
- To replace the company, click the replace replace icon. Select the company in the right panel.
- To delete the company from the subscription, click the delete delete icon.
- To add a billing address:
- Under Billing address click Edit address. If a company has been added to the subscription, clear the Same as company address checkbox, then click Edit address.
- In the right panel, enter the billing address, then click Save. This address will appear on the invoices sent to the customer and is optional.
- Add your recurring line items.
- If the option to turn off invoice creation setting has been turned on, under Invoice creation, click the dropdown menu and select an option.
Please note: you can't edit subscriptions that have automated invoice creation and payment collection turned off. In these cases, the subscription will be created and can be managed as a CRM object. For example, you could update the subscription details manually, associate it with other objects, and delete it. Use this option for subscriptions managed outside of HubSpot.
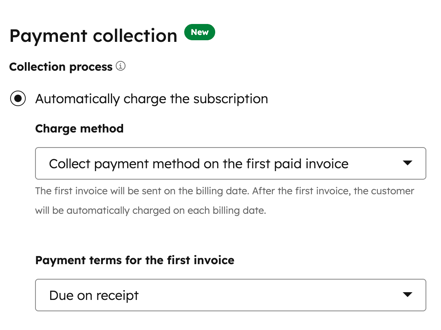
- Under Payment collection, select your collection method:
-
- Automatically charge the subscription: collect payment automatically for the subscription invoice. Click the Charge method dropdown menu and select the charge method for the subscription:
- Charge the stored payment method: charge the invoice to the buyer's stored payment method.
- Collect payment method on the first paid invoice: if the buyer doesn't have a stored payment method, you can collect their payment method during their first invoice payment at checkout.
- Click the Payment terms for the first invoice dropdown menu and select a payment term. The first invoice will be sent on the billing date. Then, the customer will be automatically charged on each subsequent billing date.
- Automatically charge the subscription: collect payment automatically for the subscription invoice. Click the Charge method dropdown menu and select the charge method for the subscription:

-
-
-
- The Accept online payments toggle will be switched on by default. The pre-filled choices on this screen reflect what's set up in payment settings.
- Select or clear the Accepted forms of payment checkboxes to set the payment types accepted for this subscription.
- Select or clear the Collecting billing address for credit card purchases checkbox to choose whether to collect the billing address.
- Select or clear the Collect shipping address checkbox to choose whether to collect the shipping address.
- Select the Store payment methods for future charges checkbox to collect your payment details at checkout for future charges.
-
-
-
- Manually collect payment on each invoice: manually collect the payment for the subscription invoice.
-
-
- Click the Payment terms dropdown menu and select when payment will be due.
-

-
-
- Select or clear the Accepted forms of payment checkboxes to set the payment types accepted for this subscription.
- Select or clear the Collecting billing address for credit card purchases checkbox to choose whether to collect the billing address.
- Select or clear the Collect shipping address checkbox to choose whether to collect the shipping address.
- Select the Store payment methods for future charges checkbox to collect your payment details at checkout for future charges.
-
Please note: if a buyer agrees to store their payment method when paying for the subscription you are setting up, the future subscription charges won't be charged automatically against that stored payment method. Subscriptions can only be automatically charged to a buyer who has already agreed to store their payment method, previous to the subscription being created. If you want to automatically charge a new stored payment method for an existing active subscription, re-create the subscription and select the Automatically charge the subscription option under Collection process, then cancel the previous subscription.
- Click to expand the Invoice settings to set the invoice options for the subscription.
-
- If you want to add notes for your buyer on the invoice, add them to the Invoice comments field. Use the text options at the bottom of the text field to format your text, add a hyperlink, or insert a snippet. Learn how to add a default comment that'll appear on every invoice.
- Under Invoice delivery, select the Automatically email invoices to the customer on each billing date checkbox to automatically send the invoices to the customer on the billing date. Reminder emails are managed through your invoice settings.
- Under Invoice tax ID, select any tax IDs that should be included in the invoice. Learn how to add tax IDs.
- By default, the language used for titles and labels on the invoice is set to English. To change the language, click the Language dropdown menu then select a language. Titles, dates, and labels will be shown in the selected language.
- By default, the date and address format will use United States format. To update this to another format, click the Locale dropdown menu then select a region.
-
- Any custom properties that have been configured in subscription settings will be displayed under Subscription custom fields. If the setting to allow users to override these fields has been turned on, you can make changes to them.

- When you are finished, click Create in the top right.
- In the dialog box, click Create to confirm the subscription, or click Cancel to go back and edit the subscription.
Other ways to create subscriptions
You can also create a subscription in the sidebar of other objects, or by converting quotes and deals.
To create a subscription from other objects.
- Navigate to your records:
- In your HubSpot account, navigate to CRM > Contacts.
- In your HubSpot account, navigate to CRM > Companies.
- In your HubSpot account, navigate to CRM > Deals.
- In your HubSpot account, navigate to CRM > Tickets.
- Click the name of the record.
- To add a subscription to the Subscriptions card of a record:
- Navigate to the Subscriptions card in the right sidebar. If you can't see the Subscriptions card in the right sidebar of a record, learn how to customize records.
- Click Add.
- Click Add new subscription to create a new subscription.
- Click Add existing subscription to add an existing subscription.
- In the right panel, select the checkboxes next to the subscriptions to add to the record.
- Click Save.
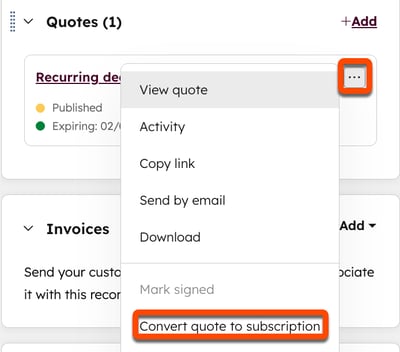
- To convert a published quote to a subscription:
- Navigate to the Quotes card in the right sidebar. If you can't see the Quotes card in the right sidebar of a record, learn how to customize records.
- Hover over an existing quote that has recurring line items, click the ellipses ellipses icon, then click Convert quote to subscription. If the deal doesn't have recurring line items, you can click Convert deal to invoice. Learn more about invoices.

- To convert a deal to a subscription:
- Navigate to the Invoices card in the right sidebar. If you can't see the Invoices card in the right sidebar of a record, learn how to customize records.
- Click Add, then select Convert deal to subscription.
Using subscriptions in other HubSpot tools
- Create subscription-based workflows (Professional and Enterprise only) to automate actions based on subscription information. For example, you can send an internal notification to your team when a subscription's status is past-due, or automatically update the subscription owner. Learn more about subscription enrollment triggers.
- Track recurring revenue in the subscriptions analytics tool, or create a custom report based on subscription data (Professional and Enterprise only). When creating a custom report, make sure to select Subscriptions as the data source, or select Single-object report to create a single object report.
- Organize your contacts or companies into segments based on subscription properties. For example, create a segment of contacts with a known subscription end date, then send an email to the segment of contacts encouraging them to renew.
A subscription example
Here’s an example of how a subscription could help a business selling coffee beans via a subscription to customers. This process could also be applied to a business selling their services on a subscription basis to customers.
Set up your products or services in the product library
The first step is to add the products being sold.
Product 1:
- Product name: Just one more cup - 1 KG Subscription
- Price: $25.00
- Recurring billing frequency: Monthly
Product 2:
- Product name: Coffee is my fuel - 500g Subscription
- Price: $18.00
- Recurring billing frequency: Bi-Weekly
Product 3:
- Product name: Coffee casual - 250g Subscription
- Price: $12.50
- Recurring billing frequency: Monthly
By creating each coffee offering as products, you can easily add them to deals and track revenue associated with each subscription type.

Configure subscription settings
Next, configure your subscription settings.
Create a payment link
Now, create a payment link. This will be used for your buyers to buy their subscriptions.
- In your HubSpot account, navigate to Commerce > Payment Links.
- In the upper right, click Create payment link.
- Give your payment link a clear name, like 1 KG monthly coffee bean subscription.
- Add the products as line items to your payment link (make sure the line items are set as recurring line items).
- Add your company logo, customize the button text (e.g., Subscribe Now and Save), and configure confirmation emails.
- When you've finished setting up your payment link, click Create.
Your payment link can then be shared with customers directly, or linked to from your content.
If you prefer to invoice customers for each subscription payment, and allow them to choose a payment method, or manually collect their payments, create a subscription for the buyer.
Purchased subscriptions
- When a buyer purchases a subscription, a subscription record will be created in HubSpot. You can view and manage the subscriptions from the subscriptions index page.
- The subscription will continue billing until the customer cancels it, or you cancel on their behalf.
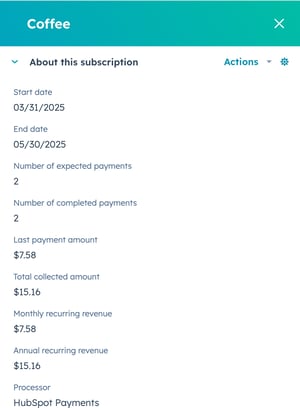
- Each subscription record will show key details like the customer, the subscribed products, the billing frequency, the next billing date, and the subscription status.
- Because these subscriptions are linked to contact records in your CRM, you gain valuable insights into your subscribers. You can see their purchase history, engagement with your marketing emails, and more. This allows for personalized communication and targeted offers.

- You can set up automated workflows triggered by new subscriptions (Professional and Enterprise only). For example:
- Send a welcome email with information about their first delivery.
- Create a follow-up task for your team to check in with new subscribers after their first month.
- Enroll subscribers in a specific marketing list for exclusive content and offers.
Report on subscriptions
Now that you’re selling subscriptions, use the commerce analytics suite to track subscription growth, churn rate, and other key metrics, across your subscribers.

Next steps
- Learn how to manage subscriptions.
- Learn more about creating invoices.
- Learn more about managing invoices.
- Learn how to manage payments.